Reader Mode
Sleep Assist® User Manual
This mode lays out the full manual as one continuous page for long-form reading, copy review, or PDF export.
Contents
Chapter navigation
Chapter navigation
1. Quick Start
New to Sleep Assist®? This chapter helps you download the app, connect your bed, and get to the home screen — all in a few minutes.
1.1 Download & Install the App
Pick the download option for your phone, then you're good to go once it's installed.
1.1.1 Download on iOS
Open the iOS App Store, search for Sleep Assist®, and download it.
iOS
For iPhone and iPad. Follow the on-screen prompts to complete installation.
1.1.2 Download on Android
Open Google Play, search for Sleep Assist®, and download it.
Android
For Android devices. Follow the on-screen prompts to complete installation.
1.2 What to Expect the First Time
After opening the app for the first time, here's the general flow:
- Download and open the app
- Find and connect your bed
- If you have a smart bed, sign up or sign in, and then complete the initial setup
- If you have an adjustable bed, no account is needed - you can start using it right after connecting it
- Land on the home screen and start using the app
Already installed and ready to connect? Jump straight to .
2. First Connection & Setup
This chapter walks you through connecting your bed to the app and finishing the basic setup. If it's your first time, just follow the steps in order.
2.1 Before You Start
Take half a minute to check the following; it'll make the rest of the connection much smoother:
- The bed is powered on and ready to connect
- Your phone is close to the bed, so the app can search nearby
- Bluetooth, location, and camera permissions are enabled on your phone
- If connecting to a Wi-Fi smart bed, have the Wi-Fi name and password ready. The bed only supports a dedicated 2.4G or 5G band — combined multi-band networks won't work
- If auto-search doesn't find your bed, try scanning the QR code first; if the bed is found but the type is wrong, select the correct type manually; if scanning doesn't work either, enter the device ID manually
All set? Move on to .
2.2 Start Connecting Your Bed
Once you're ready, start from the welcome screen.
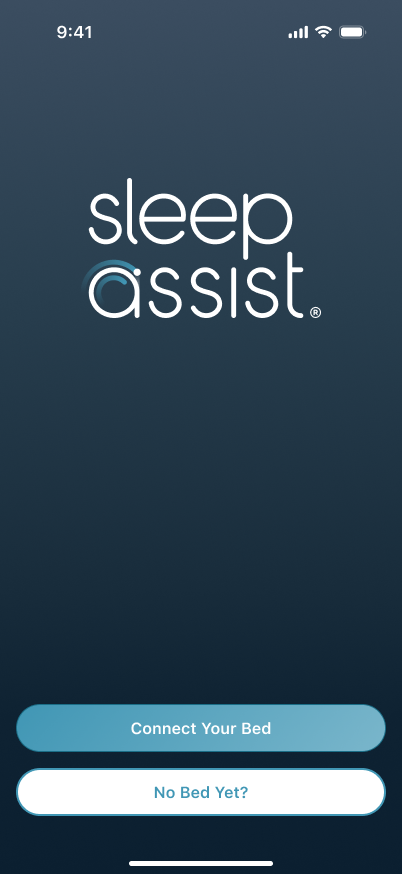
The first time you open the app, you'll see a welcome screen with two main buttons: Connect Your Bed and No Bed Yet?
- Already have a bed — tap Connect Your Bed.
- Don't have a bed yet — tap No Bed Yet? to visit the Ergomotion® website and learn more.
Started connecting? Next up: .
2.3 Find and Connect Your Bed
Start with the easiest option — automatic connection. In most cases, the app will find your bed right away. If it doesn't, try the QR code. If that doesn't work either, enter the device ID manually. If the bed is found but the type can't be confirmed, select the correct type on screen. Once the bed type is confirmed, continue to .
2.3.1 Automatic Connection
The easiest way — most users get connected right here.
- Tap Connect to start searching for your bed.
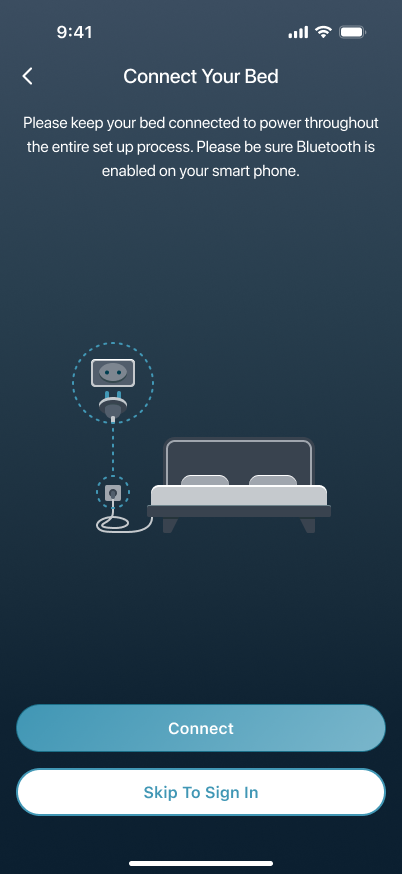
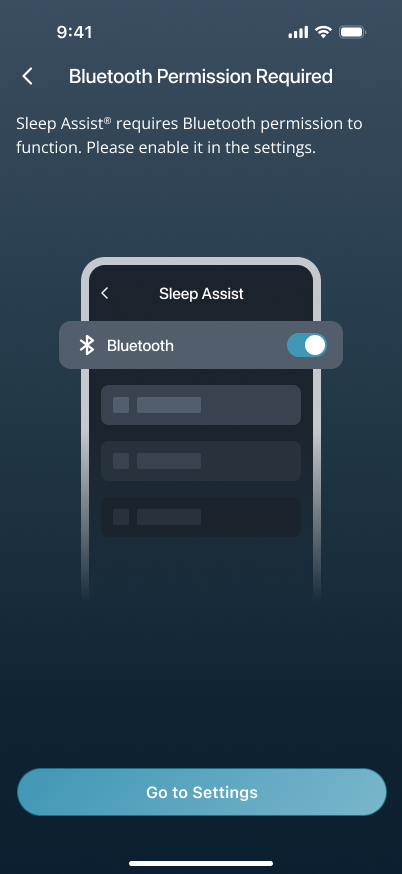
- If a Bluetooth permission prompt appears, tap Allow — otherwise the app can't find nearby beds.
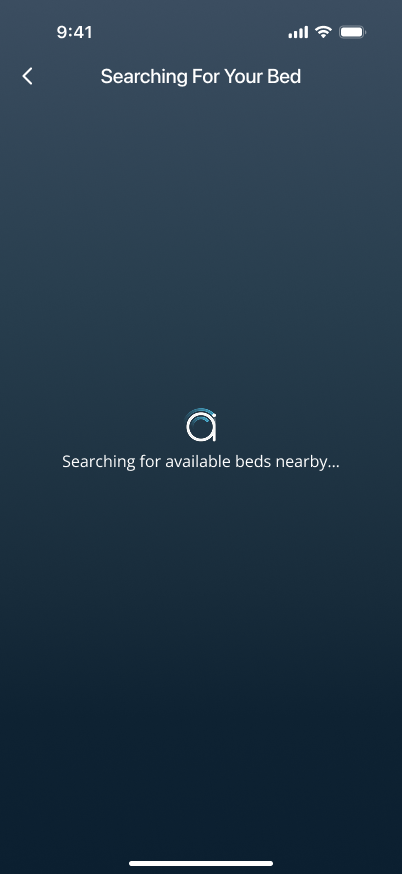
- Wait while the app searches for nearby beds.
- When beds are found, a list appears. Select yours and continue.
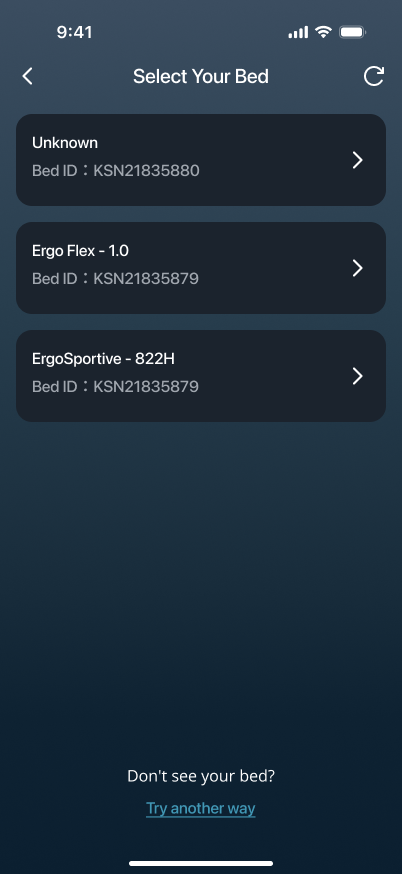
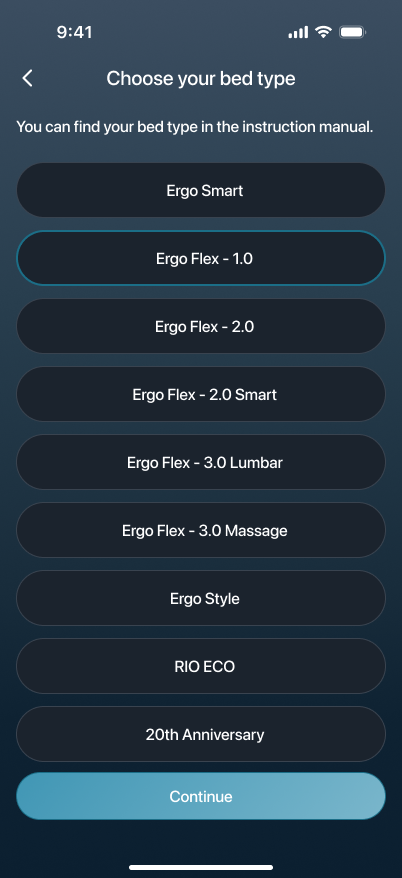
- If the app finds your bed but can't determine the type yet, select it first, then follow the prompts to the bed type selection page.
- Confirm the correct bed type on the selection page, then continue.
2.3.2 QR Code Connection
Didn't auto-search find your bed? Try scanning the QR code instead.
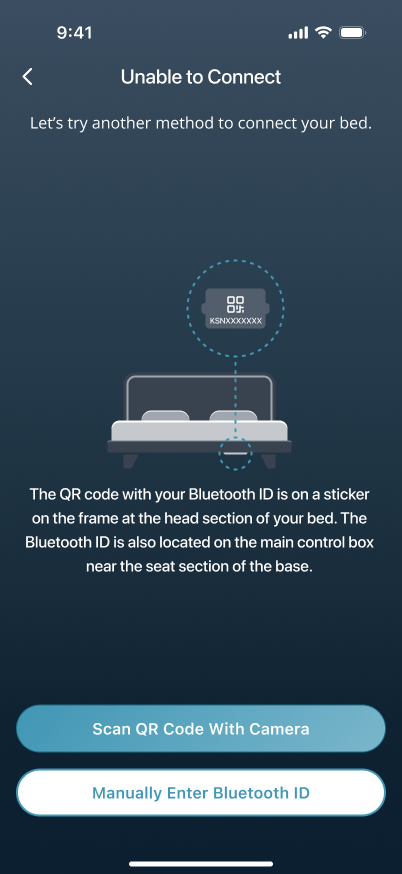
- On the Unable to Connect page, tap Scan QR Code with Camera.
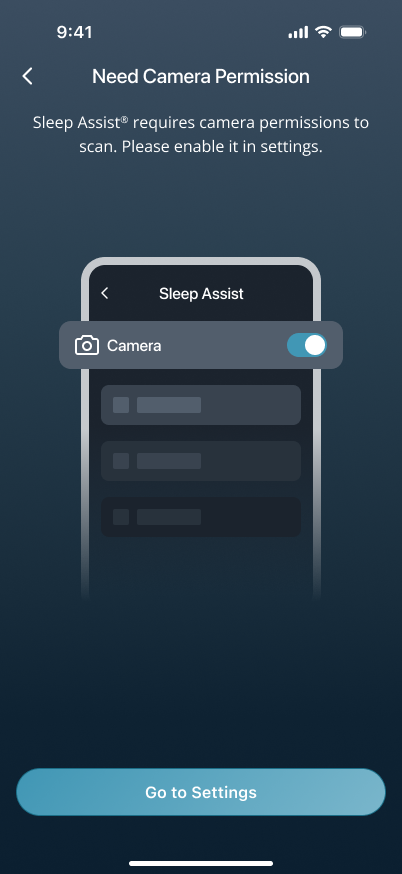
- If a camera permission prompt appears, tap Allow.
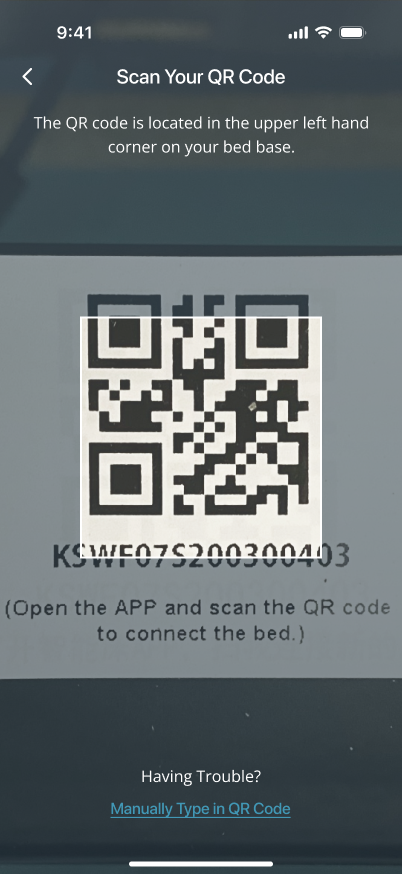
- Point your camera at the QR code on the control box underneath the bed.
- Once connected, follow the on-screen prompts to continue.
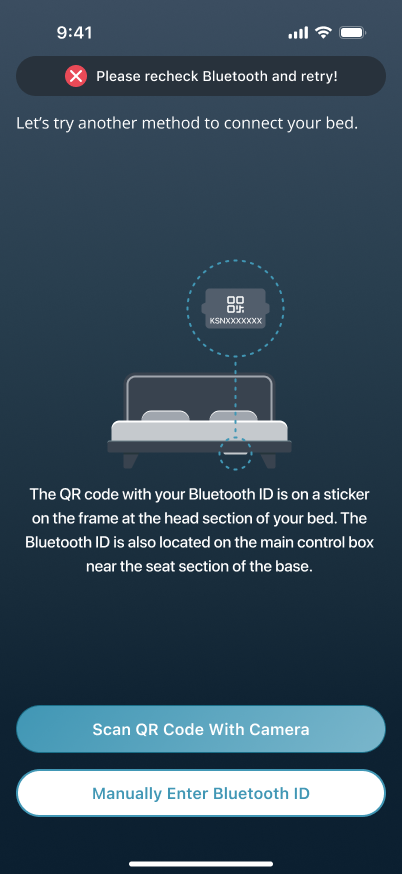
- If it says connection failed, make sure Bluetooth is on, then go back and try again.
2.3.3 Manual Device ID Entry
QR code not working, or still can't connect after scanning? Enter the device ID manually.
- On the Unable to Connect page, tap Manually Enter Bluetooth ID.
- The device ID is on the control box underneath the bed — see the illustration for reference.
- Enter your smart bed's device ID.
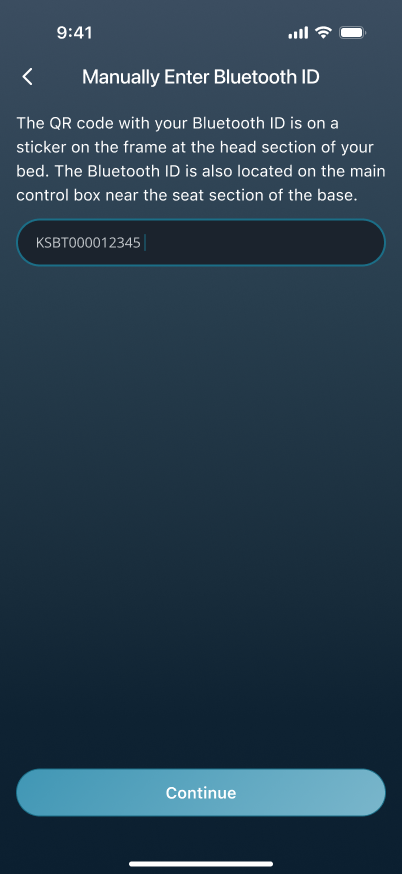
- Make sure the entry looks right, then continue. If the format is wrong, the page will tell you — just fix it and try again.
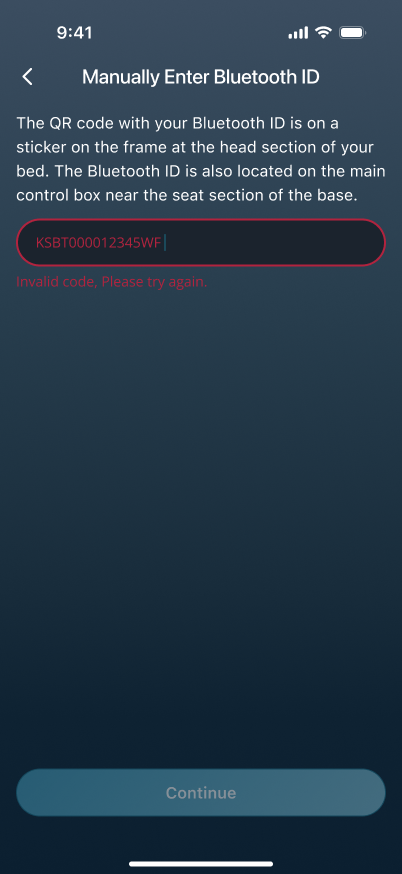
- Once connected, follow the on-screen prompts to continue.
- If it says connection failed, make sure Bluetooth is on, then go back and try again.
2.3.4 Not Ready to Connect Yet
Don't want to connect right now, or was this bed already connected before? Tap Skip To Sign In to move on.
If this is your first time, or the bed hasn't been linked to your account yet, go back to the earlier sections above.
2.4 Continue Setup by Bed Type
After your bed is found, what comes next depends on the bed type. Adjustable beds go straight to the home screen. Smart beds need account sign-up or sign-in first, then more setup.
2.4.1 Adjustable Bed
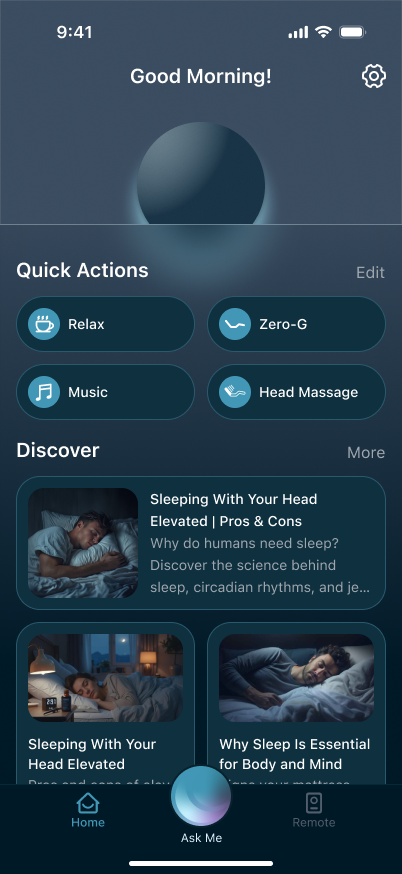
Adjustable beds don't need an account — the app goes straight to the Homepage once connected, and you're ready to go. That's the end of Chapter 2. Next, read in full.
2.4.2 Smart Bed
First-time smart bed users still need to sign up, sign in, and complete the initial profile. Next step: .
2.5 Create Your Smart Bed Account
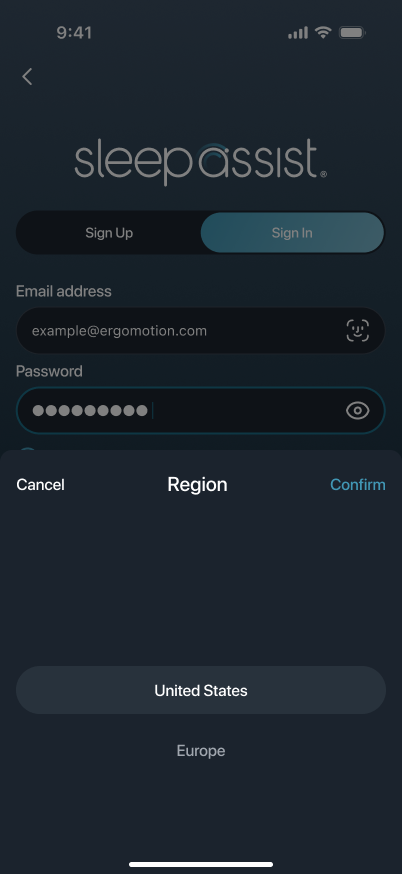
First time with a smart bed and no account yet? Create one here. You can sign up with email, Apple, or Google. Once you've signed up and verified, continue to .
2.5.1 Sign Up with Email
Complete sign-up directly on the Sign Up page.
- Enter your email address.
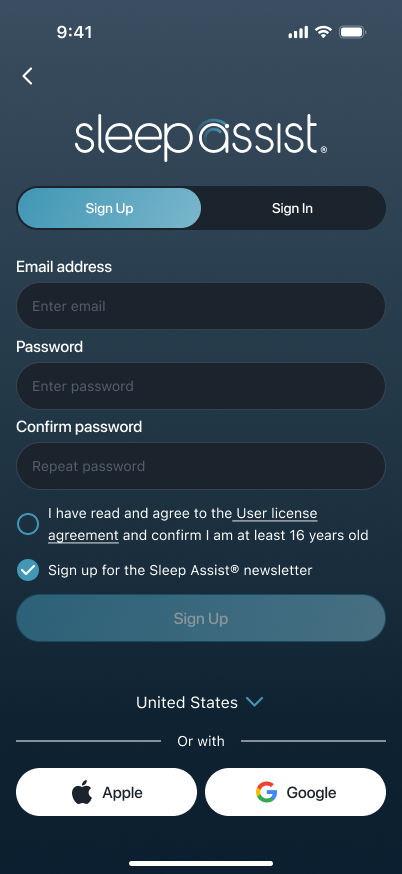
- Create a password, then enter it again to confirm.
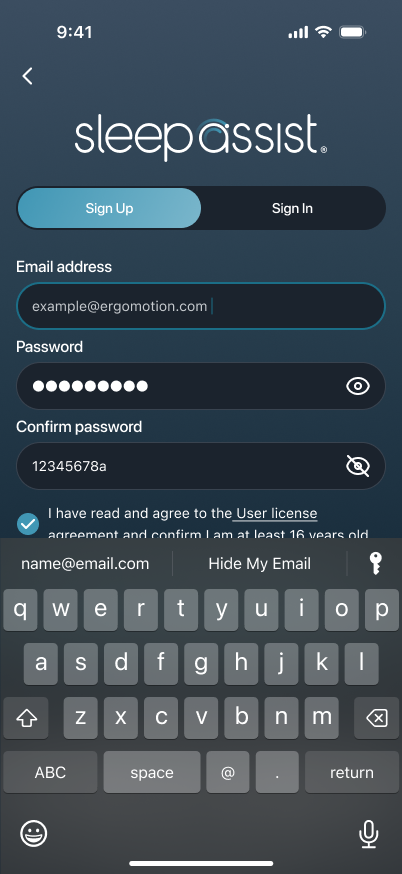
- Select your region.
- Check the required agreement boxes.
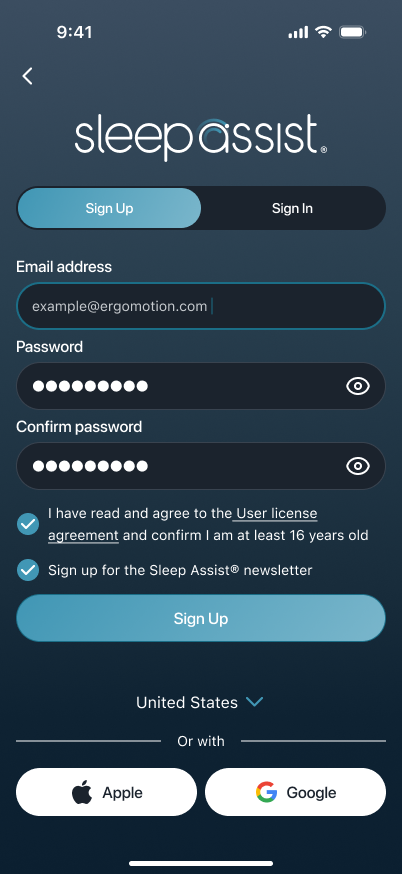
- Tap the sign-up button.
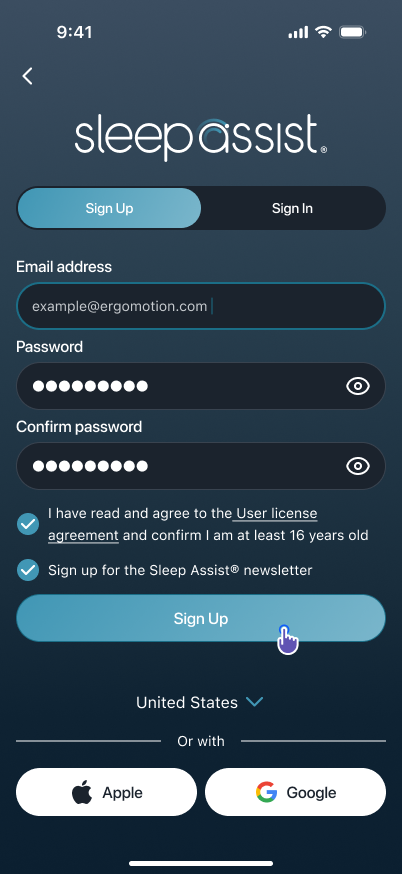
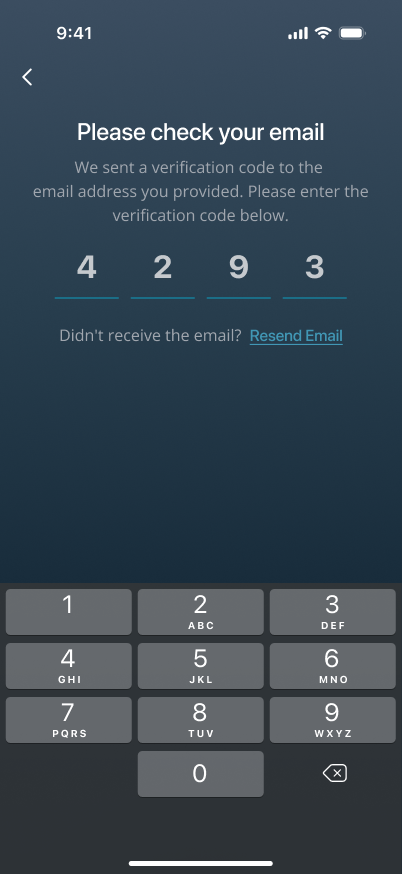
- Check your email for the verification code, then enter it in the app to complete verification.
2.5.2 Sign Up with Apple
Already signed in to Apple on your phone? You can use it for a quick sign-up.
- Tap Apple at the bottom of the sign-up page.
- Complete Apple authorization on the system screen.
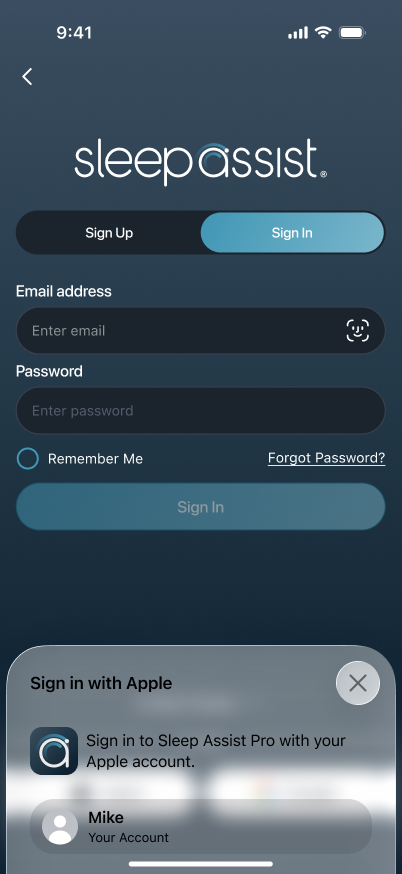
- Once done, you'll return to the app to continue setup.
2.5.3 Sign Up with Google
Already signed in to Google on your phone? You can also use it for a quick sign-up.
- Tap Google at the bottom of the sign-up page.
- Complete Google authorization on the system screen.
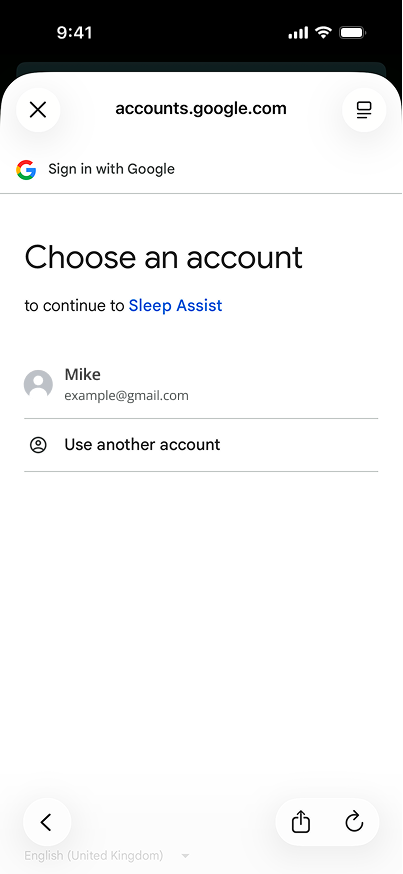
- Once done, you'll return to the app to continue setup.
2.6 Set Up Your Smart Bed
Account ready? Now finish connecting the smart bed. Bluetooth and Wi-Fi beds have slightly different steps, and you'll also need to confirm whether to turn on Sleep Data Tracking. Once that's done, continue to .
2.6.1 Set Up a Bluetooth Smart Bed
Bluetooth smart beds have a simpler process.
- Wait for the app to finish the Bluetooth connection.
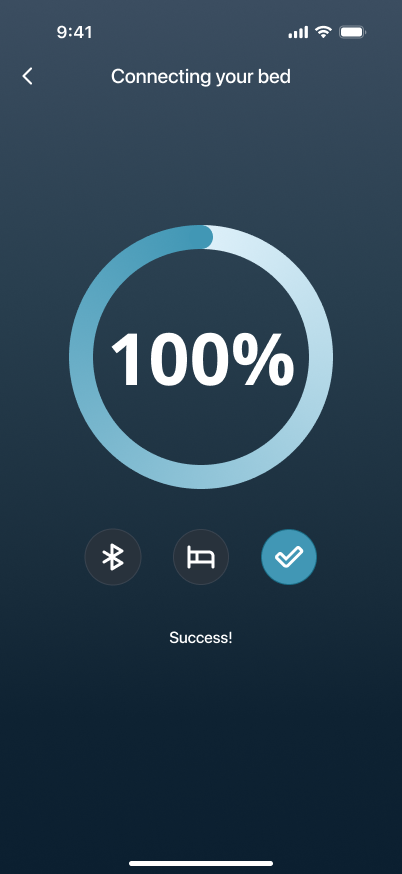
- Wait for the app to finish the smart bed setup.
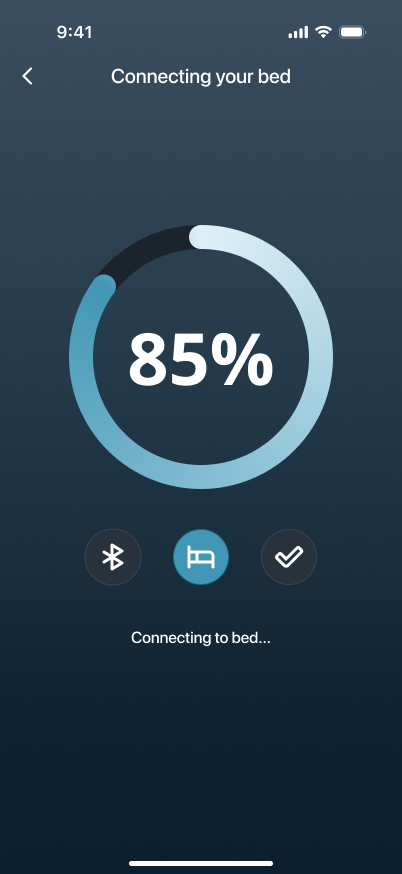
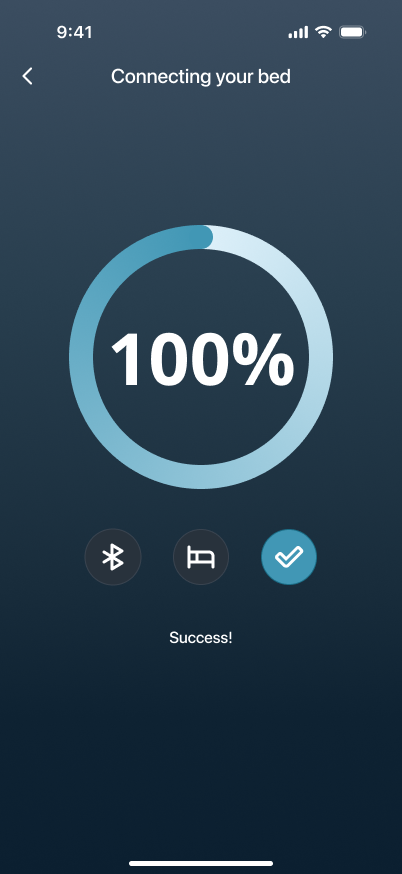
- Connection complete — on to Sleep Data Tracking.
2.6.2 Set Up a Wi-Fi Smart Bed
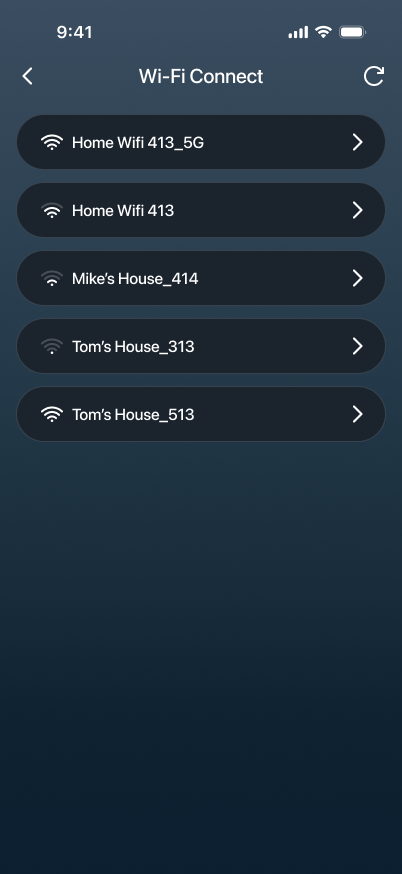
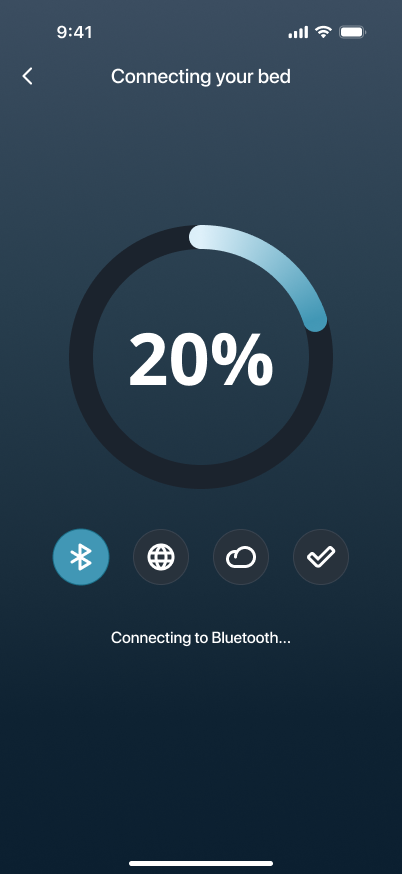
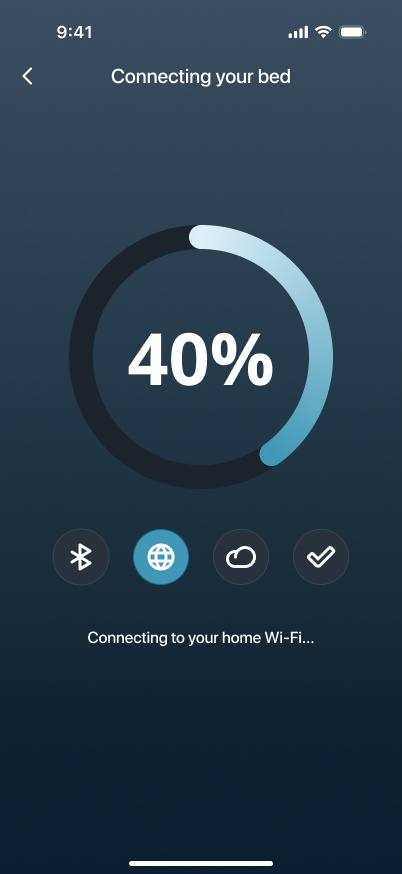
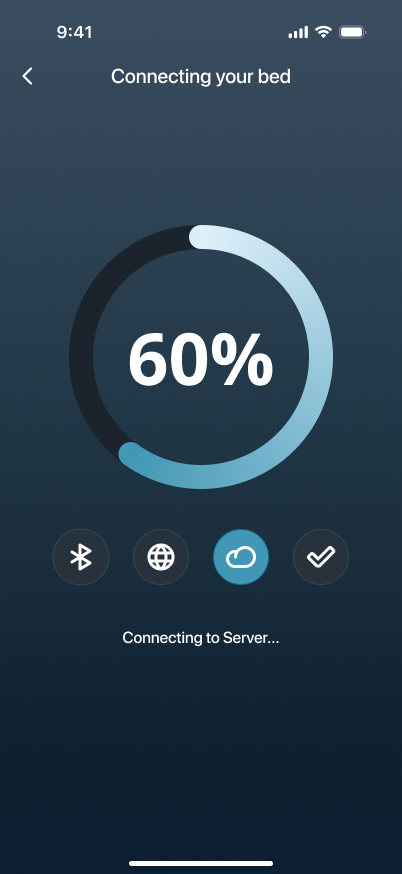
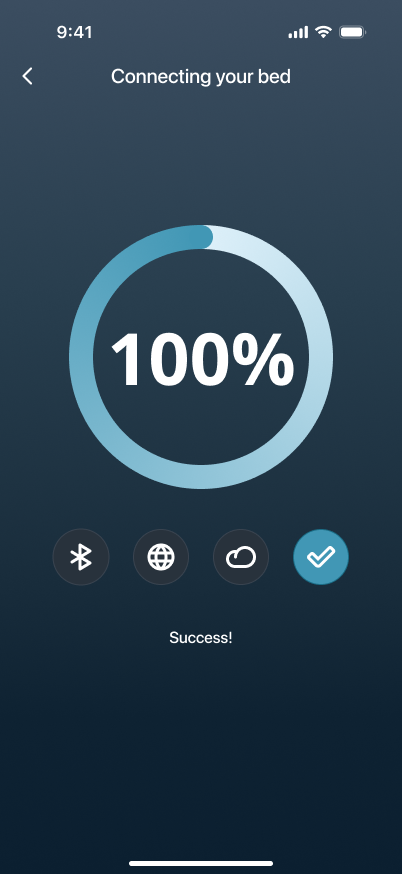
Wi-Fi smart beds also need to be connected to your home Wi-Fi.
- Select an available Wi-Fi network. Use a dedicated 2.4G or 5G band — don't use a combined multi-band network.
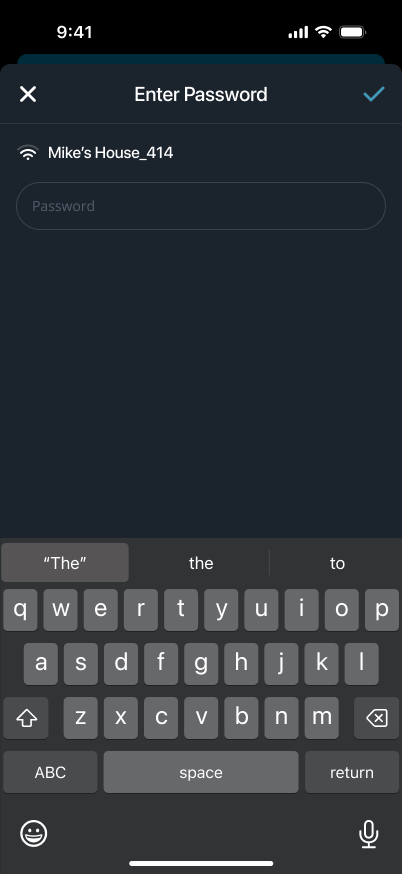
- Enter the Wi-Fi password and continue.
- Wait for the app to finish the Bluetooth connection.
- Wait for the app to finish the Wi-Fi connection.
- Wait for the app to finish the server connection.
- Connection complete — on to Sleep Data Tracking.
2.6.3 Turn On Sleep Data Tracking
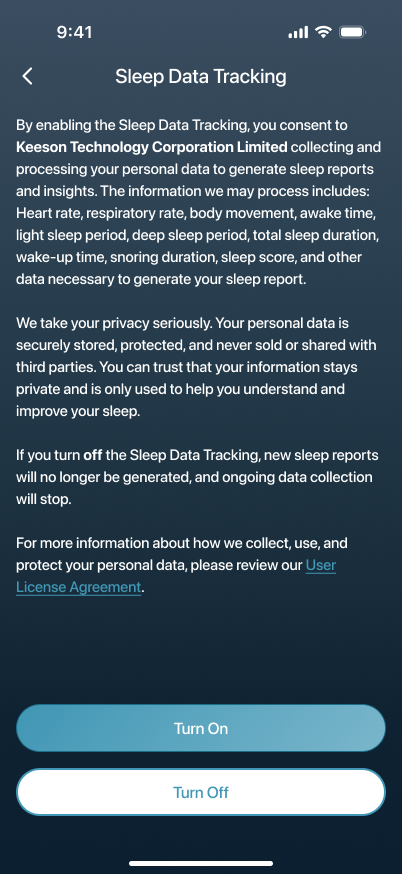
Once the bed is connected, the page shows Sleep Data Tracking, where you decide whether the app should record your sleep data going forward.
- Read the instructions on the page.
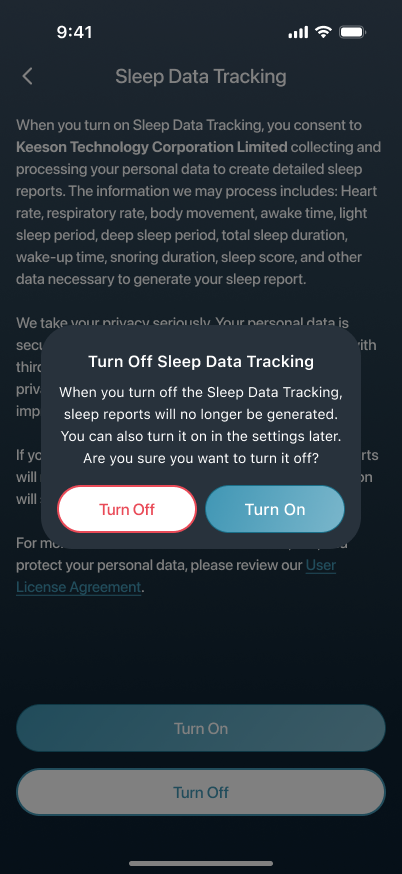
- Choose whether to turn it on. If you turn it off, the app won't track sleep data or generate sleep reports. You can always turn it back on later in Settings.
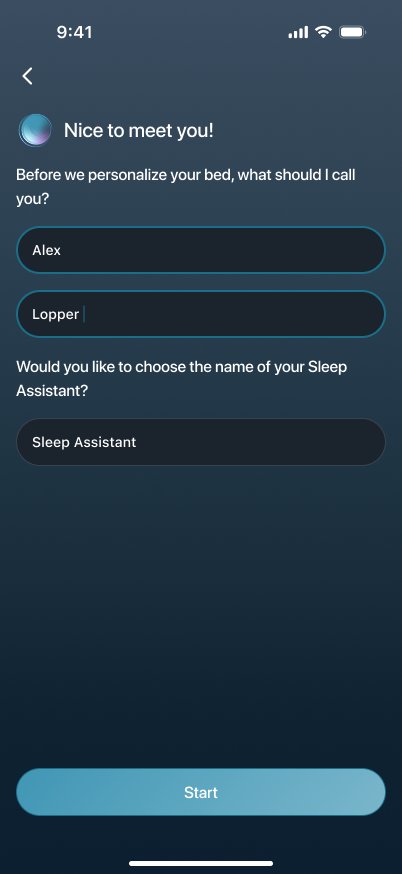
- Tap Continue to move on to your first profile setup.
2.7 Complete Your First Profile
Bed connected and Sleep Data Tracking confirmed — now fill in some basic info. You'll go through your nickname, basic details, sleep goals, and personal preferences. If your bed has split-zone features, there's one extra step to pick your sleeping side. Once you're done, you'll land on the home screen — head over to .
2.7.1 Smart Bed Without Split-Zone Features
- Enter your nickname.
- Read the setup instructions on the page.
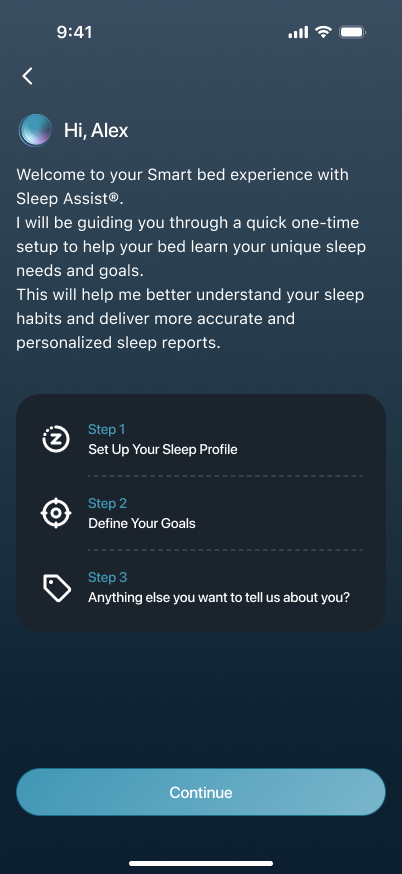
- Fill in basic info: gender, height, weight, mattress thickness, birthday, time format, etc.
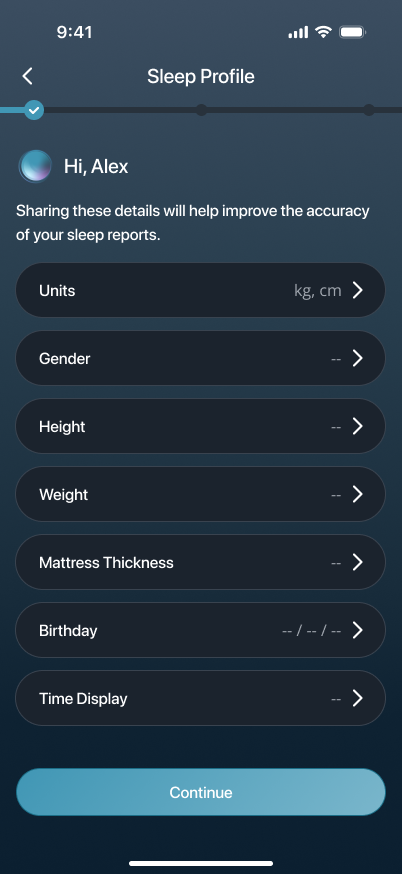
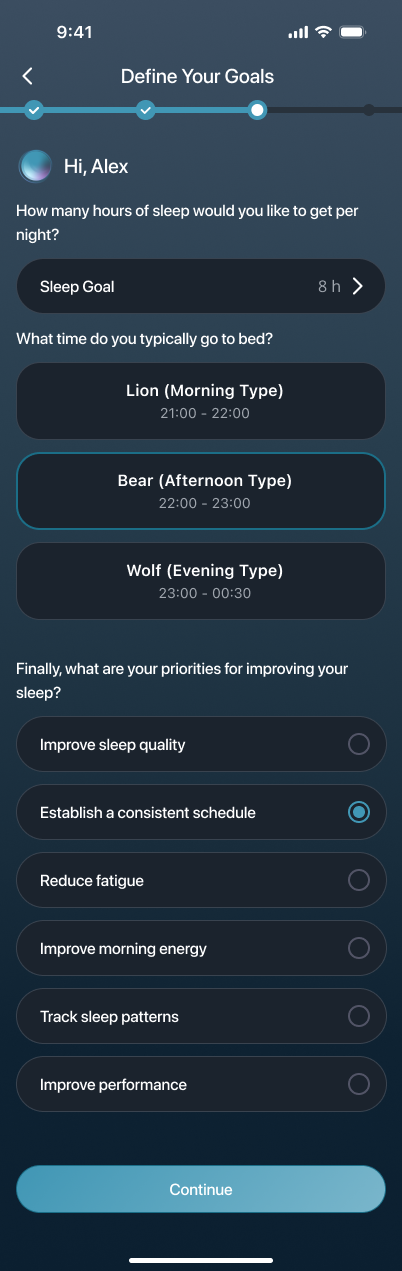
- After basic info, move on to the Sleep Goal page.
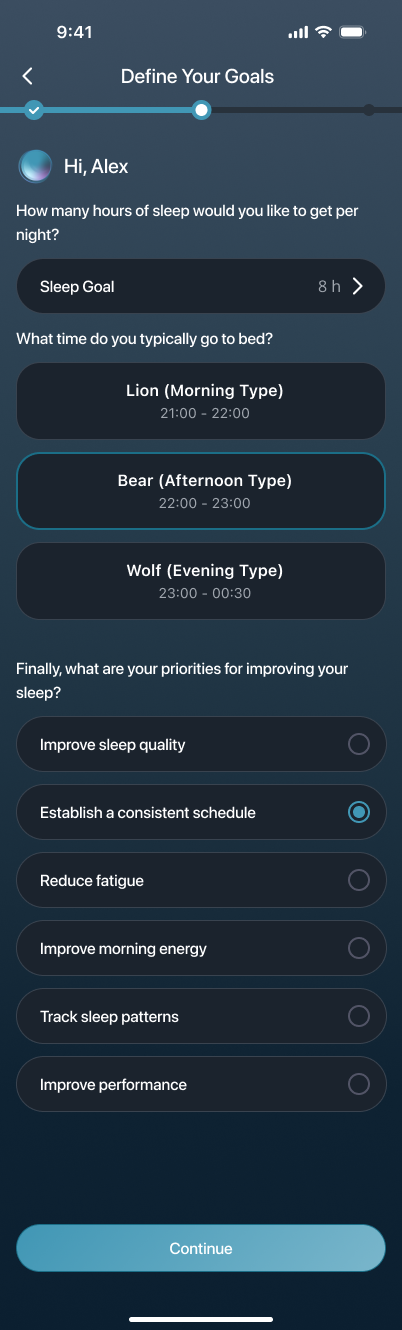
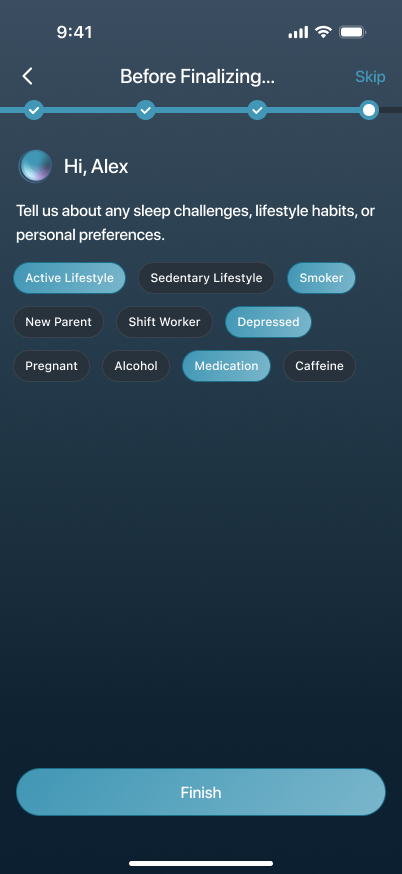
- Continue to the personal tags page and pick the ones that fit. You can also tap Skip for now.
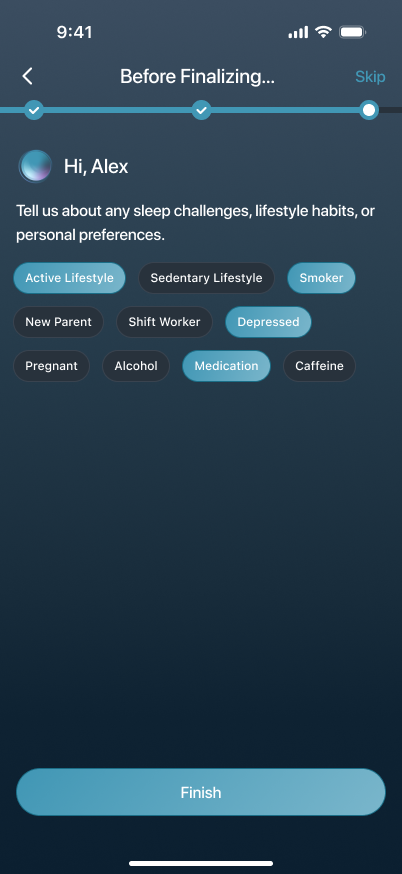
- Done — you'll enter the home screen.
2.7.2 Smart Bed With Split-Zone Features
- Enter your nickname.
- Read the setup instructions on the page.
- First, choose your sleeping side.
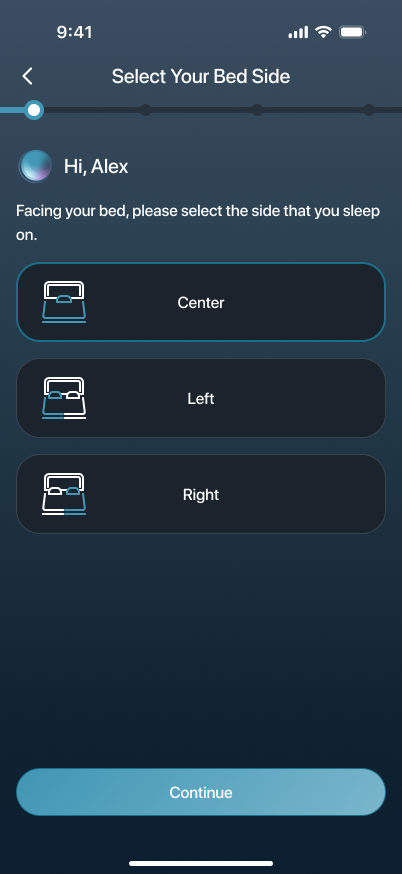
- Open the basic info page and confirm unit settings first.
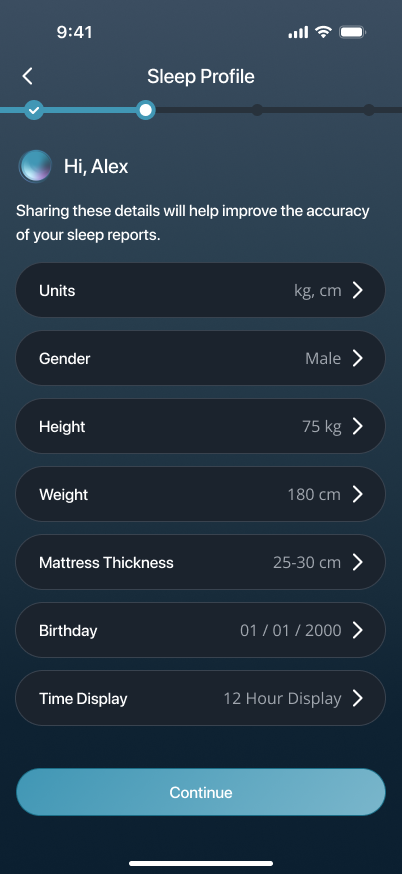
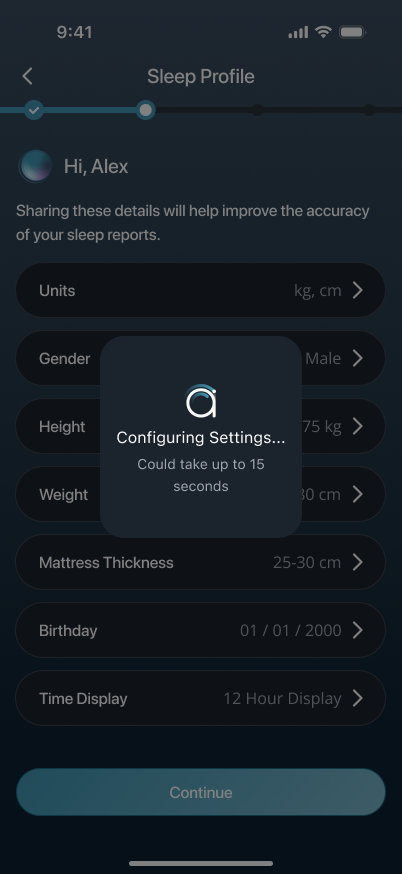
If you adjust the units or a key field, the system may briefly save the settings.
- After basic info, continue with Sleep Goal and choose the sleep area you want to improve first.
- On the final personal tags page, review everything and tap Finish to enter the home screen.
Once you see the home screen, your first connection and setup are all done.
3. Using the App
Connection and first-time setup done? Now it's time to get familiar with the app on a smart bed. This chapter covers the home screen, Sleep Report, Real-Time Data, Remote, and Sleep Schedule. If you have an adjustable bed, see Chapter 4 instead.
3.1 Sign In
Smart bed users can sign in here to reach the home screen. Adjustable beds usually don't need an account — just connect and go.
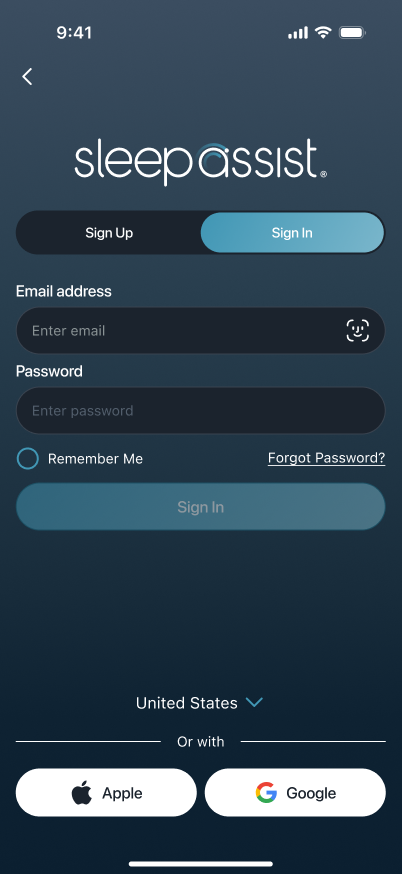
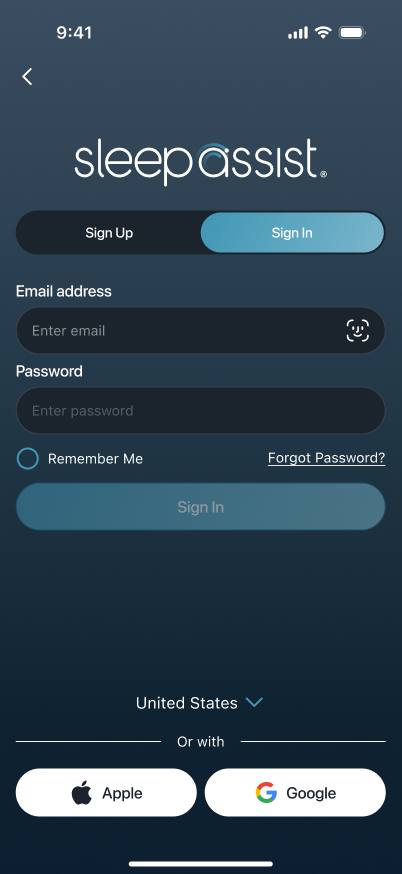
3.1.1 Sign In with Email
- Open the Sign In page.
- Enter your registered email and password.
- Tap Sign In.
- Sign-in successful — you're on the home screen.
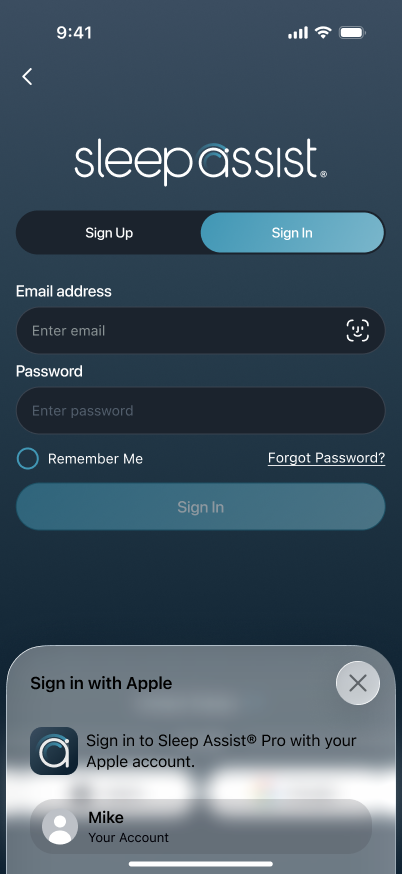
3.1.2 Sign In with Apple
Signed up with Apple? Tap the Apple option on the Sign In page.
- Tap Apple at the bottom of the Sign In page.
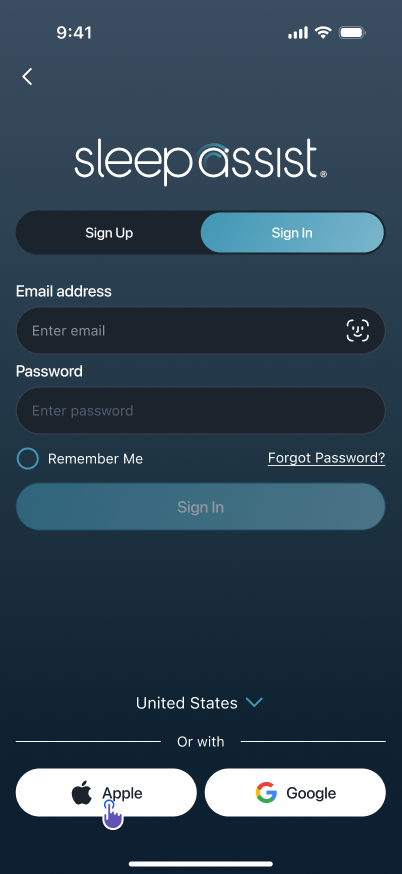
- Complete Apple authorization on the system screen.
3.1.3 Sign In with Google
Signed up with Google? Tap the Google option on the Sign In page.
- Tap Google at the bottom of the Sign In page.
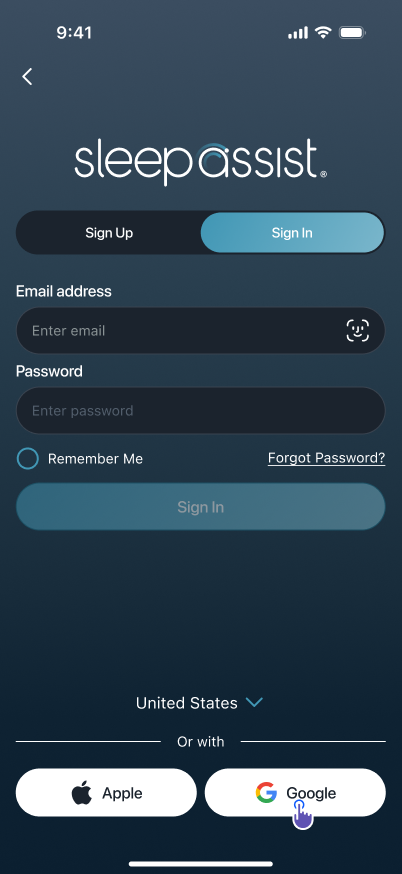
- Complete Google authorization on the system screen.
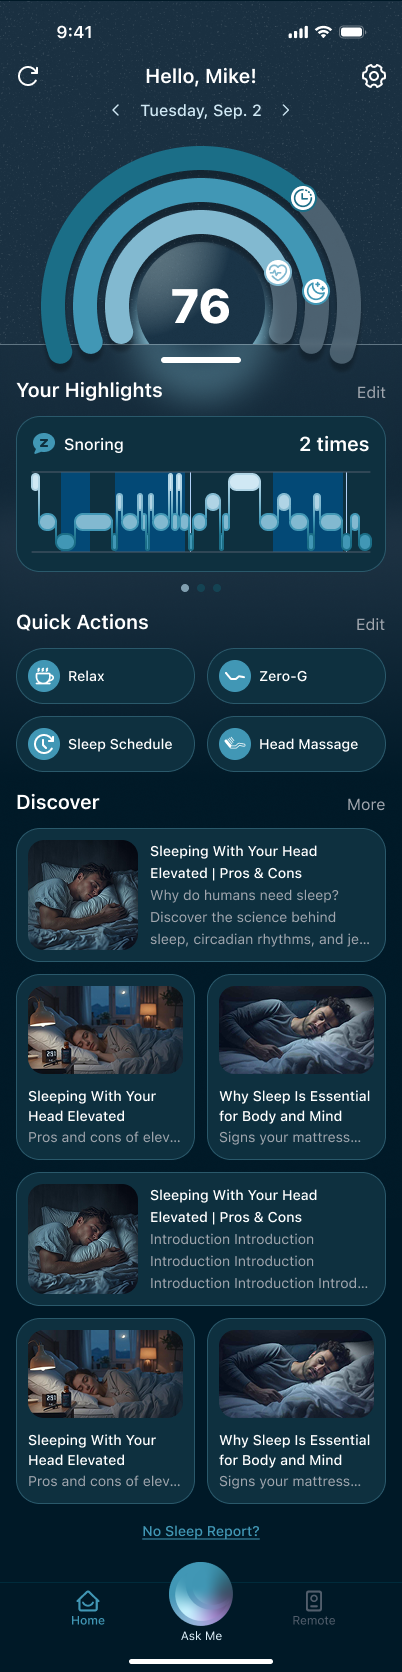
3.2 Smart Bed Home
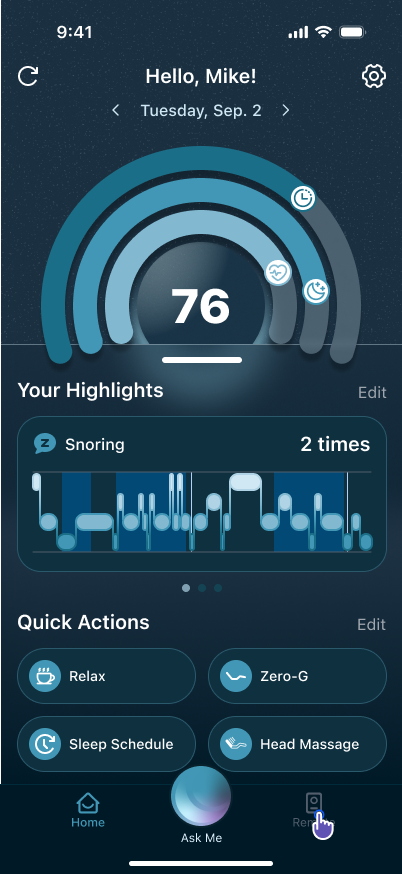
The smart bed home screen brings together everything you use most: sleep reports, key metrics, quick actions, and settings.
First time here? Walk through it in this order:
3.2.1 Sleep Score
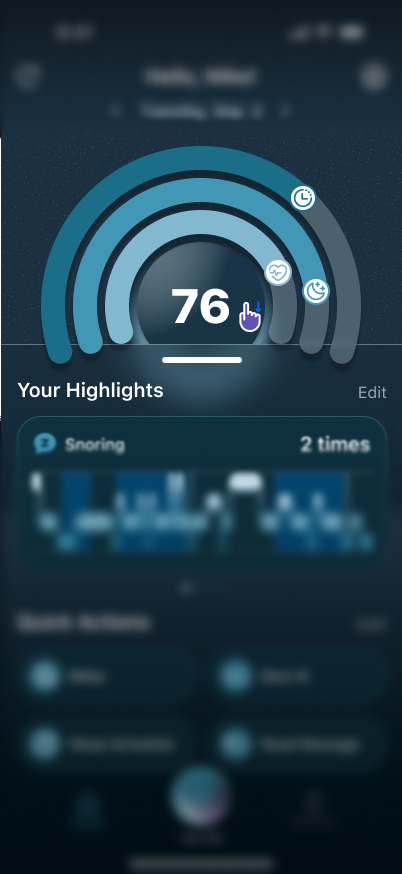
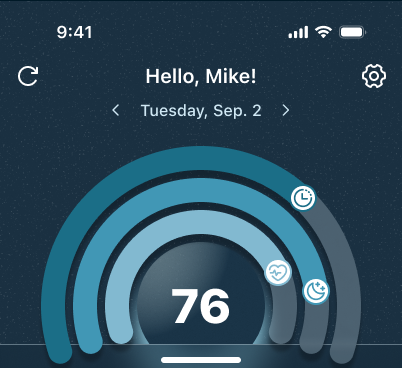
- When the selected date has sleep data, the top of the page shows your sleep score and summary.
- The page auto-refreshes once on load. To get the latest data manually, tap the refresh button.
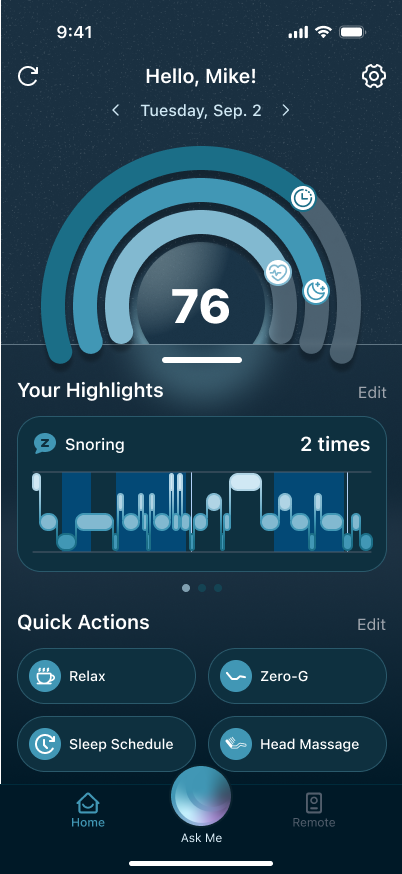
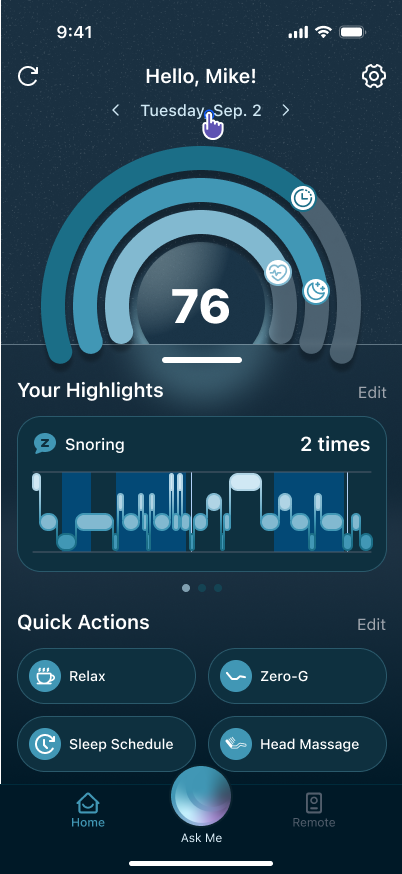
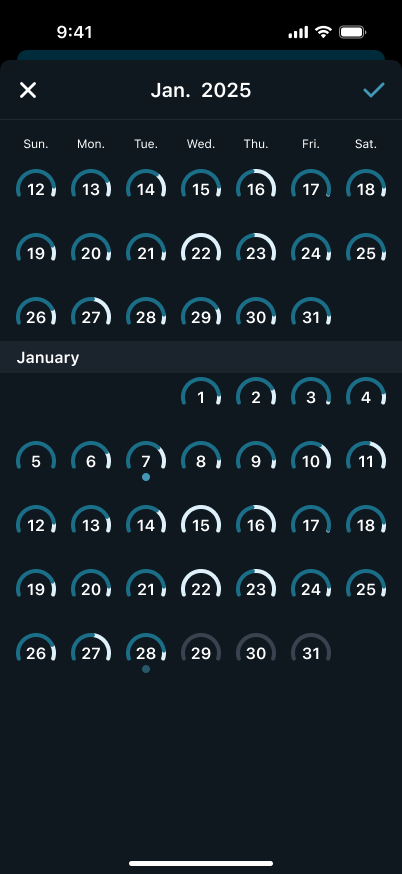
- To view another date, tap the date and switch using the pop-up picker.
3.2.2 Your Highlights
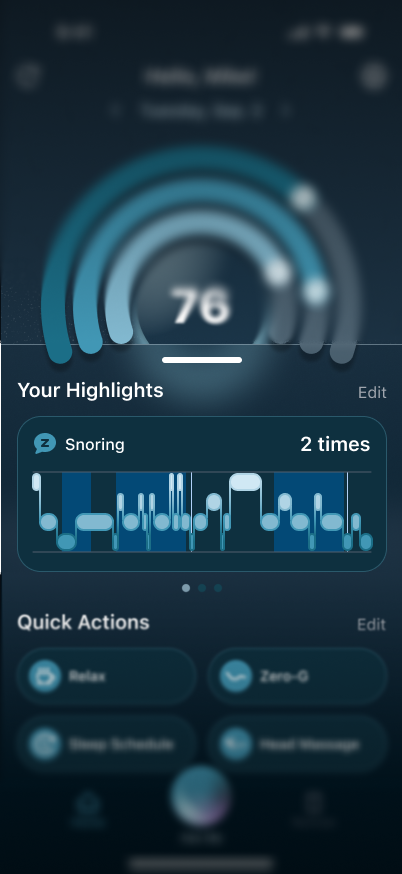
- Your Highlights show key sleep metric cards — swipe left or right to browse.
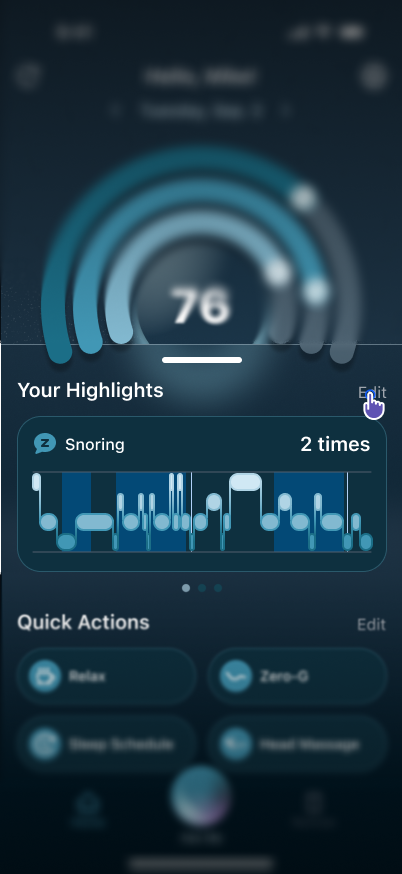
- To adjust what's shown, tap Edit on the right.
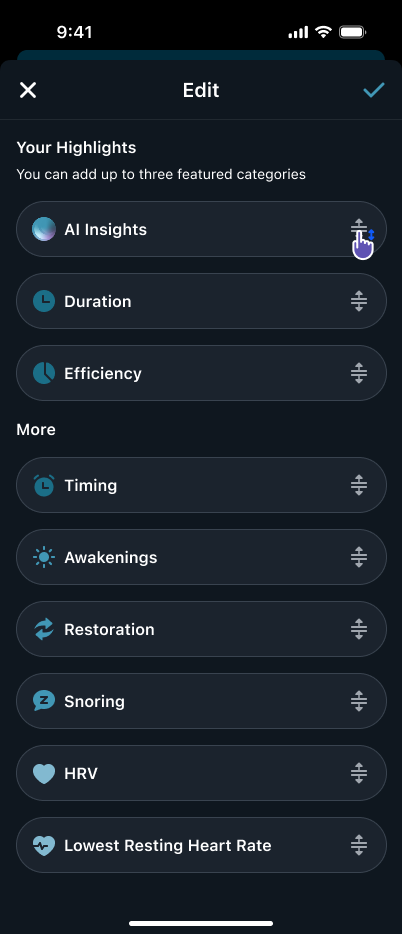
- The home screen shows the top three cards. Drag to reorder, then tap the button in the upper right to save.
3.2.3 Quick Actions
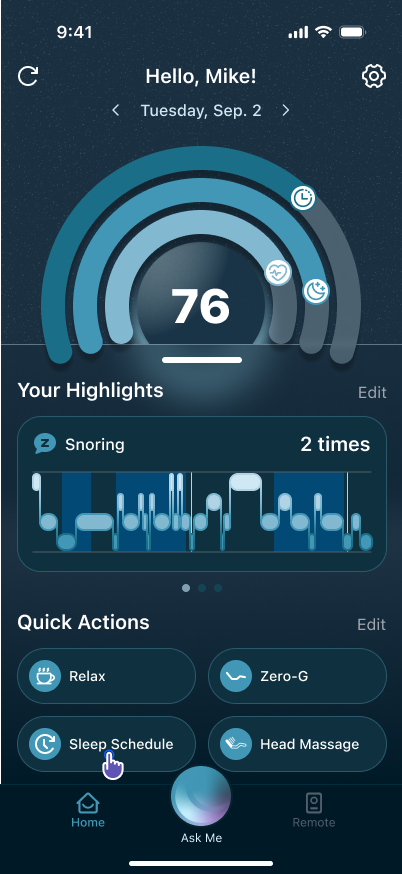
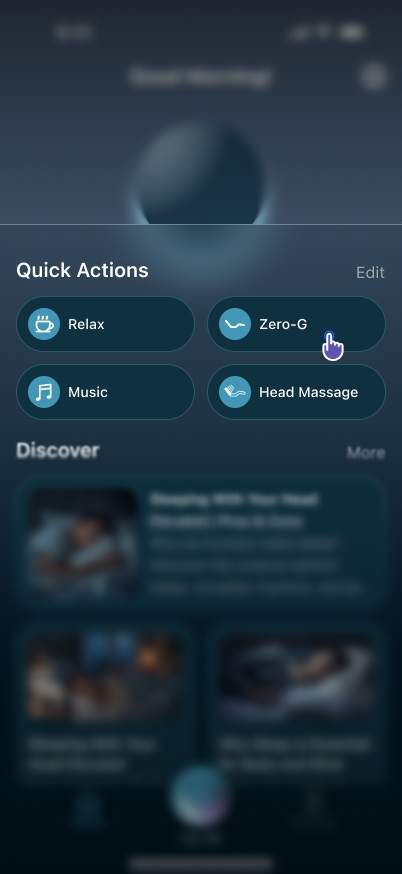
- Quick Actions give you fast access to features like Real-Time Data, Sleep Schedule, and more.
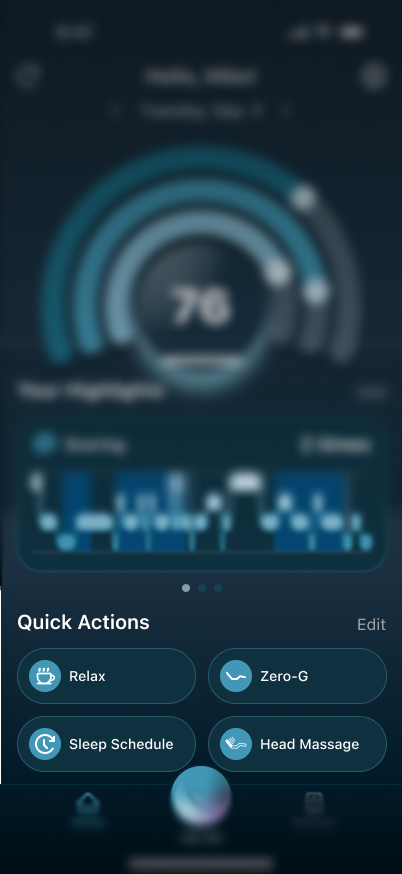
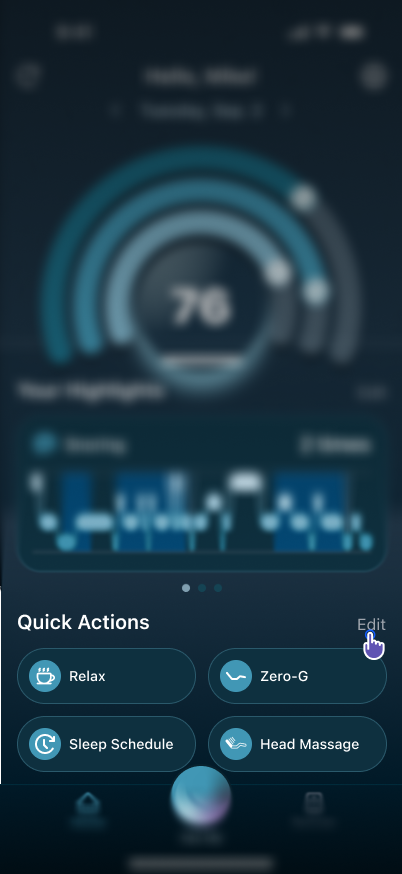
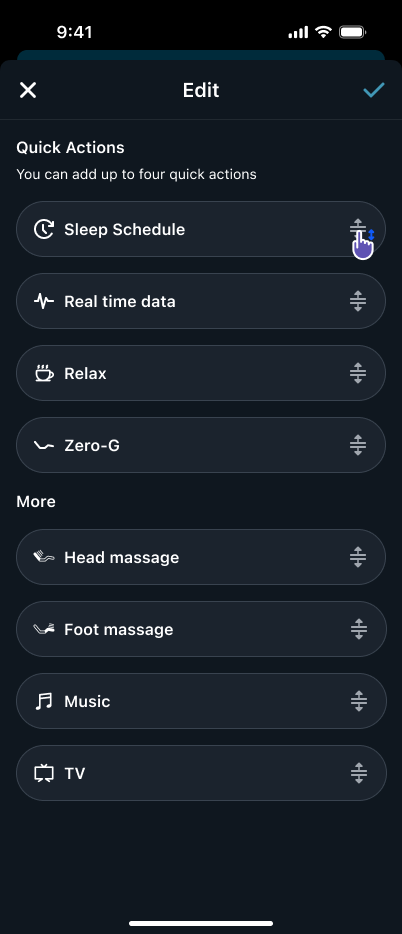
- To adjust the order or content, tap Edit on the right.
- Same idea — the home screen shows the top four actions. Drag to reorder, then save.
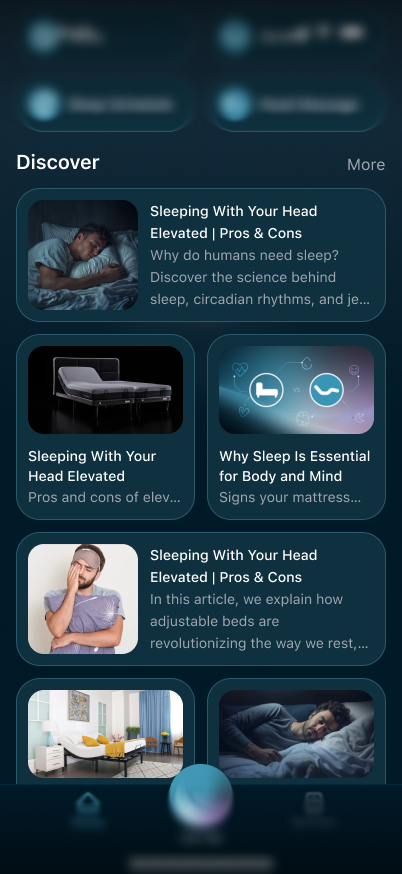
3.2.4 Discover
- Discover shows sleep-related articles. Tap any that catch your eye to read them right in the app.
3.2.5 Other
- For a more detailed sleep analysis, tap or pull down the sleep score area to open Sleep Report.
- Need to change account, notification, device, or other settings? Tap Settings.
3.3 View Sleep Reports & History
Want to see today's sleep results or look back at previous nights? Open Sleep Report. Beyond the total score, you can drill into each metric's details and trends.
3.3.1 View a Sleep Report
- On the home screen, tap the sleep score area or pull down to open Sleep Report.
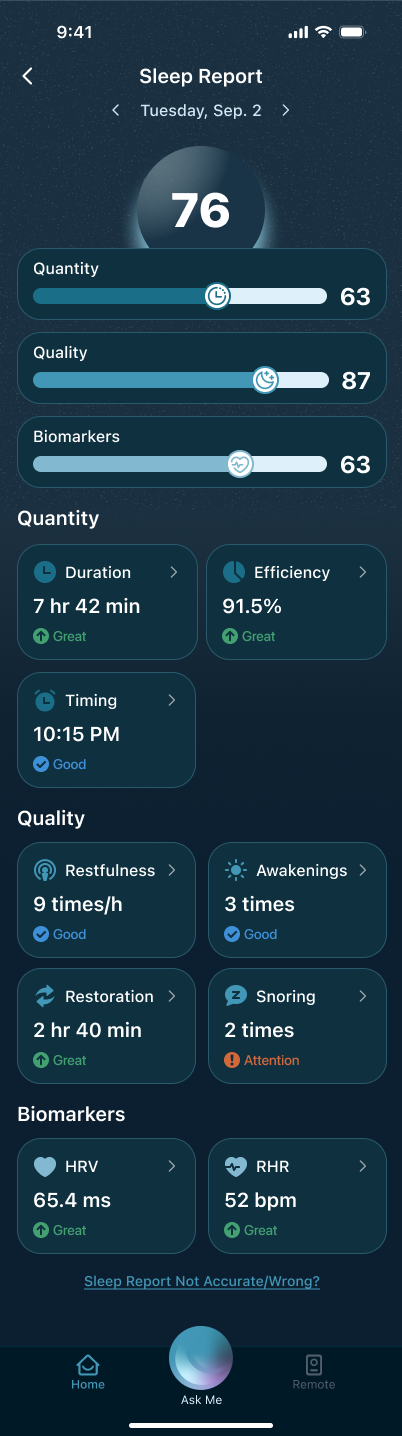
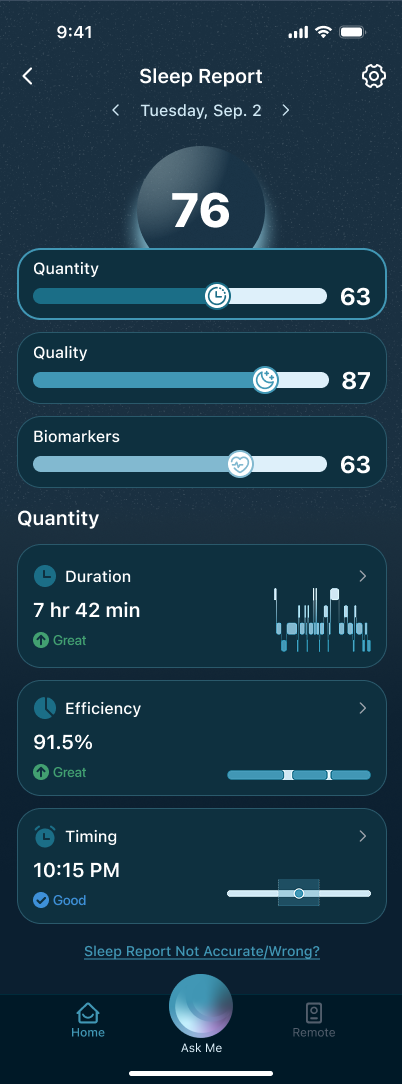
- Start with today's sleep results and metrics. "Today" usually means the sleep session from last night through this morning. The current report covers 3 categories with a total of 9 metrics.
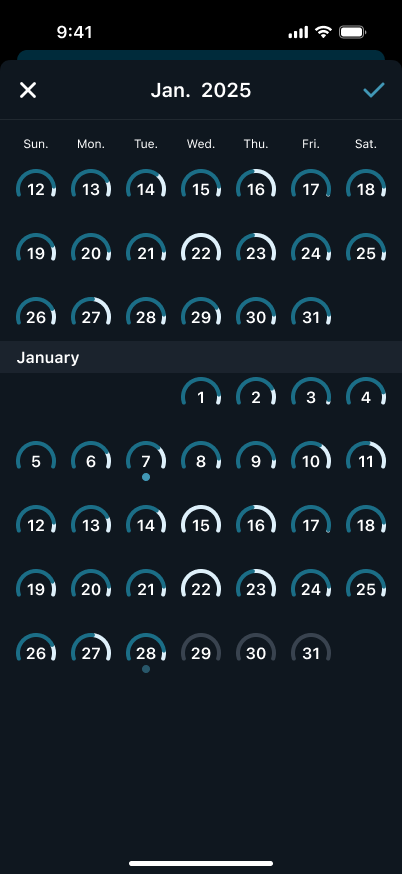
- To view another date, tap the current date.
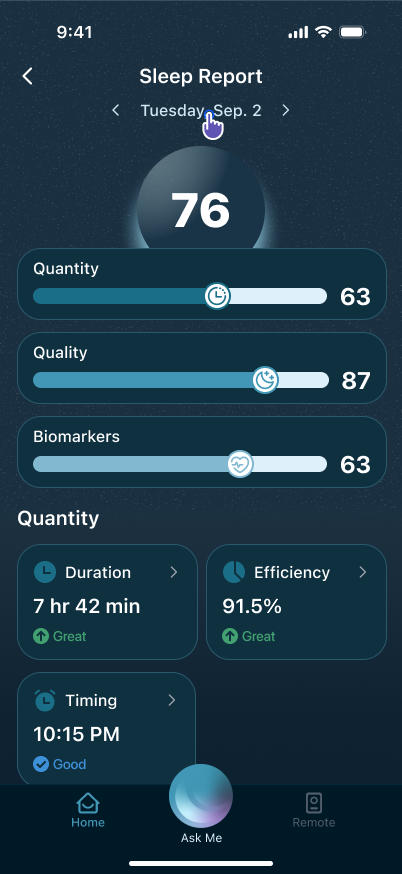
- Pick the date you want from the pop-up to switch to that night's report.
- Tap a category score to view the metrics under that category.
3.3.2 View Metric Details & Trends
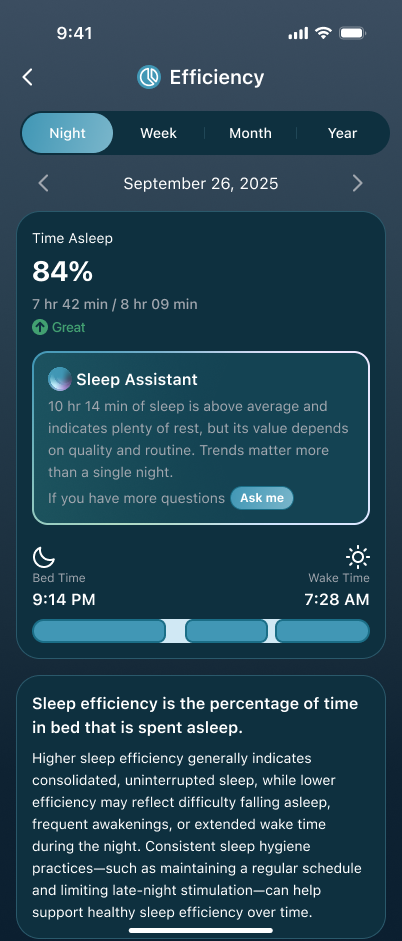
- In the Sleep Report, tap any metric card to open its detail page.
- Check the detailed data explanation. To ask follow-up questions, tap Ask me in the daily view.
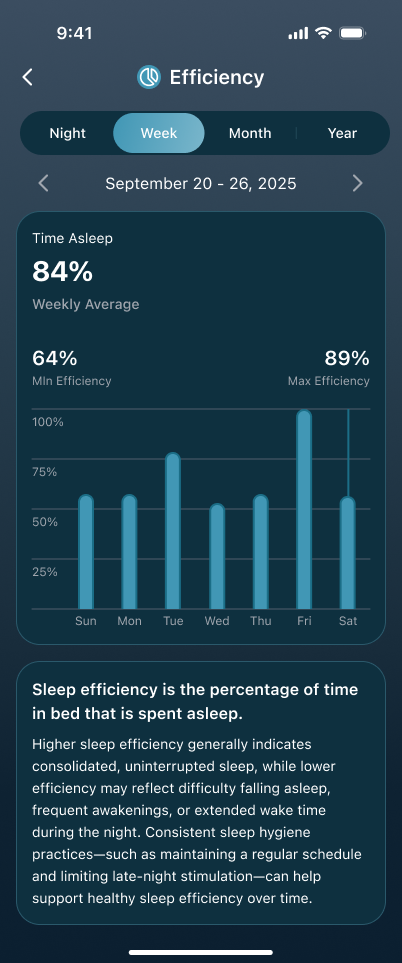
- Switch between weekly, monthly, and yearly trends.
3.3.3 Understand the 9 Metrics
The Sleep Report groups its 9 metrics into 3 categories: Quantity, Quality, and Biomarkers. Each metric's detail page shows the night's data with an explanation of what it means.
Quantity — how much you slept:
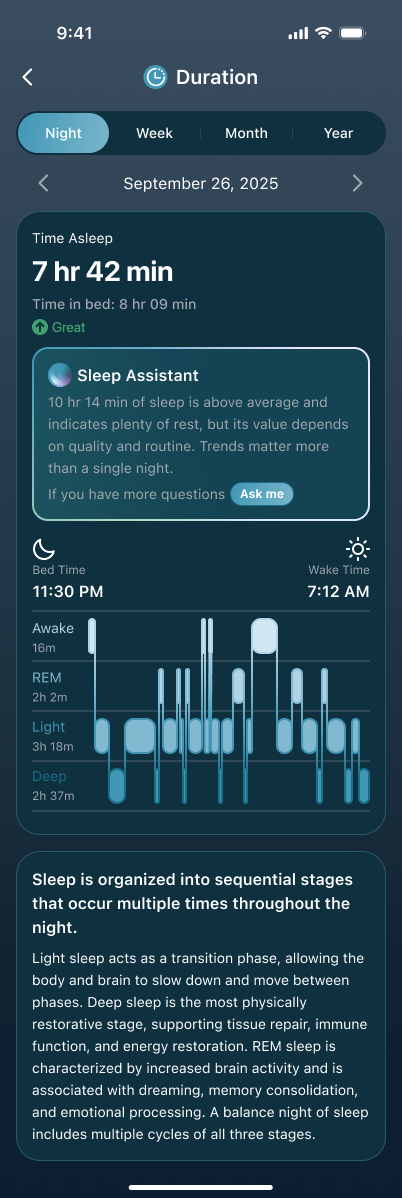
- Duration: the total time you spent asleep, with a breakdown of the Awake, REM, Light, and Deep stages across the night.
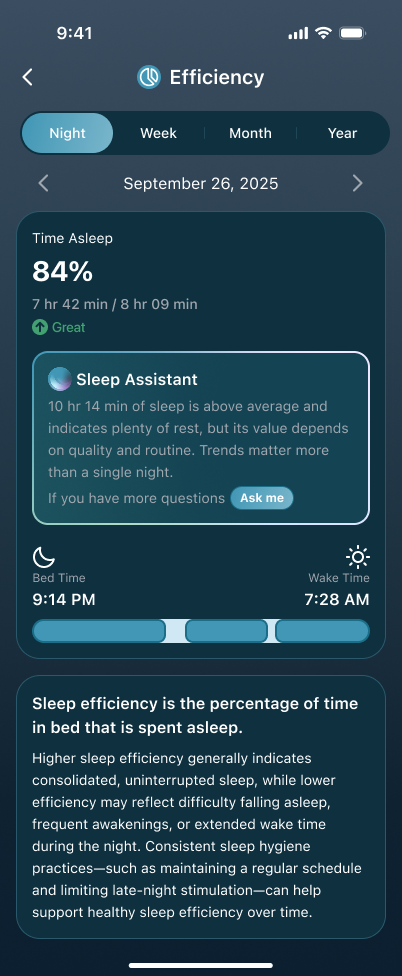
- Efficiency: the percentage of your time in bed that you actually spent asleep.
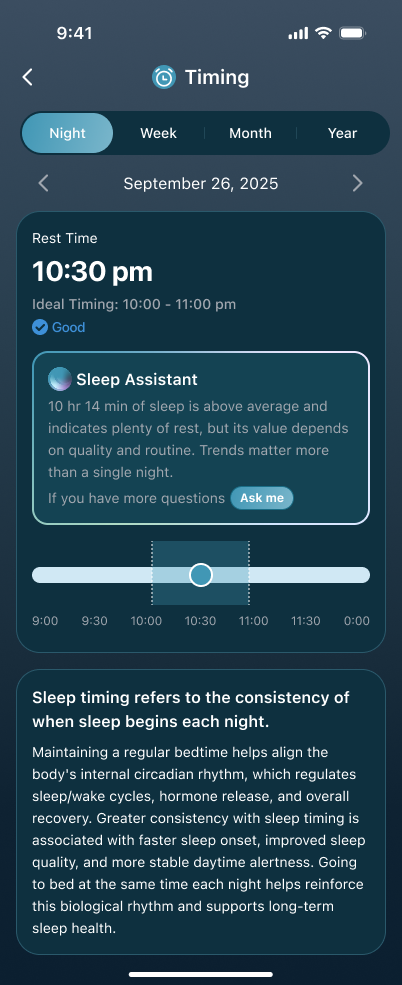
- Timing: when your sleep began, compared with your ideal window — a consistent bedtime helps keep your body clock steady.
Quality — how well you slept:
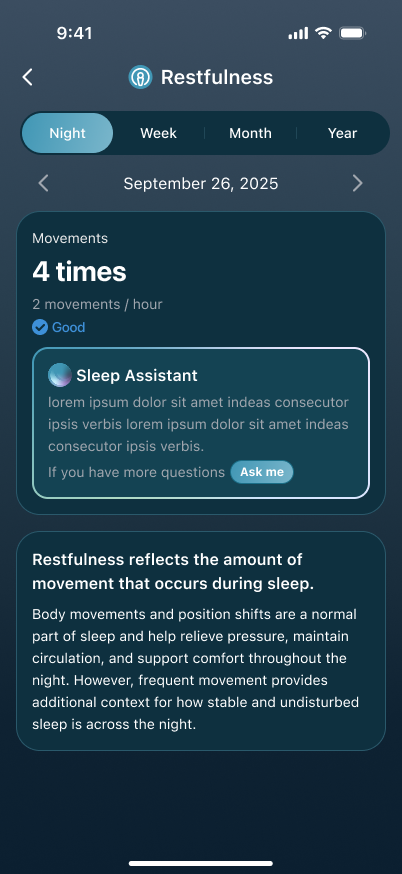
- Restfulness: how much you moved during sleep — frequent movement can mean less settled sleep.
- Awakenings: brief wake-ups after sleep began — how many times, and how long you were awake.
- Restoration: the percentage of sleep spent in the Deep and REM stages, which matter most for physical recovery.
- Snoring: your snoring time for the night. On compatible smart beds, the bed can detect snoring and gently raise the head side to help (Anti-Snore Intervention), and the report counts these interventions.
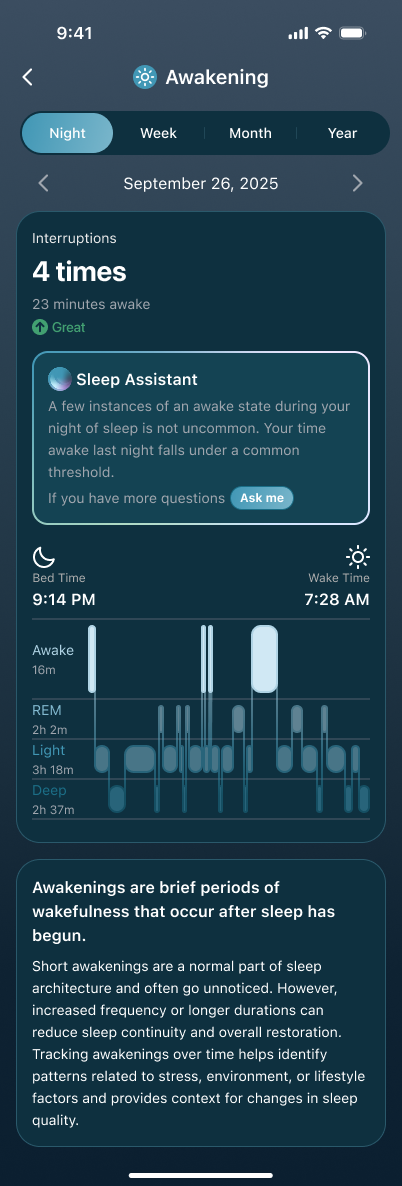
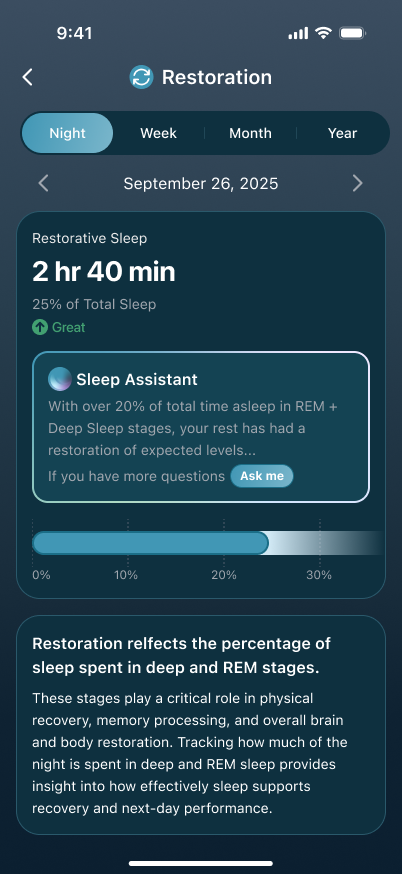
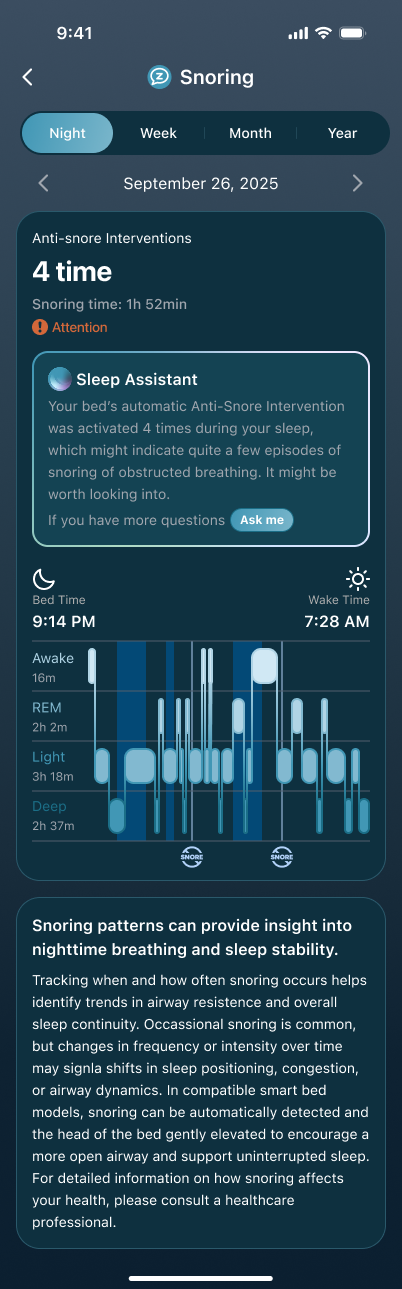
Biomarkers — your body's signals during sleep:
- HRV (Heart Rate Variability): the variation in time between heartbeats — a useful signal of recovery and overall condition.
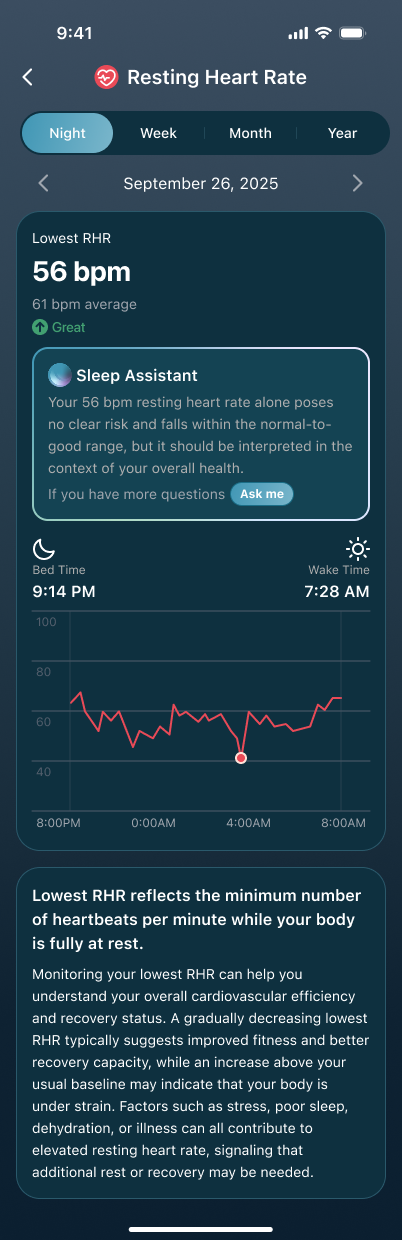
- RHR (Resting Heart Rate): your lowest heart rate while fully at rest. A rate that stays above your usual baseline can mean your body is under strain.
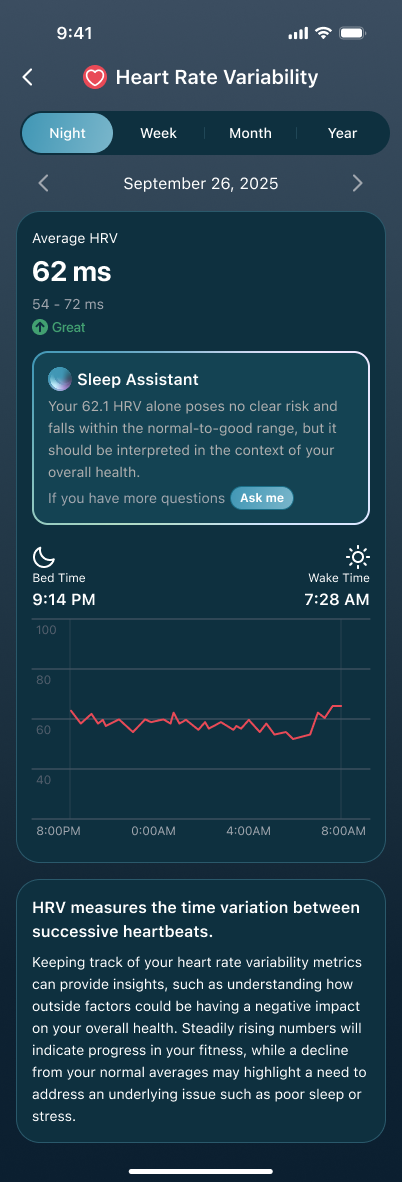
3.4 View Real-Time Data
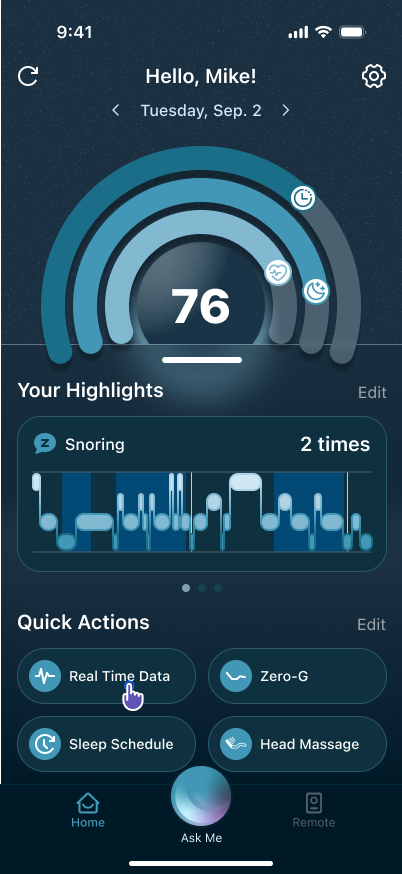
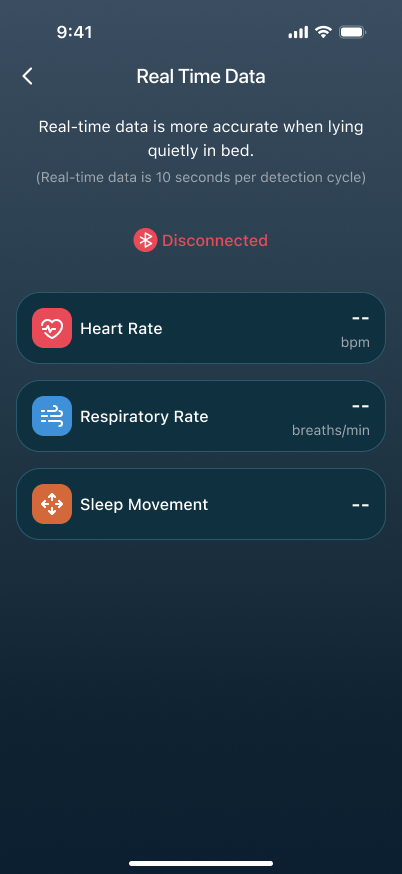
Want to see your live body data — heart rate, respiratory rate, body movement? Open Real-Time Data. This feature only appears in Quick Actions on the smart bed home screen.
- In Quick Actions on the home screen, tap Real-Time Data.
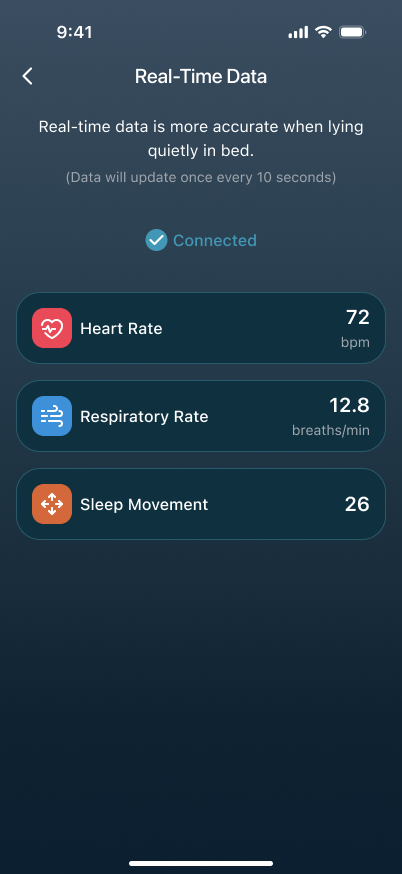
- Check the current readings in the live metrics area. The current version shows Heart Rate, Respiratory Rate, and Sleep Movement.
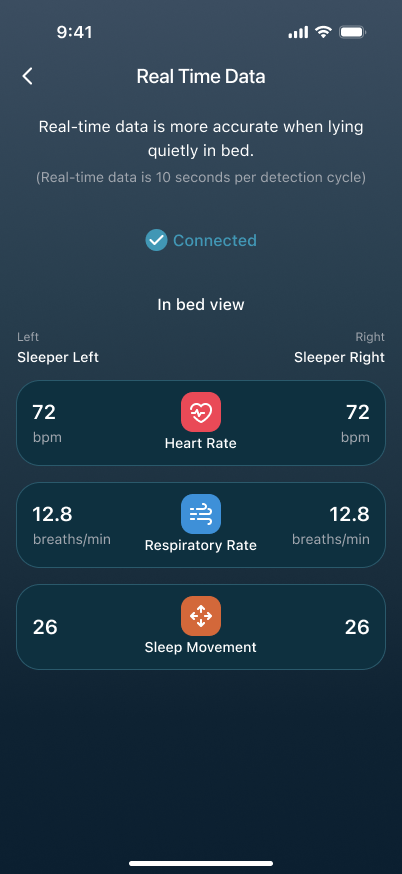
- If your bed supports dual-sleeper mode, the page shows data for both Sleeper Left and Sleeper Right.
- If it shows disconnected, there won't be any live data. Go back to the home screen, check the connection, and try again.
3.5 Use the Remote
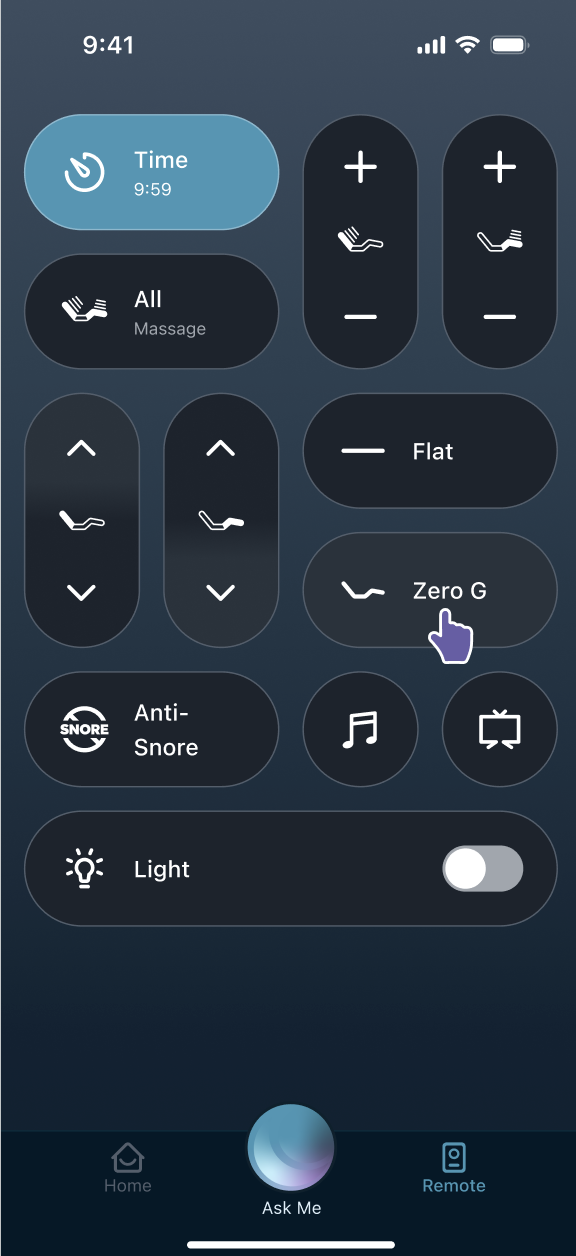
The Remote page lets you directly control your bed: positions, massage, presets, and lighting. Available controls vary by bed model — the page shows what's available for your current bed.
- Open Remote from the bottom navigation.
- If connected, just use the buttons on screen. Available controls may differ by bed model.
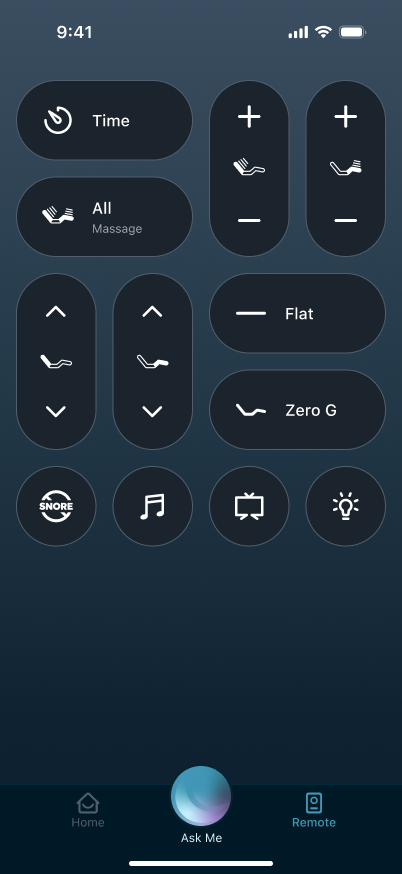
- If it shows disconnected, go back to the home screen, reconnect the bed, then return to Remote.
3.6 Use Sleep Schedule
Want the bed to automatically adjust positions, start massage, or turn on lighting at set times? Set up a Sleep Schedule. You can create a repeating weekly schedule or a one-time schedule for tomorrow only.
If both a weekly schedule and a tomorrow-only schedule exist, the system runs the tomorrow-only one first. The temporary schedule runs once; then future dates go back to the weekly plan.
3.6.1 Open Sleep Schedule
Open Sleep Schedule from Quick Actions.
3.6.2 Use a Weekly Sleep Schedule
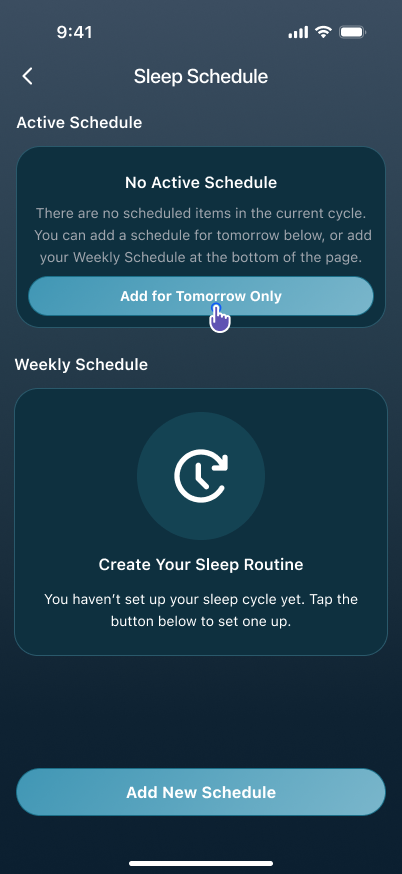
- On the Sleep Schedule page, review the Active Schedule and Weekly Schedule sections.
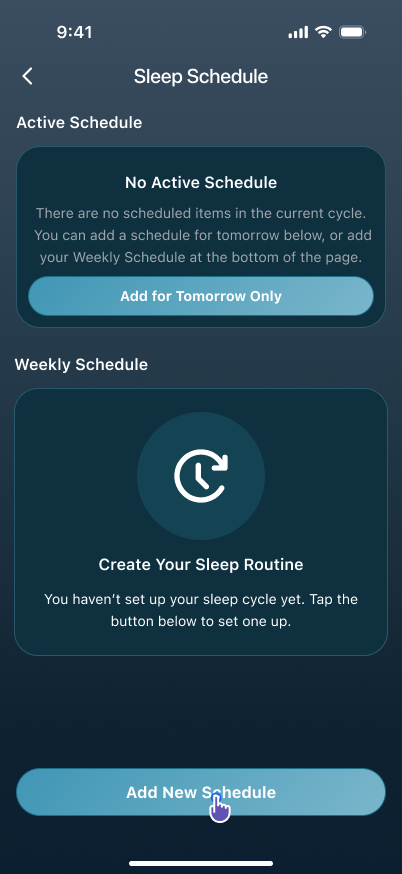
- Tap Add New Schedule and choose the days it applies to. A Bluetooth smart bed keeps a single weekly schedule; a Wi-Fi smart bed can have a separate schedule for each day, up to seven.
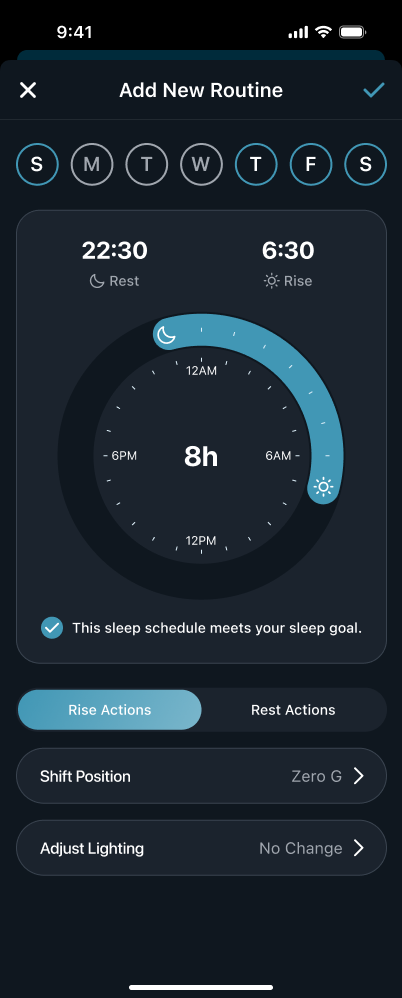
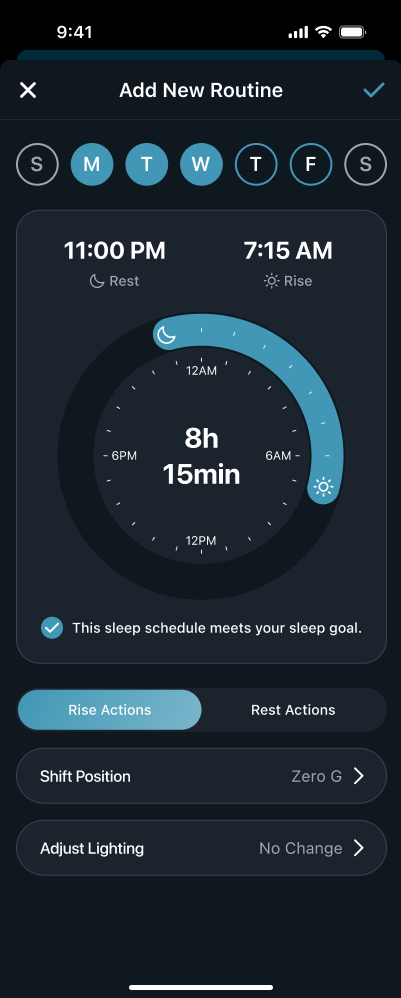
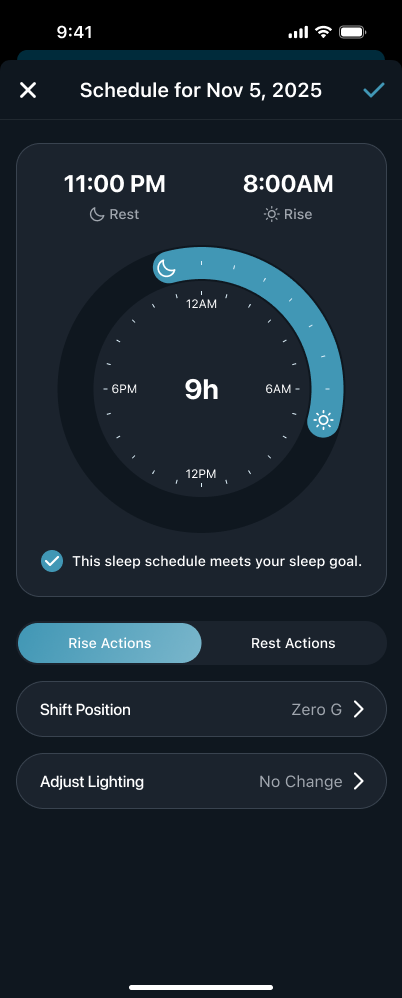
- On the edit page, set Rest Actions and Rise Actions (positions, massage, lighting, etc.), then save. The bed will repeat these actions at your chosen bedtime and wake-up time.
3.6.3 Set a One-Time Schedule for Tomorrow Only
- Just want to change tomorrow? Tap Add for Tomorrow Only or Change for Tomorrow Only.
- Set the Rest Actions and Rise Actions for tomorrow, then save. The system runs this one-time schedule tomorrow only. If there's also a weekly schedule, the one-time plan takes priority.
4. Adjustable Bed
This chapter is all about adjustable beds. An adjustable bed doesn't need an account — once it's connected, you're ready to go, and the focus is on quickly controlling positions, massage, and lighting, with Sleep Schedule and AI available too. If you have a smart bed, see Chapter 3 instead.
4.1 After You Connect
Adjustable beds don't require sign-up or sign-in. Once you've found the bed and confirmed the bed type in Chapter 2, the app goes straight to the home screen and you're ready to go.
Next, see to learn how to use each part of the home screen.
4.2 Adjustable Bed Home
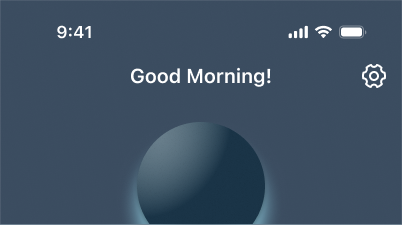
The adjustable bed home screen is all about quick control: positions, massage, lighting, and shortcuts. You won't see account features, Sleep Report, or Real-Time Data here, though Ask Me for Sleep Assistant is still available.
- Tap a feature in Quick Actions to control the bed directly.
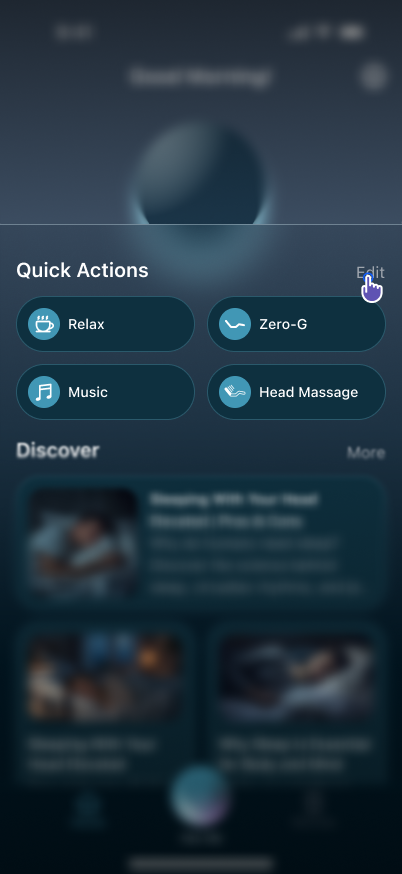
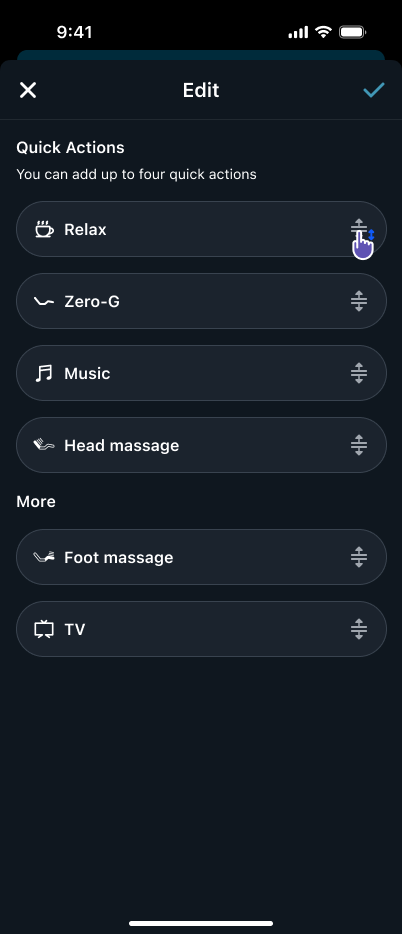
- To adjust what's shown, tap Edit on the right. On the Edit page, you can keep up to four quick actions and drag to reorder them.
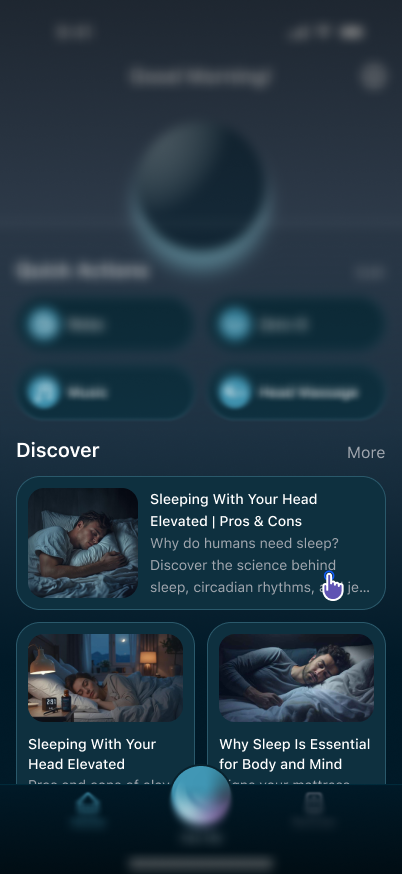
- Scroll down to Discover for sleep-related articles — tap any that catch your eye to read them right in the app.
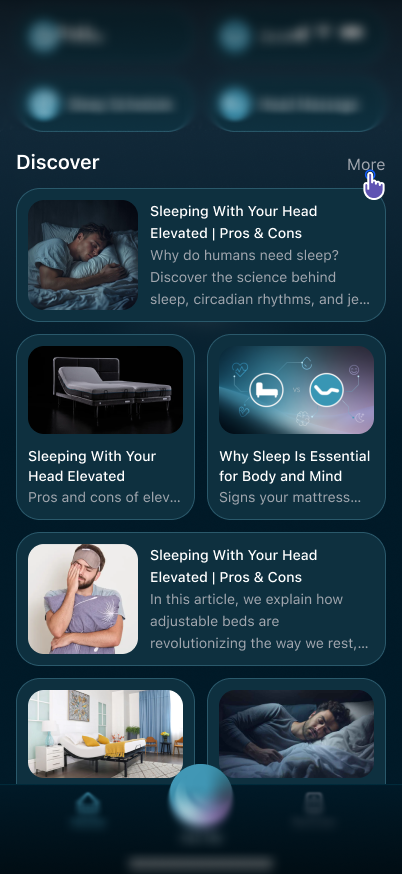
- Tap More to browse the full article list.
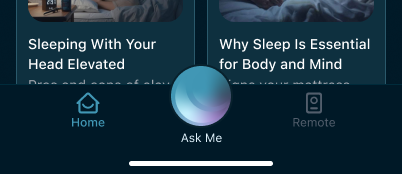
- For more controls (positions, massage, lighting, etc.), tap Remote in the bottom navigation.
- To view this bed's settings, tap the settings button in the upper right.
4.3 Use the Remote
The Remote page lets you directly control your bed: positions, massage, presets, and lighting. Available controls vary by bed model — the page shows what's available for your current bed.
- Open Remote from the bottom navigation.
- If connected, just use the buttons on the screen.
- If it shows disconnected, go back to the home screen, reconnect the bed, then return to Remote.
4.4 What You Can and Can't Do
Adjustable beds don't track sleep data and don't need an account, so some features won't appear in the app. Here's a quick reference.
Available
- Position, massage, and lighting controls: Quick Actions on the home screen, or Remote in the bottom navigation.
- Custom quick actions: tap Edit to the right of Quick Actions on the home screen — keep up to four and drag to reorder.
- Sleep Schedule: have the bed run position, massage, and lighting actions at set times — see for details.
- Discover sleep articles: scroll down on the home screen.
- AI Chat: ask Sleep Assistant a question via Ask Me on the home screen — see for details. Adjustable beds don't have Sleep Report, so the AI features related to sleep reports aren't available.
- This bed's settings: the settings button in the upper right of the home screen.
Not available
- Sign-up and sign-in: adjustable beds don't need an account.
- Sleep Report (sleep reports and history): adjustable beds don't track sleep data.
- Real-Time Data: same as above.
If you can't connect the bed, or the home screen shows it as disconnected, see .
5. AI Chat
AI Chat is a text-based assistant built into the app, available with both smart beds and adjustable beds. It helps you understand bed features, walks you through how things work, handles basic issues, and can take you to the right page when needed.
5.1 What AI Can Help With Right Now
Think of AI Chat as an always-available smart bed assistant. The current version is best at handling these types of questions:
- What a feature is — like a mode, preset, or sensor function
- How to use a feature — how to unlock, set up, or access something
- Basic troubleshooting — bed won't move, remote not responding, and other common issues
- Recognizing clear control requests and taking you to the right control page
- Explaining where sleep data comes from and guiding you to submit feedback
If your question is outside the current scope, AI Chat may direct you to human support or a feedback form.
5.2 Open AI Chat
AI entry points appear on the home screen and on metric detail pages.
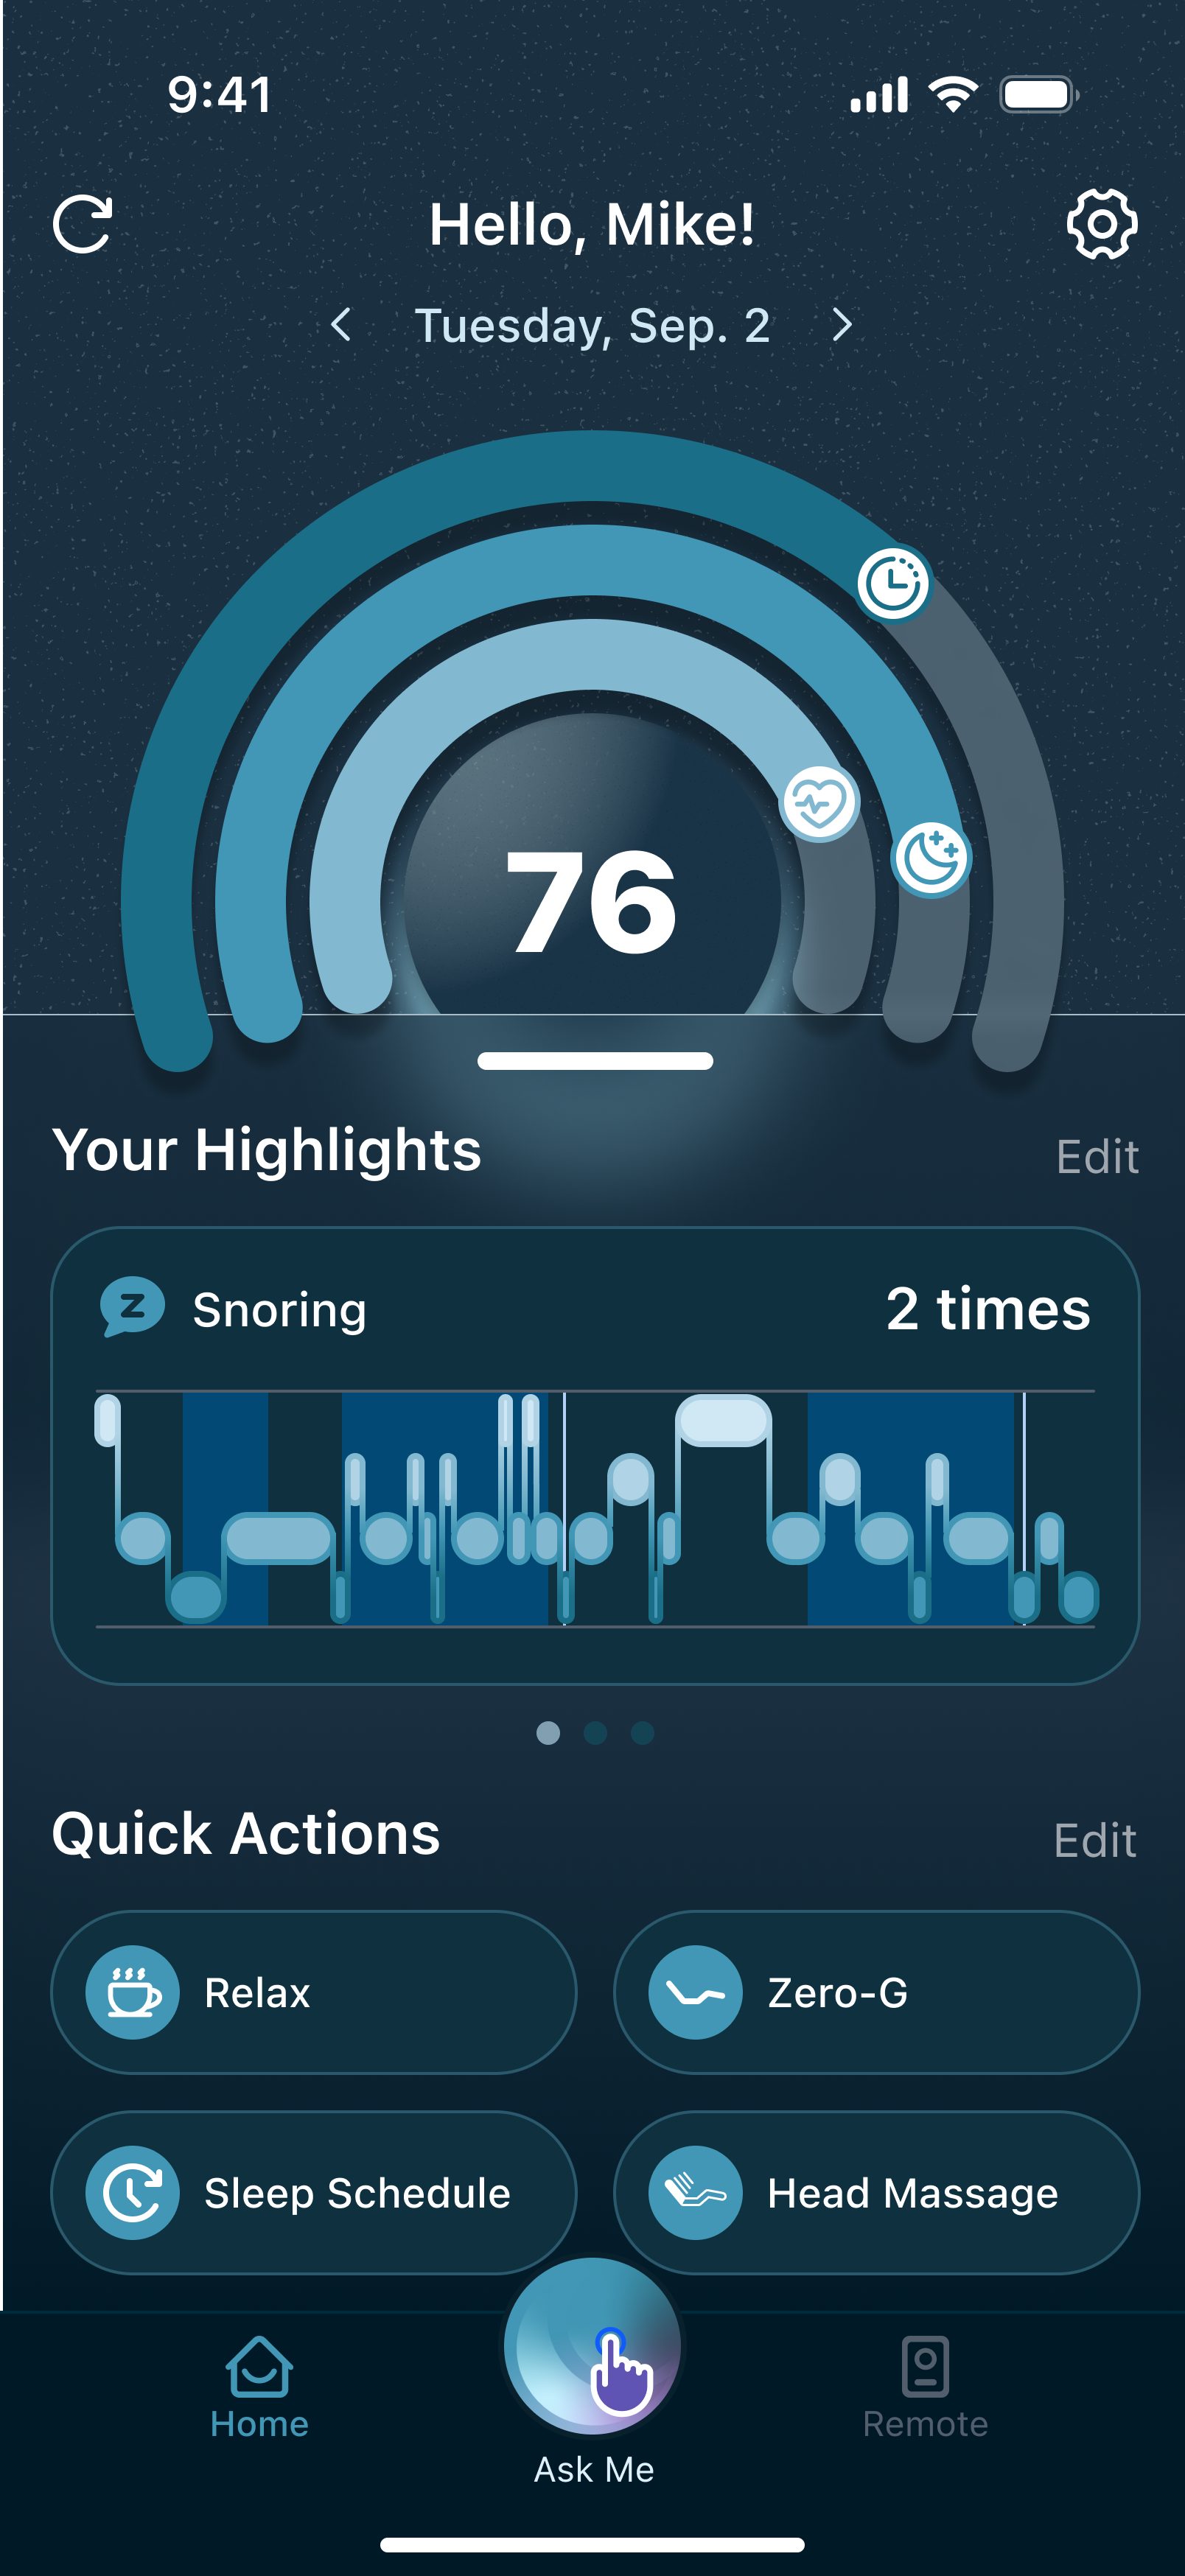
- On the home screen, tap Ask me at the bottom.
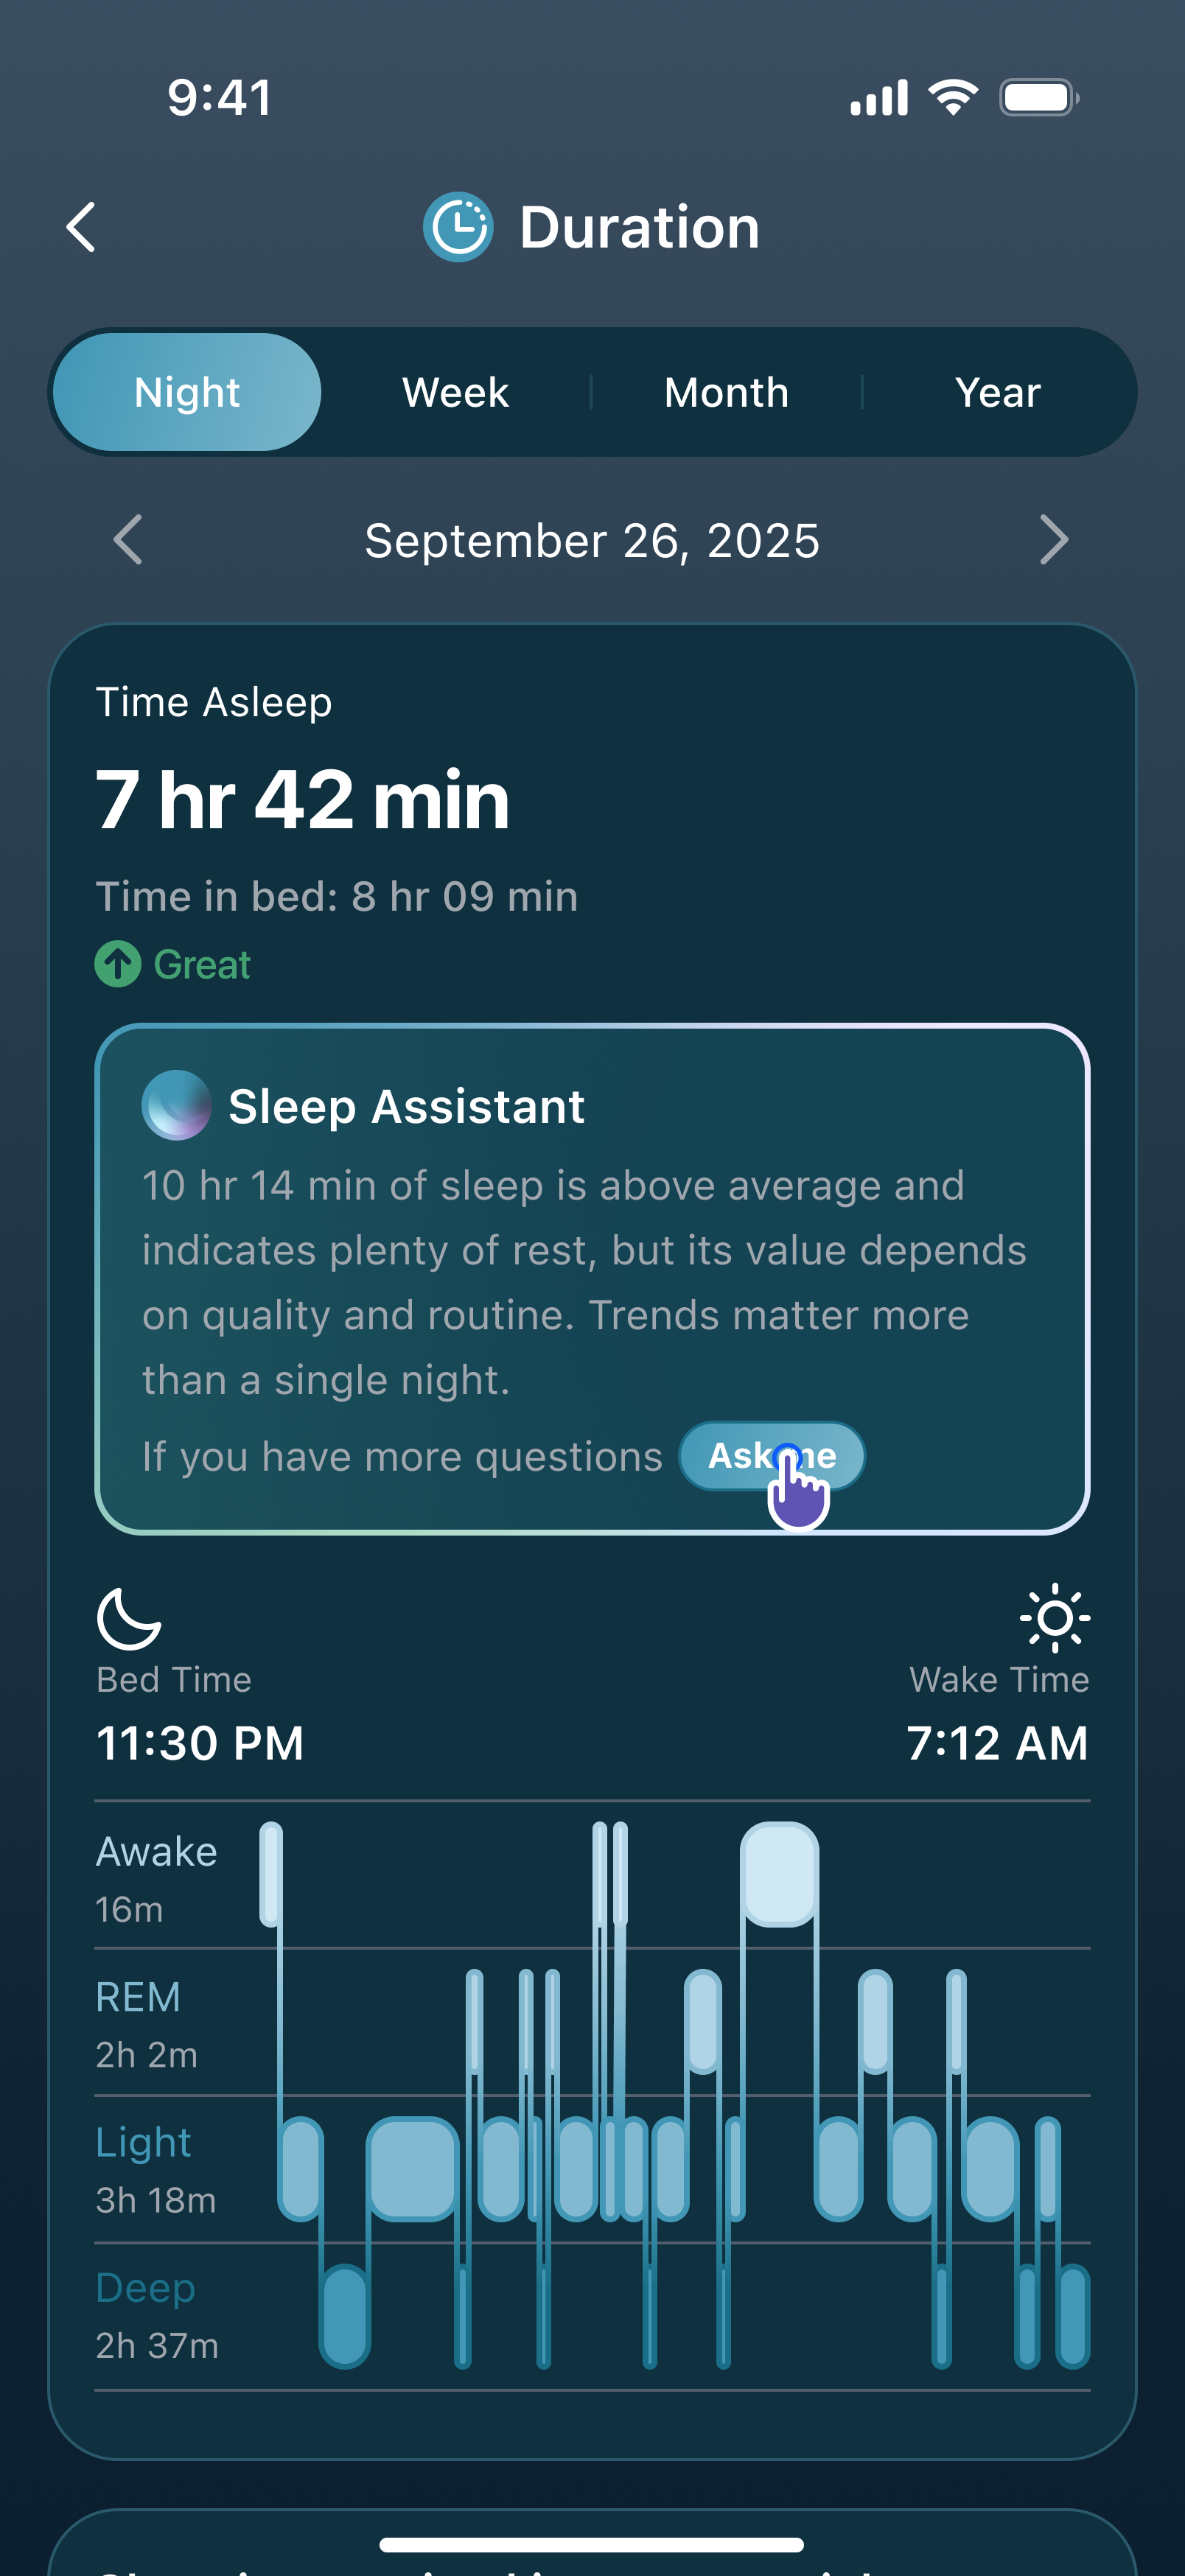
- On a metric detail page's daily view, tap Ask me.
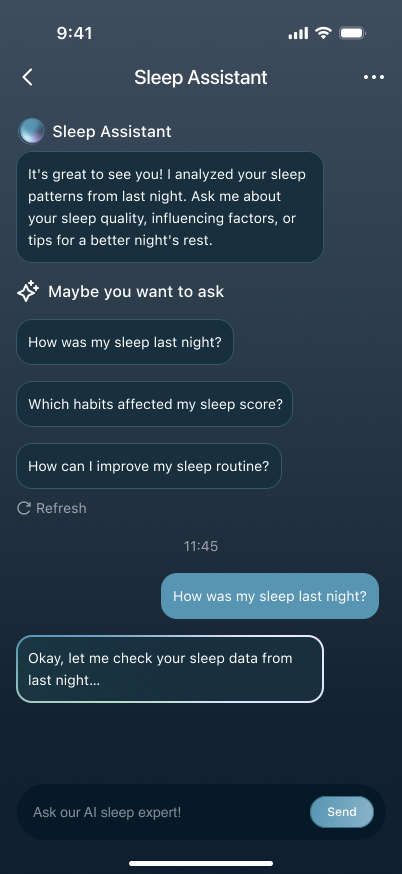
- Once inside, check out the suggested questions or existing recommendations.
5.3 Review AI Suggestions & Keep Asking
After opening AI Chat, start by looking at the suggestions, then decide if you want to ask more. When you do ask, try to be direct about what you want to do or what's going wrong.
- Look at the AI suggestions on the current page.
- If there are suggested questions, tap one to see the reply.
- To ask your own question, just type it in.
- Not sure how to phrase it? Just write the feature name, the issue you're seeing, or the action you want.
For example, you can ask:
- What is Auto Anti-Snore Intervention?
- How do I unlock Child Lock?
- Why does my base not respond to my remote?
- Go to zero gravity.
- Why is my sleep duration incorrect?
5.4 How AI Helps You
AI Chat responds differently depending on your question. Here's what you'll typically see:
- Ask how to do something — AI gives you step-by-step instructions.
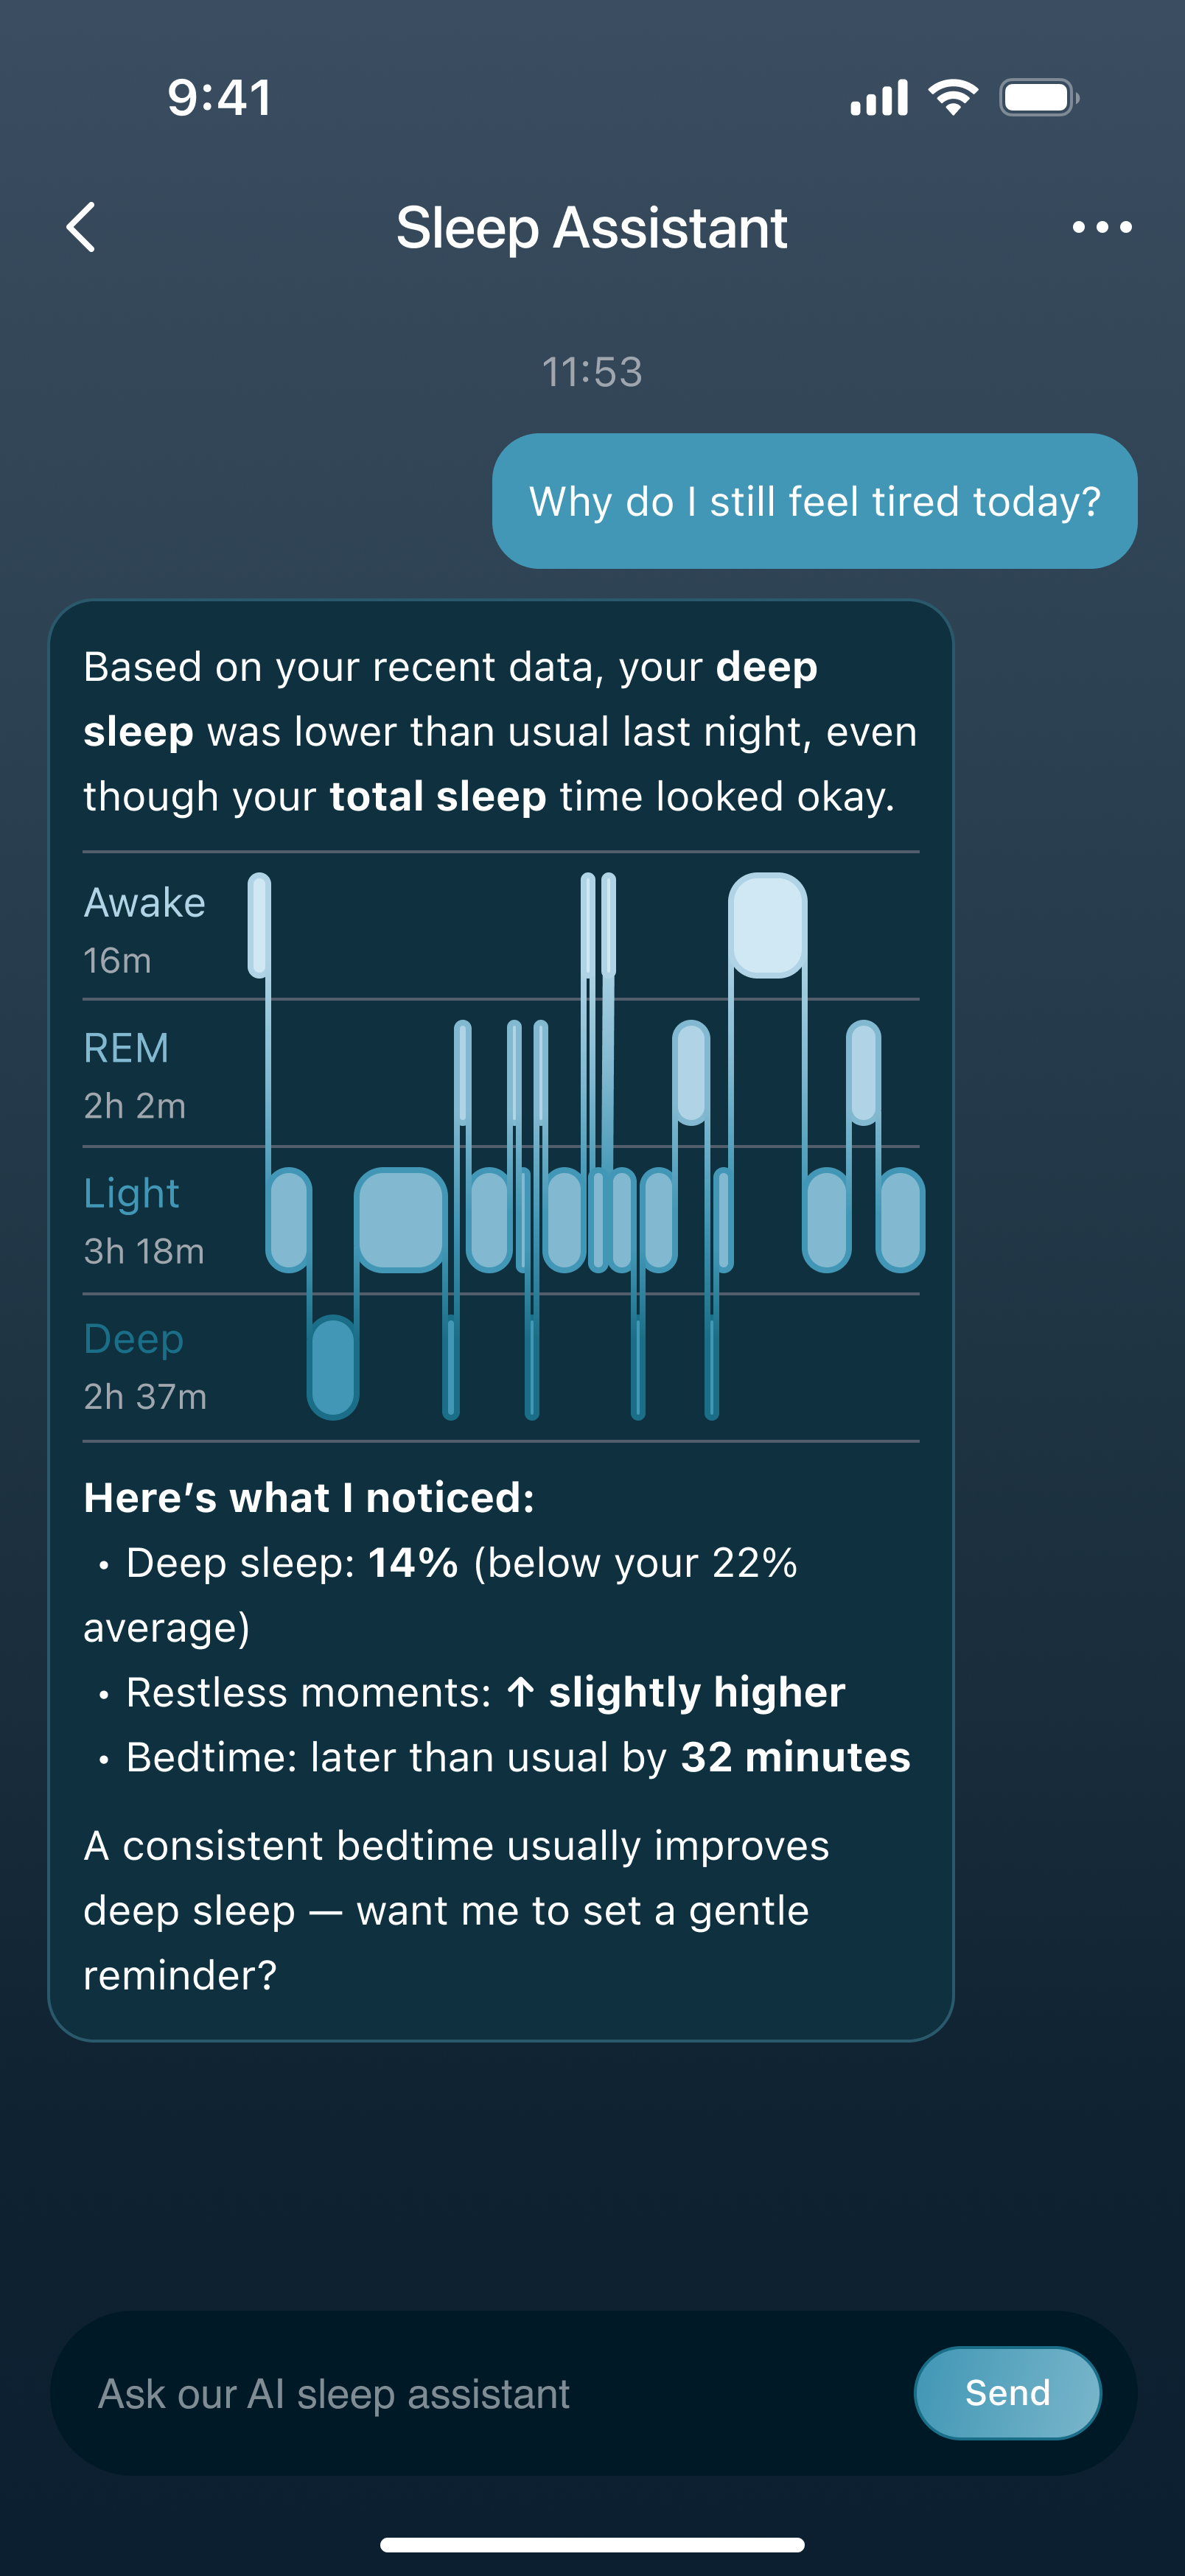
- Ask about a metric or related info — AI shows the relevant chart data.
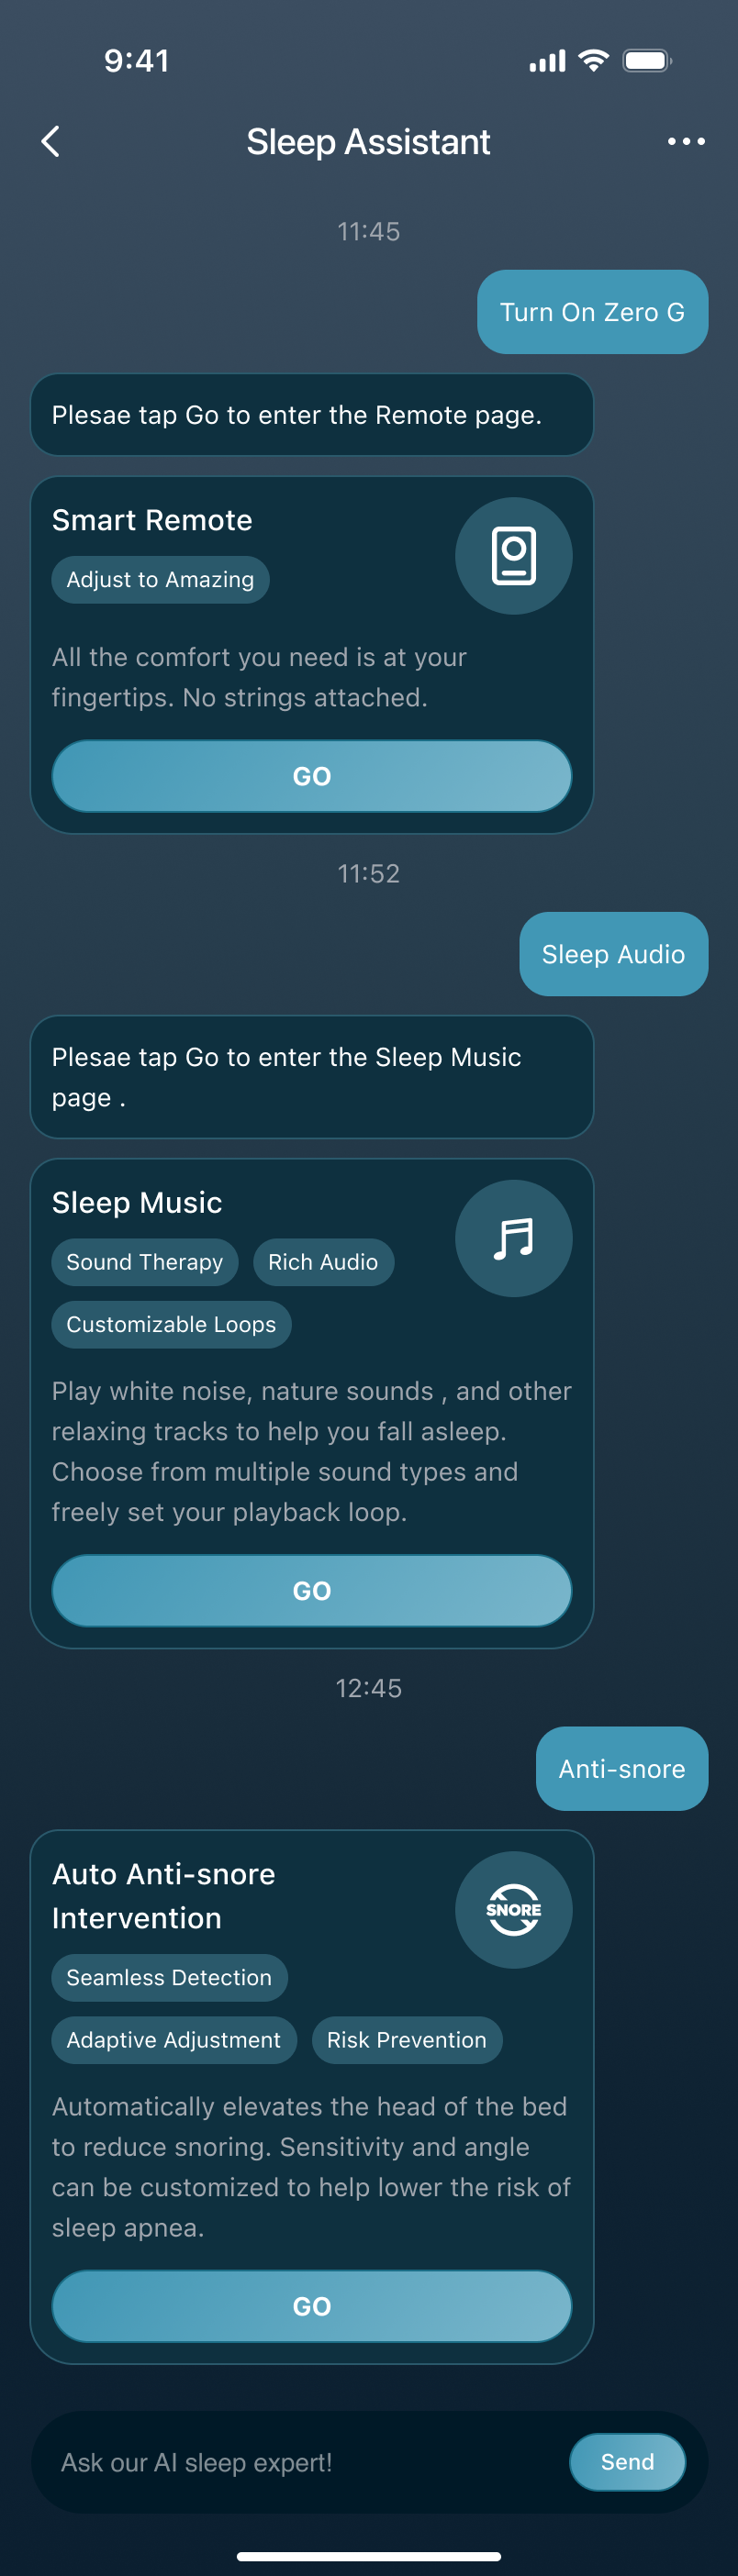
- Express a clear action (like moving the bed to a preset) — AI may show a feature card and guide you to the Remote page.
5.5 When to Use Human Support
AI Chat handles common questions, but it's not a full diagnostic tool. If the issue isn't resolved, the page may offer a human support link or feedback form.
You're better off reaching out to human support or submitting a feedback form when:
- The issue persists after following AI's troubleshooting steps
- The bed keeps failing to connect, won't move, or the same problem keeps coming back
- You need to submit a specific sleep data issue for further investigation or calibration
5.6 If Something Doesn't Look Right
If AI Chat only gives generic responses, or the answer doesn't match your situation, check these first:
- Are you connected to a smart bed?
- Does the current page have available data?
- Did your question clearly mention the feature name, the issue, or what you want to do?
If it's still not helpful, check first, then decide whether to switch to human support or a feedback form.
6. System Settings
Want to fine-tune your experience? This chapter covers bed settings, sleep preferences, health data connections, notifications, and the AI assistant's name.
6.1 Open Settings
Need to change bed settings, notifications, or account info? Start here. As long as you're signed in, the Settings page usually opens even if the bed is temporarily disconnected.
- On the home screen, tap Settings.
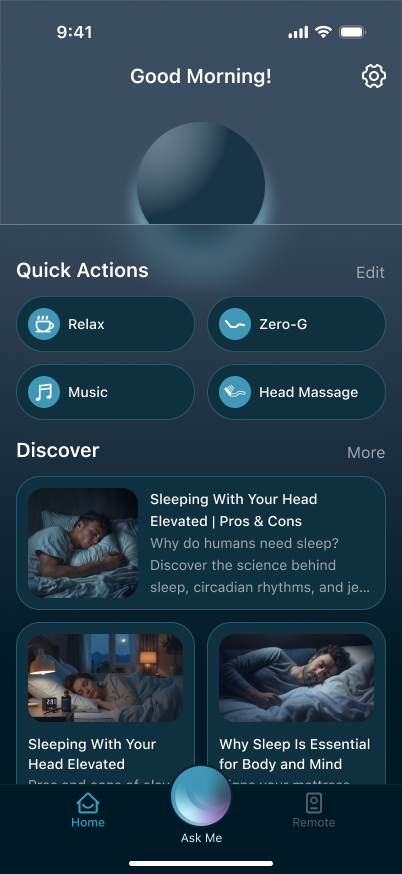
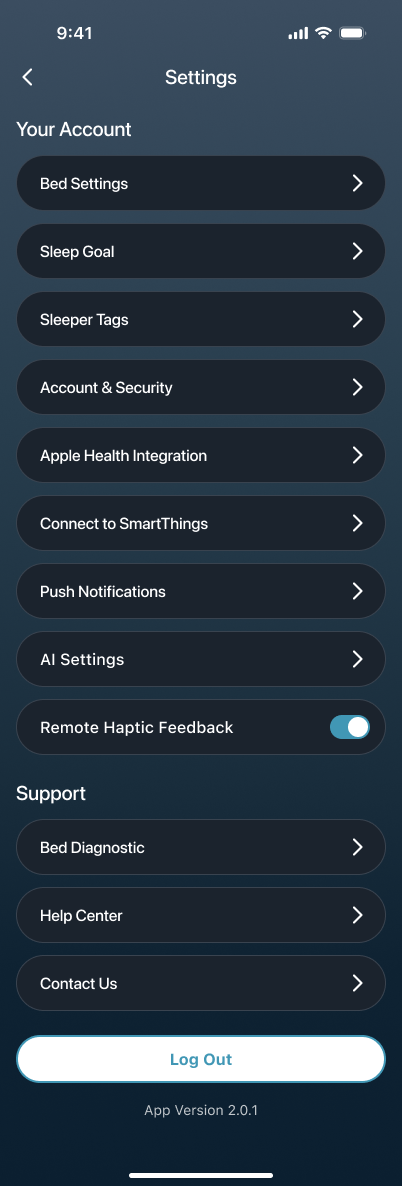
- From here you can change bed settings, adjust sleep goals, connect health data, manage notifications, or handle account-related items.
6.2 Manage Bed Settings
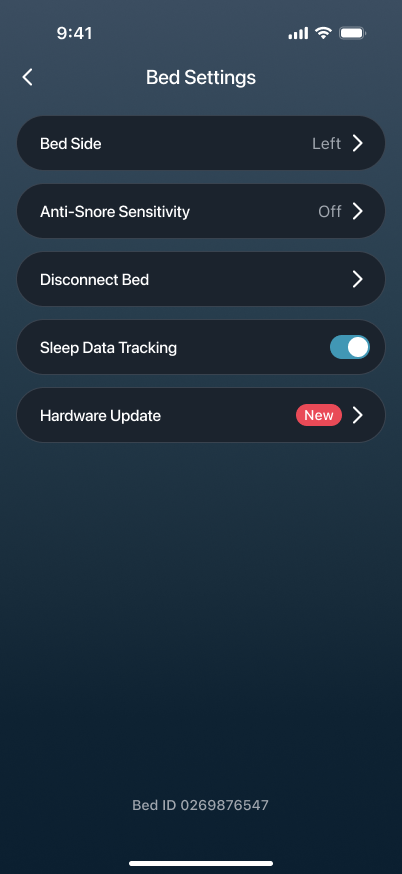
Bed Settings lets you view and change common settings for your current bed — bed side, anti-snore sensitivity, Sleep Data Tracking, disconnection, and hardware updates.
6.2.1 Open Bed Settings
You'll see the most-used settings for your current smart bed. Confirm which bed you're working with, then decide what to change.
- On the Settings page, tap Bed Settings.
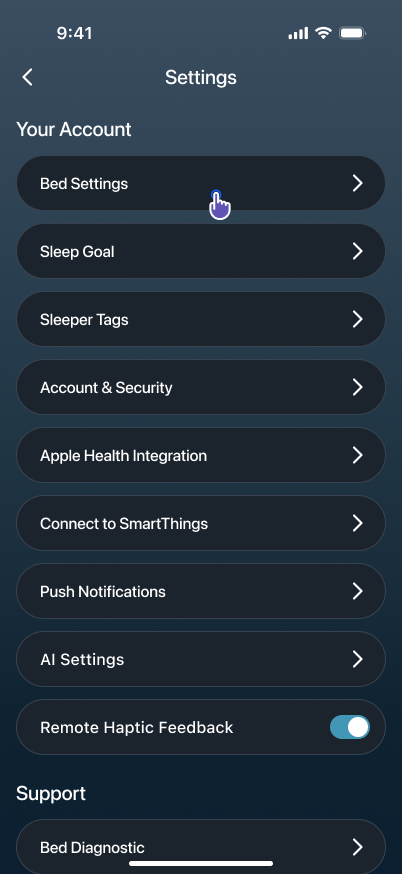
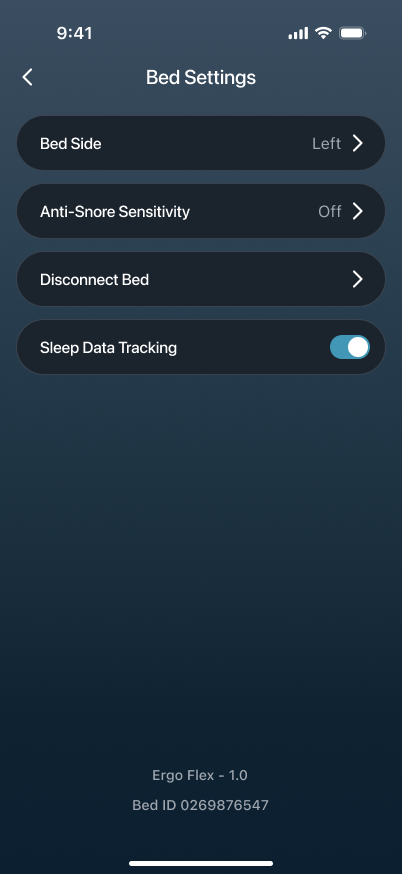
- The page shows Bed Side, Anti-Snore Sensitivity, Disconnect Bed, and Sleep Data Tracking; Hardware Update appears only when an update is available. The Bed ID near the bottom lets you verify which bed you're managing.
6.2.2 Change Bed Side
The sleeping side doesn't match the current setting? Change it here. Getting this right makes side-related settings and data more accurate.
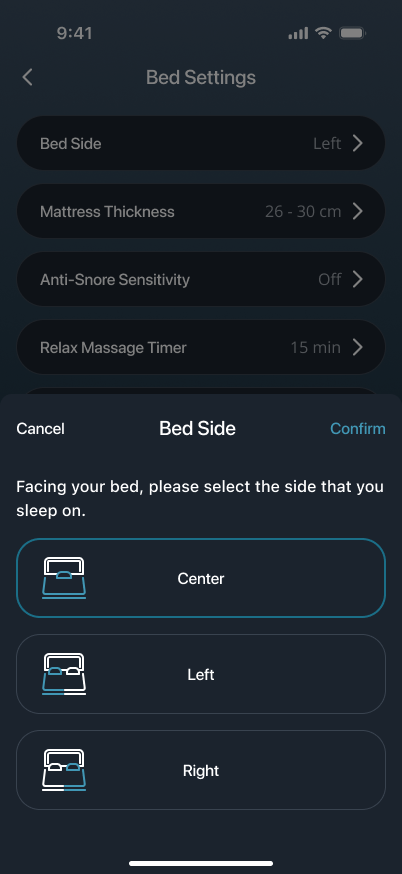
- Tap Bed Side.
- In the panel, choose Center, Left, or Right.
- Tap Confirm to save.
6.2.3 Adjust Anti-Snore Sensitivity
Want the bed to respond faster when snoring is detected? Adjust the sensitivity here. If you'd rather not use it for now, just turn it off.
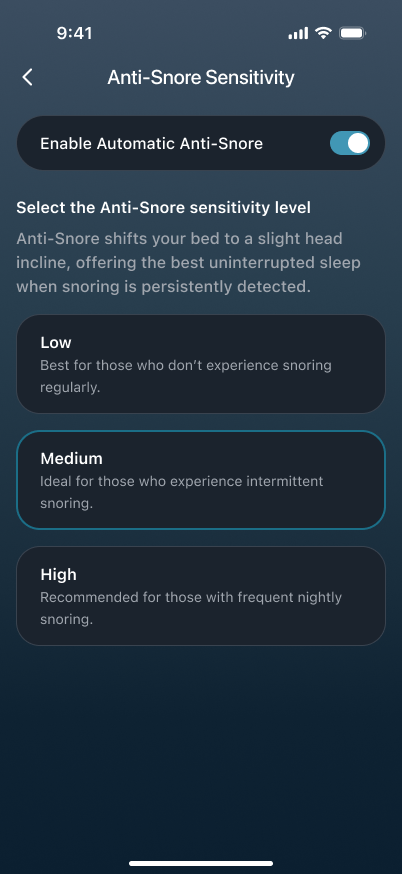
- Tap Anti-Snore Sensitivity.
- Use the Enable Automatic Anti-Snore toggle to turn it on or off.
- If it's on, choose Low, Medium, or High.
6.2.4 Control Sleep Data Tracking
To keep seeing new sleep data in the app, keep Sleep Data Tracking on. If you turn it off, existing data stays, but new data won't sync.
- Stay on the Bed Settings page.
- Toggle Sleep Data Tracking on or off.
When off, the app stops recording new sleep data. When you turn it back on, only future data will continue syncing.
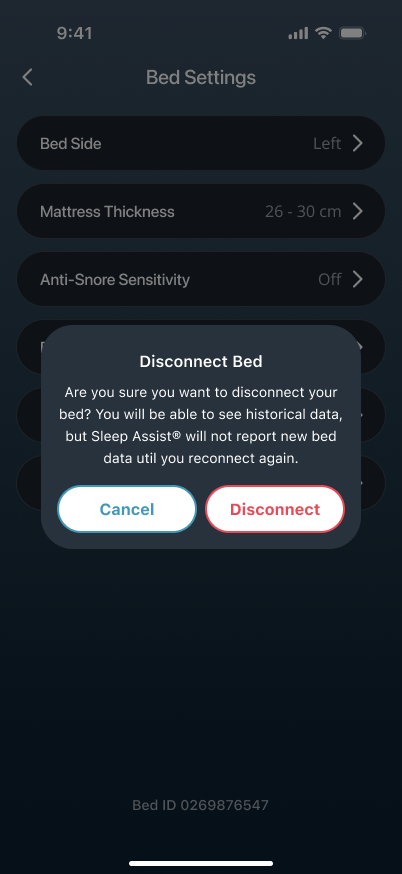
6.2.5 Disconnect the Current Bed
No longer using this bed, or switching to a different one? Disconnect it here. Your account can usually still see historical data, but no new bed data comes in until you reconnect.
- Tap Disconnect Bed.
- Review the prompt in the confirmation dialogue.
- All good? Tap Disconnect.
6.2.6 Install a Hardware Update
See "New" here? That means a hardware update is available for the bed. Updates usually fix issues or add capabilities. Once it starts, stay near the bed until it's done.
- Tap Hardware Update.
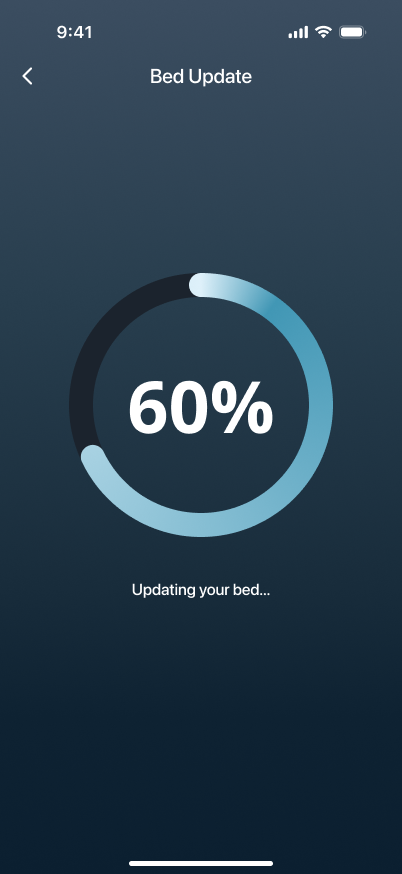
- In the Bed Update dialogue, tap Update Now.
- Stay near the bed and wait for the progress to finish.
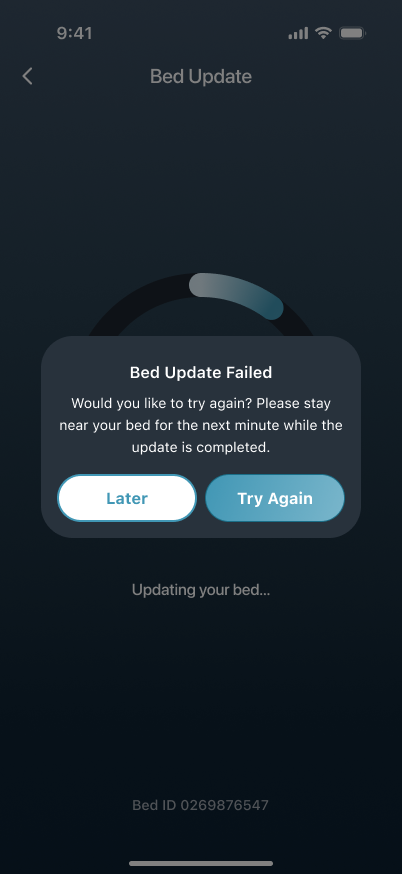
- If the update fails, tap Try Again to retry or Later to come back to it.
6.3 Sleep Goal
Want the app's recommendations to better match your routine? Set your Sleep Goal here — target sleep duration, sleep type, and improvement priority.
6.3.1 Set Target Sleep Duration
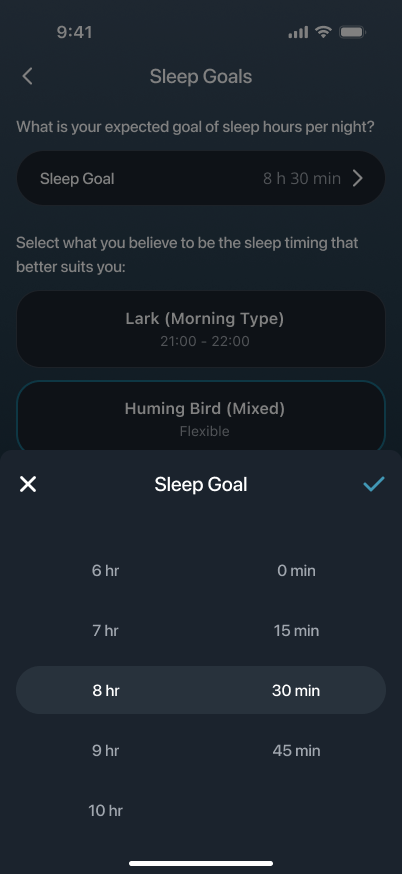
Adjust how long you want to sleep each night. Once set, sleep-related features will align with your goal.
- On the Settings page, tap Sleep Goal.
- Choose your preferred sleep duration.
6.3.2 Set Sleep Type & Improvement Priority
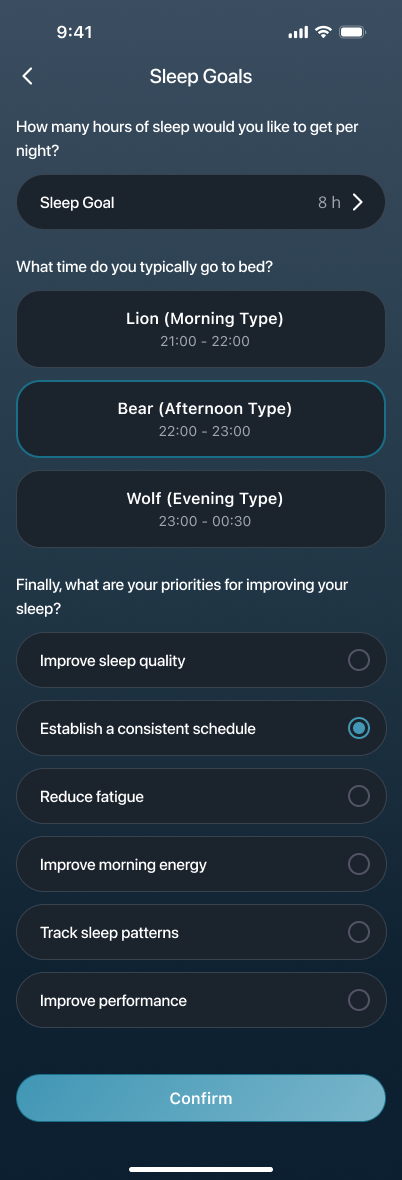
Help the app understand your routine and what matters most to you. Don't overthink it — just pick what's closest.
- Choose the sleep type that fits you best — Lion, Bear, or Wolf.
- Choose the improvement goal you want to focus on right now.
- Tap Confirm to save.
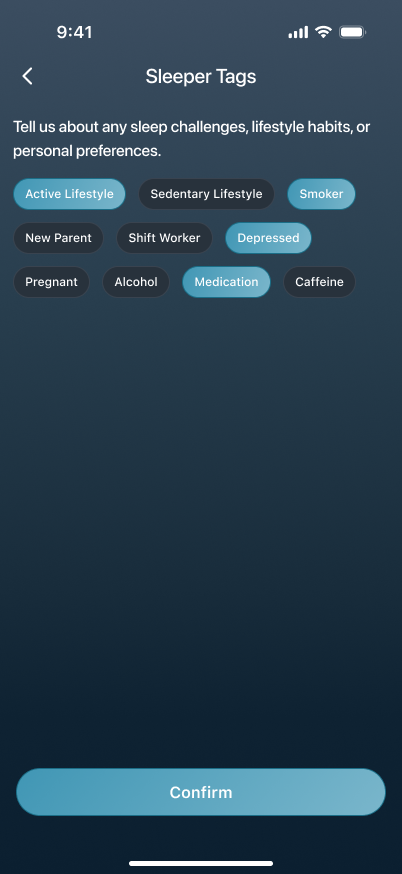
6.4 Sleeper Tags
Want to share your sleep habits, lifestyle, and preferences? Add them here. The closer these match you, the more relevant your content and suggestions will be.
- On the Settings page, tap Sleeper Tags.
- Pick the tags that fit — lifestyle habits, sleep challenges, or personal preferences.
- Tap Confirm to save.
6.5 Health Data Integration
Want to sync Sleep Assist® data to your phone's health platform? Turn on the matching integration here. Currently supported: Apple Health Integration on iPhone, plus Health Connect and Samsung Health Integration on Android. Turning off an integration only stops future syncing — historical data already written stays intact.
6.5.1 iPhone: Apple Health Integration
- On the Settings page, tap Apple Health Integration.
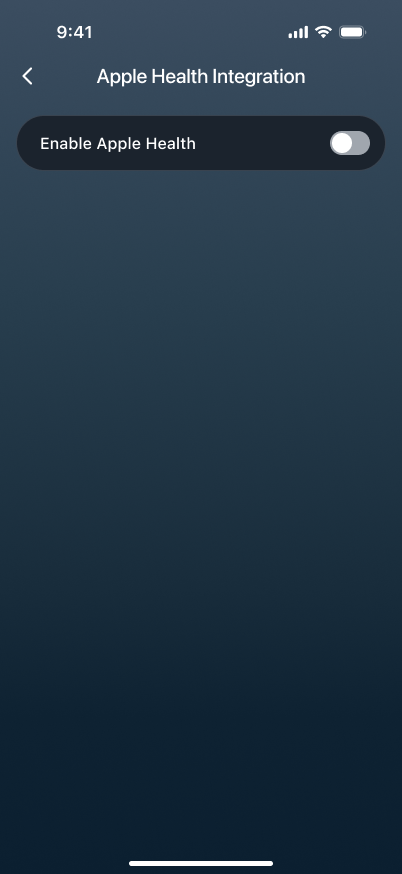
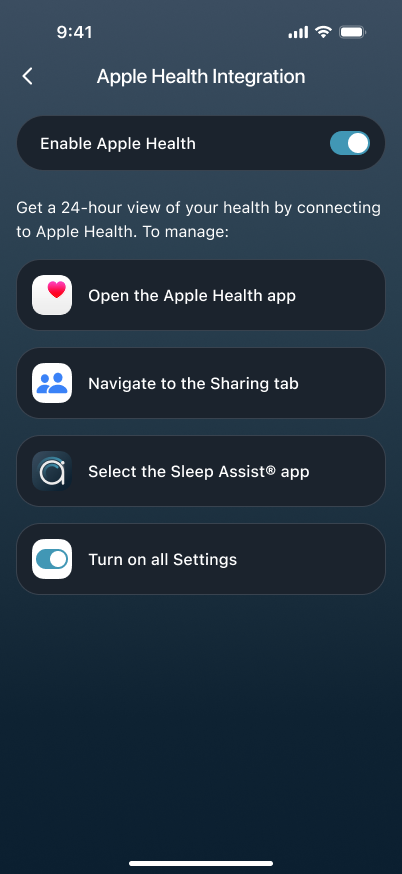
- On the Apple Health authorization page, turn on the permissions you need and tap Allow.
- Once enabled, the page shows the active state. If you later turn it off, no new data gets written, but what's already there stays.
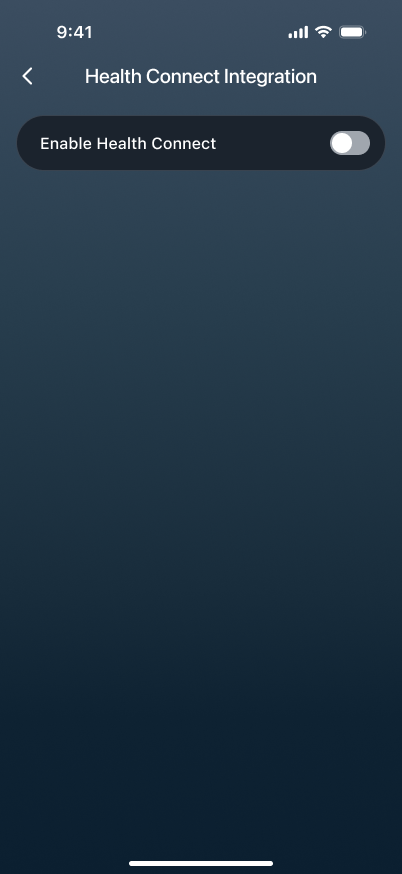
6.5.2 Android: Health Connect
If your phone supports Health Connect, use this to sync health data.
- On the Settings page, tap Health Integration, then tap Health Connect Integration.
- Turn on Enable Health Connect.
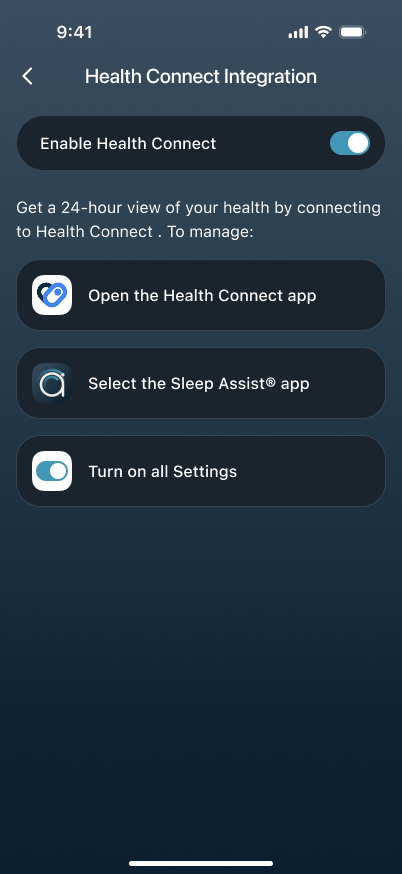
- Follow the on-screen prompts. Tap Open the Health Connect app, find the Sleep Assist® app, and complete authorization.
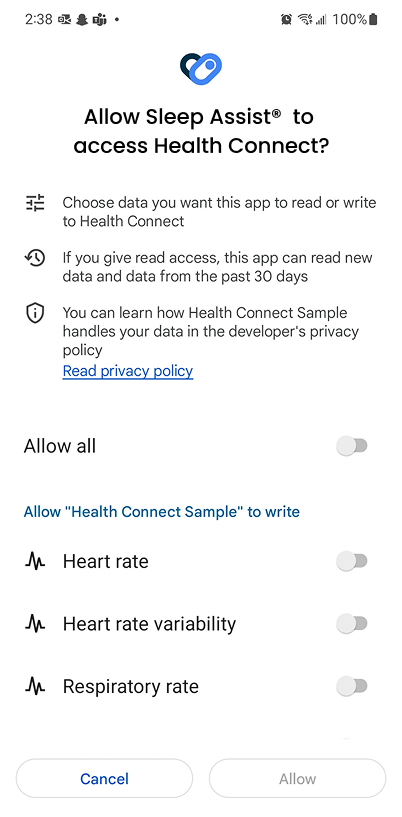
- On the Health Connect permissions page, turn on the read/write permissions you need, then return to the app.
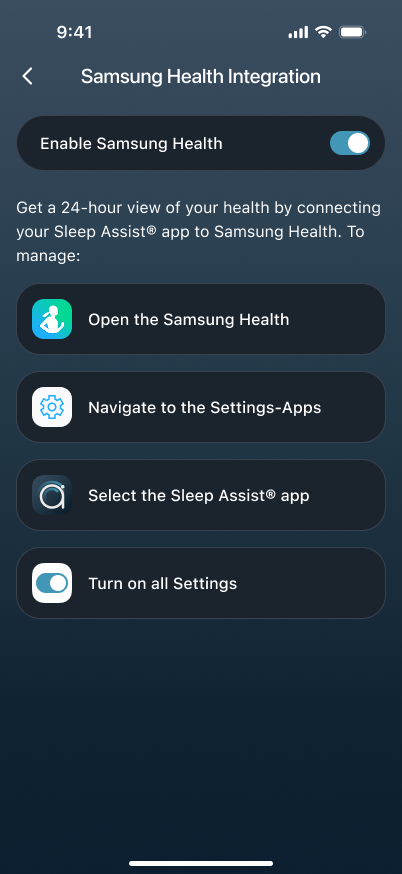
6.5.3 Android: Samsung Health Integration
Using Samsung Health? Complete authorization and turn on syncing here.
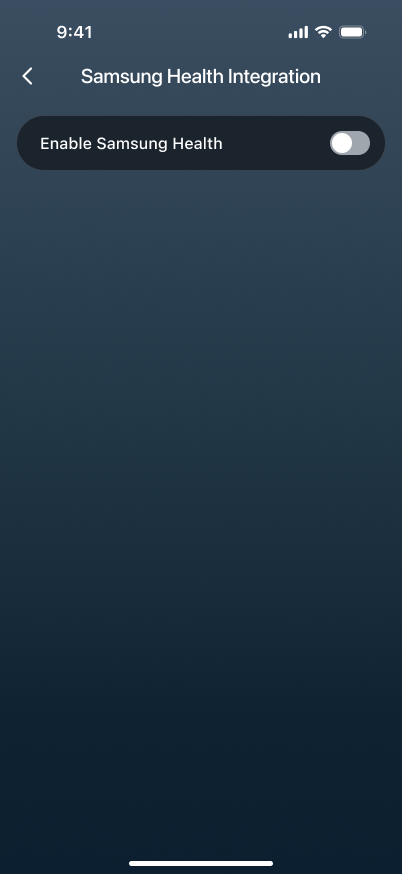
- On the Settings page, tap Health Integration, then tap Samsung Health Integration.
- Turn on Enable Samsung Health.
- Tap Open the Samsung Health app, go to Settings > Apps, and select the Sleep Assist® app to authorize.
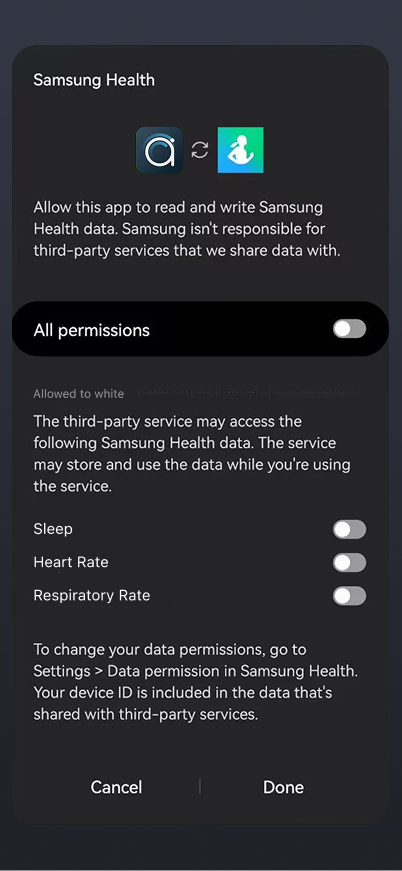
- On the Samsung Health permissions page, turn on the permissions you want to share, then tap Done.
6.6 Push Notifications
Want to adjust your reminders? Configure notifications here — morning and evening reminders, sync alerts, and email sleep reports.
6.6.1 Turn On Notification Permission
If your phone's notification permission isn't on, none of the reminders below will work. Best to take care of this first.
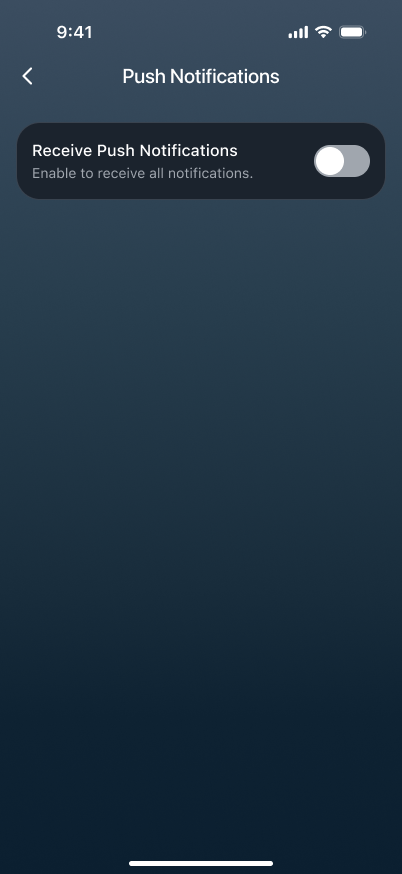
- On the Settings page, tap Push Notifications.
- Turn on Receive Push Notifications. If a system prompt appears, tap Allow. If not, go to your phone's system settings to enable notifications.
6.6.2 Set Morning Reminders
Want a reminder each morning to check your sleep report? Set it here.
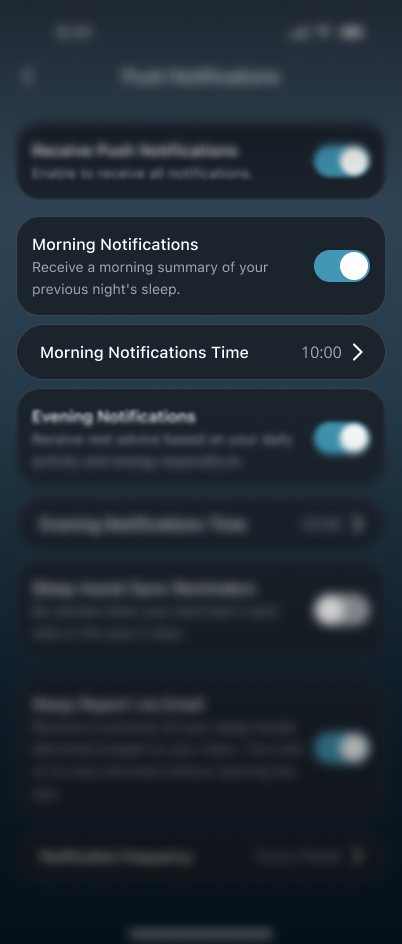
- Turn Morning Notifications on or off as needed.
- Choose the reminder time in Morning Notifications Time.
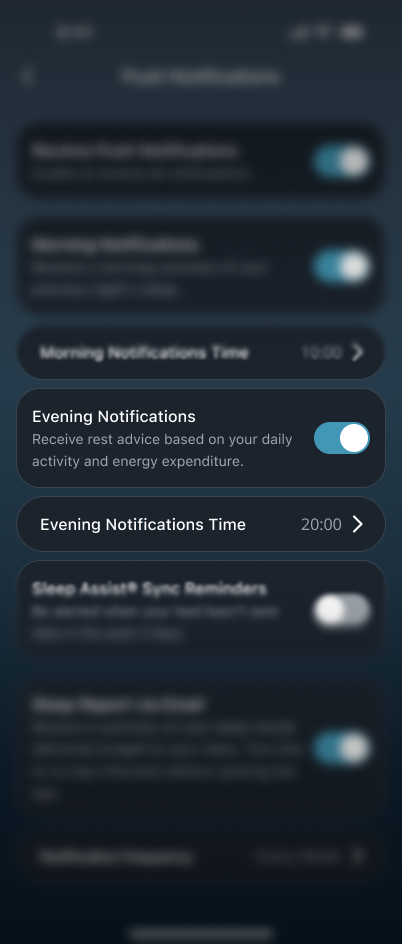
6.6.3 Set Evening Reminders
Want a nudge in the evening to wind down? Set it here. Great for building a more consistent routine.
- Turn Evening Notifications on or off as needed.
- Choose the reminder time in Evening Notifications Time.
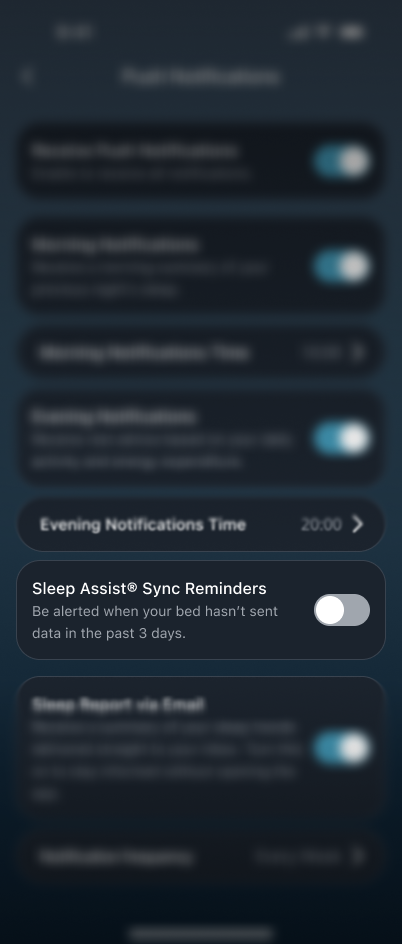
6.6.4 Set Sync Reminders
Worried the bed might go days without syncing? Turn this on to catch long gaps early.
- Turn on Sleep Assist Sync Reminders.
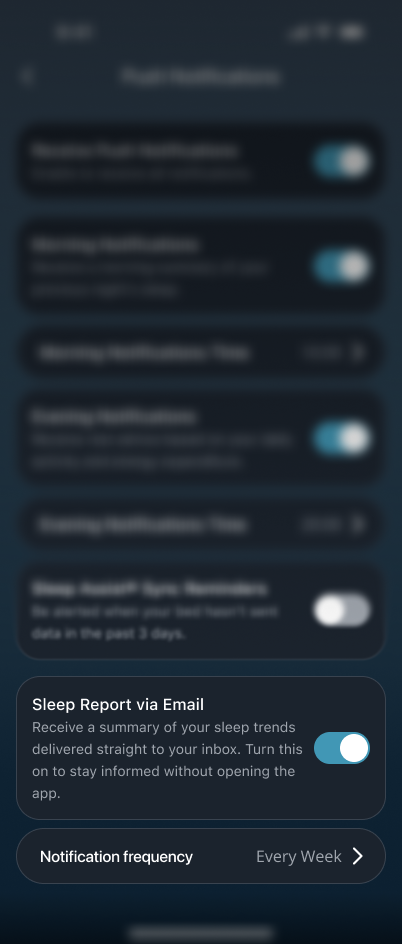
6.6.5 Set Email Reports
Prefer getting your sleep report by email? Turn this on and pick a frequency — the system sends reports on schedule.
- Turn on Sleep Report via Email.
- Choose the frequency in Notification frequency.
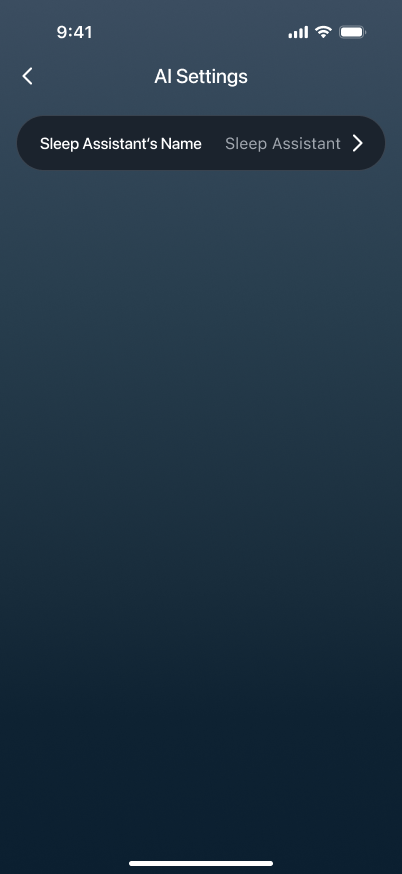
6.7 AI Settings
Want to change the AI assistant's display name in AI Chat? Adjust it here.
- On the Settings page, tap AI Settings.
- Tap Sleep Assistant's Name.
- Enter the name you'd like to use.
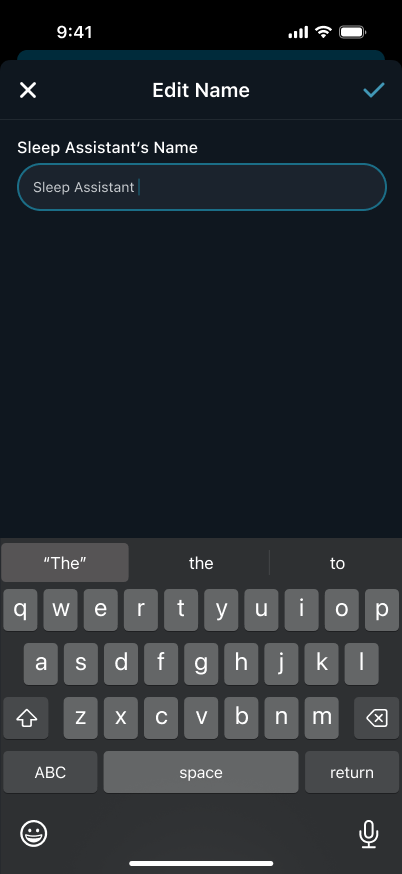
- Save and go back. The new name will show up in AI Chat.
7. Account & Security
This chapter covers your account. If you used a previous app, start by migrating your old account. You can also change your nickname, units, height, or weight, manage sleep data and sharing, turn on Face ID sign-in, change or recover your password, and switch accounts or sign out. If you're thinking about deleting your account, read this chapter first to understand what happens.
7.1 Migrate an Account from an Older App
Used one of Ergomotion's older apps (Sleep Assist®, ErgoSportive, or Dawn House)? There's no separate migration option to look for. Sign in or sign up with the email you used before, and the app recognizes your previous account and walks you through migrating it. (If your old Dawn House account signed in with Google, Apple, or Facebook, the app can't recognize it automatically — see 6.1.3.)
The migration dialogue appears over the current page in either of these cases:
- After entering your old email and password on the Sign In page and tapping Sign In.
- After registering with your old email on the Sign Up page and tapping Sign Up.
If no previous account is found, the dialogue never appears — just continue signing in or signing up as usual.
7.1.1 Choosing What to Do in the Migration Dialogue
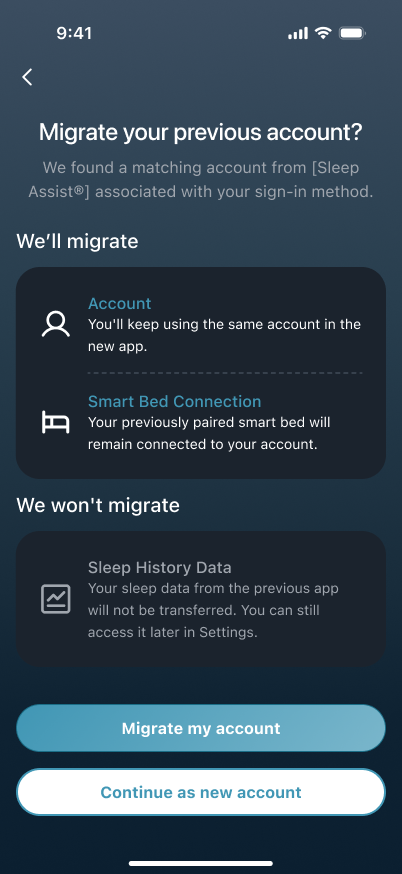
The dialogue is titled Migrate your previous account? and names the older app your account was found in. It also spells out the scope:
- Migrated: your account and the smart beds paired with it.
- Not migrated: your name and your sleep history (still viewable after migrating — see 6.1.5).
You have two choices:
- Migrate my account: bring your old account over and continue with the steps in 6.1.2.
- Continue as new account: skip migration and create a brand-new account with the same email (or the same Google/Apple identity). Your old account and its data stay untouched — but this can't be undone, and the dialogue won't appear again.
Want to decide later? Close the dialogue (the close button, a tap outside it, or the system back gesture). Your email and password stay filled in, and the dialogue appears again the next time you submit.
7.1.2 Migrating with Email
Triggered from an email sign-in or sign-up, migration takes at most five steps:
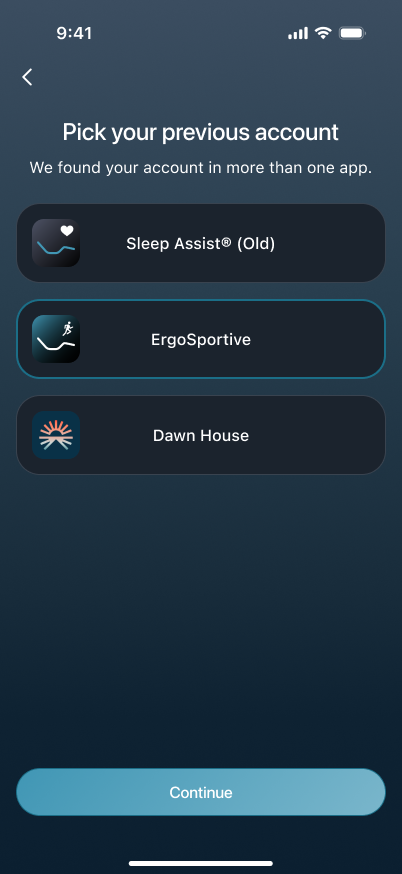
- Choose the older app. This step only appears when your account is found in more than one older app — otherwise it's skipped. Select the one to migrate and tap Continue.
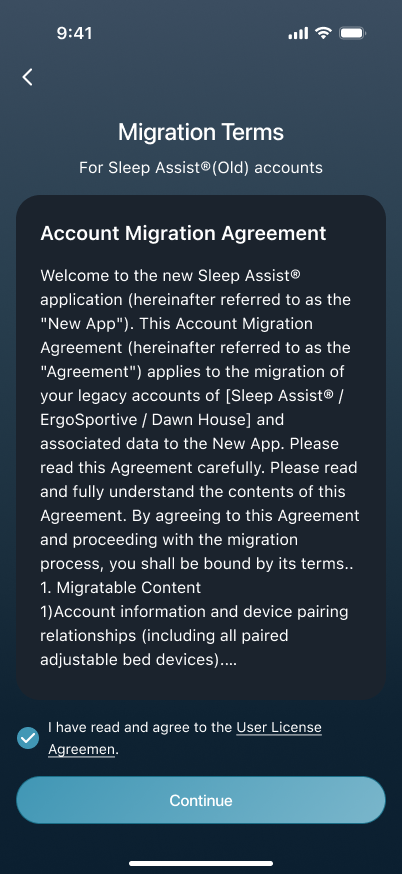
- Read the Migration Terms, check to agree, and tap Continue.
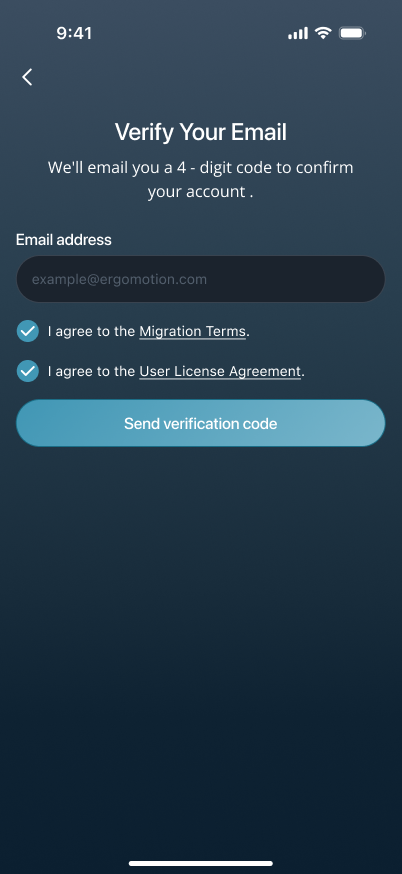
- Confirm your email — it's pre-filled with the one you just used and can't be edited. Check both Migration Terms and Privacy Policy, then tap Send Code.
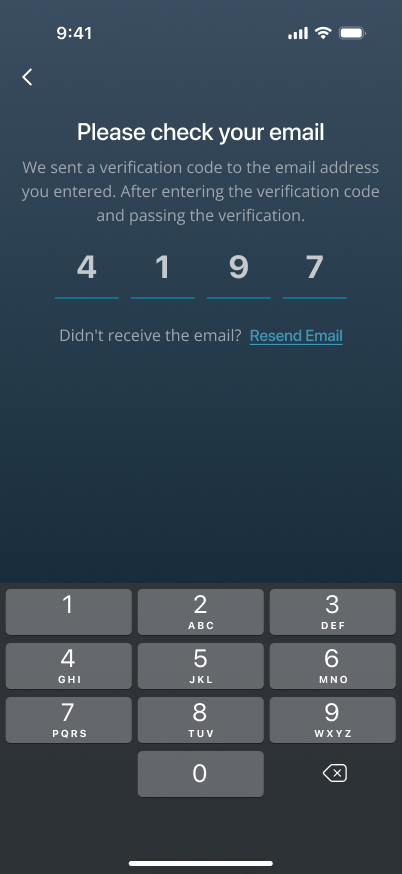
- Enter the 4-digit code from your email. A correct code advances automatically; a wrong one turns the field red and clears it for another try. If nothing arrives, tap Resend Email after the countdown ends.
- Set a new password — at least 8 characters with one special character (!@#$%), entered the same way twice (your old password isn't carried over). Tap Submit & Migrate to finish.
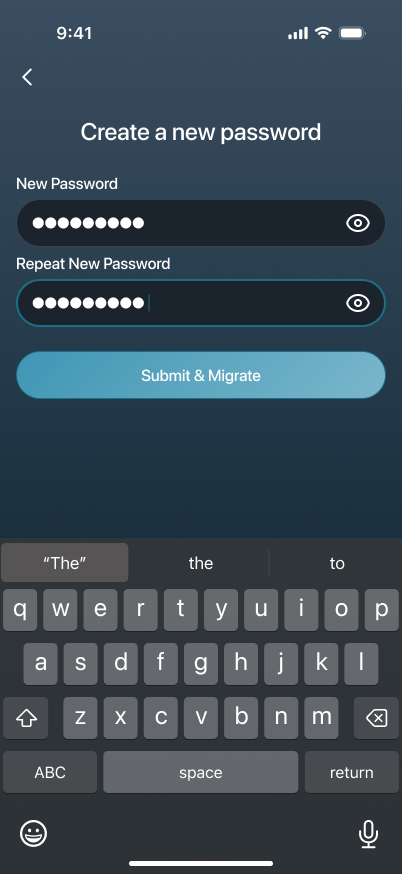
You'll briefly see Migration complete, then move on automatically — see 6.1.4.
7.1.3 If Your Old Account Used Google, Apple, or Facebook
Only the older Dawn House app supported third-party sign-in. If your old Dawn House account used Google, Apple, or Facebook, there's no in-app migration flow for it — and signing in to the new app with the same Google or Apple account won't identify your old account either. Instead, the support team migrates it for you by email:
- Watch for the migration guidance email in the inbox tied to your old account. It includes a Migration Agreement.
- Register a new account. Following that email's guidance, register for the new Sleep Assist® with the same email as your old account. If your old account used an Apple private email, register with your regular email instead.
- Reply to the migration guidance email from your old account's address to confirm it's you. Completing the email's steps counts as agreeing to the Migration Agreement.
The support team links your old app's sleep history to your new account, and if a bed was paired with your old account and you haven't connected one yourself, they migrate that bed over too. When it's done, you'll get a confirmation email and a View Previous App Data entry will appear in the app — see 6.1.5. In the meantime, you can keep using your new account and the app as usual.
7.1.4 After Migration
Once you see Migration complete, you'll fill in your account profile — the same steps as first-time setup (see 2.7 Complete Your First Profile). After that, the app takes you to the right home screen based on the bed you're connected to and the bed on your old account:
- If a bed is already connected, you land on the connected home screen.
- If no bed is connected yet, you land on the disconnected home screen, where you can start connecting a bed anytime — see .
Your old account's sleep history isn't migrated into the new app, but you can still view it — see 6.1.5.
7.1.5 Viewing Your Old App's History
Sleep records, heart rate, HRV, respiratory rate, and other history from your older app aren't migrated into the new app, but you can view them separately after migrating:
- Open Settings.
- Open Account & Security.
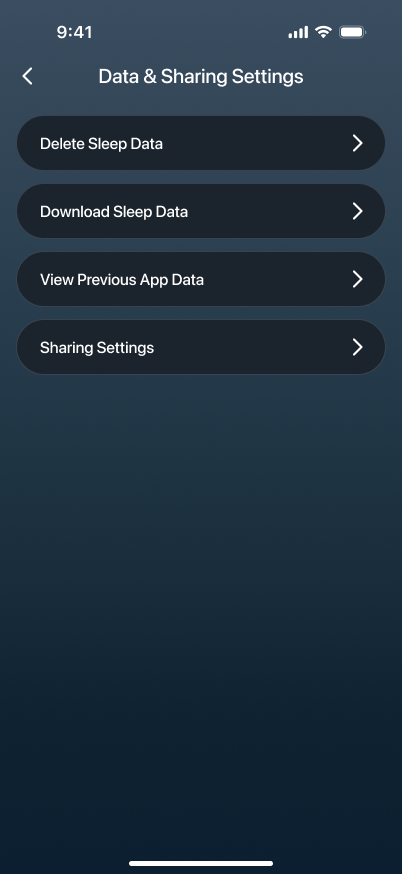
- Go to Data & Sharing Settings.
- Tap View Previous App Data. The source app is shown beneath it (the name after From).
This opens your older app's sleep history — no need to sign in again. This option only shows for users who migrated; if you choose Continue as new account instead, it won't appear.
7.1.6 Common Prompts During Migration
If you see any of these prompts during migration, here's what to do:
- Account not found.: appears on Sign In when neither the new nor the old apps have an account for that email. Check the email for typos, or switch to Sign Up.
- Wrong password: the email is right, but the password isn't. Re-enter it, or tap Forgot Password? on the Sign In page to reset.
- Unable to send code. Please try again: the code couldn't be sent. Check your connection and tap Send Code again.
- Verification field turns red: the code is wrong, the field clears, and you can re-enter. If it never arrives, tap Resend Email.
- Something went wrong. Please try again. Or a network prompt: the migration didn't complete, and your old account and data are unaffected. Try again later from the same sign-in entry point, and the migration dialogue will reappear.
7.2 Edit Personal Info
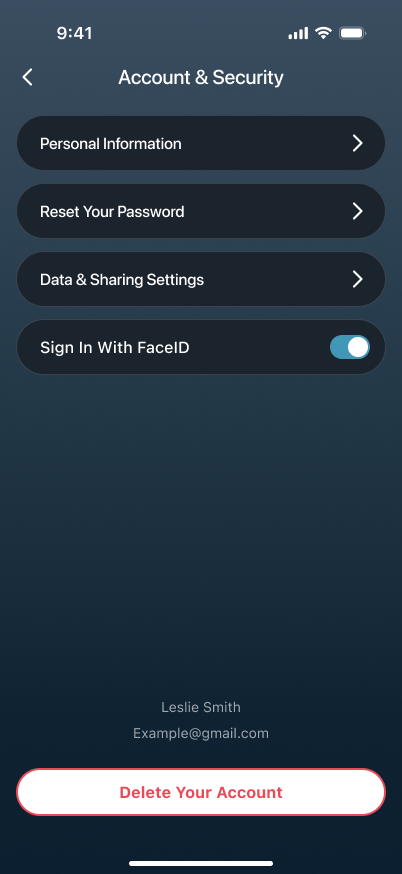
To update your nickname, units, height, or weight, go to Account & Security, then open Personal Information. These settings affect how your profile appears and how some data is displayed.
7.2.1 Open Account & Security
- Go to Settings, then tap Account & Security.
7.2.2 Edit Your Personal Information
- Tap Personal Information.
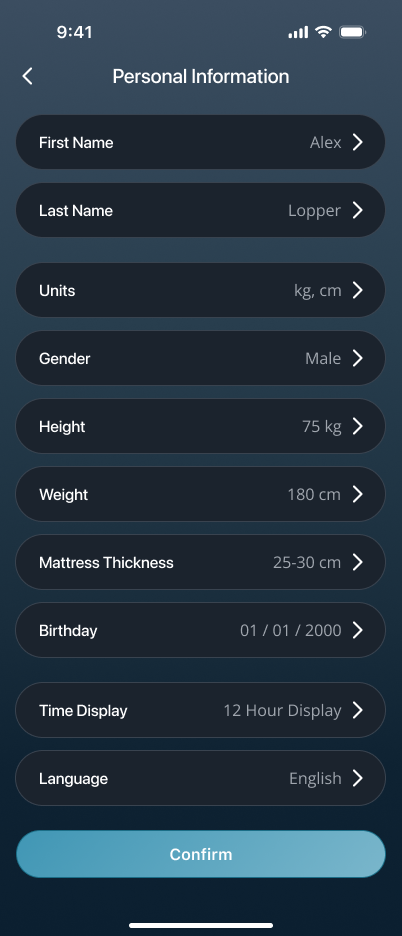
- Update what you need.
- Tap Confirm at the bottom.
If you're changing both units and body measurements, adjust Units first — it makes height, weight, and similar fields easier to verify.
7.3 Manage Sleep Data & Sharing
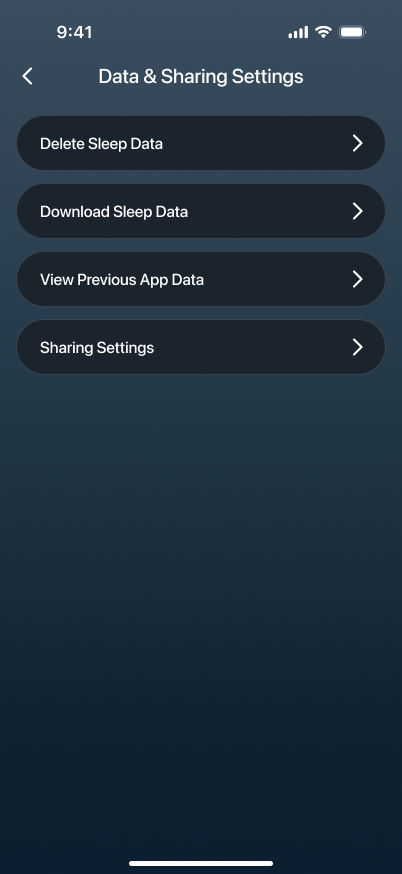
To delete sleep data, download it, or manage sharing, go to Account & Security, then open Data & Sharing Settings.
7.3.1 Open Account & Security
- Go to Settings, then tap Account & Security.
7.3.2 Open Data & Sharing Settings
- On the Account & Security page, tap Data & Sharing Settings.
7.3.3 Delete Sleep Data
Want to remove sleep records from specific dates? Use Delete Sleep Data.
- Tap Data & Sharing Settings.
- Tap Delete Sleep Data and pick the dates to remove.
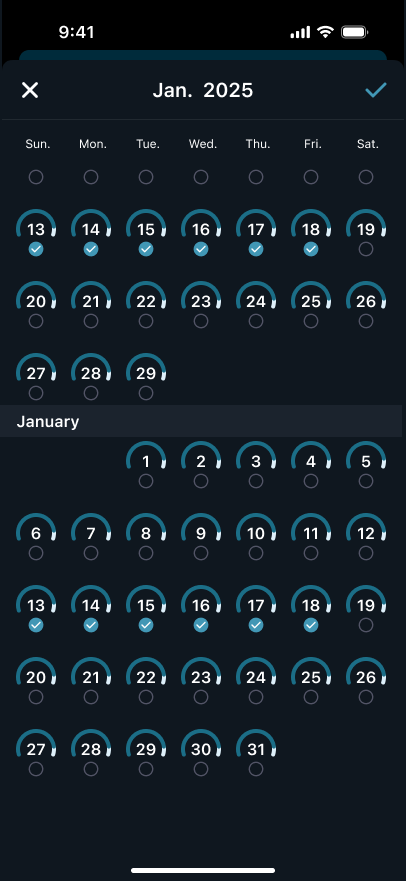
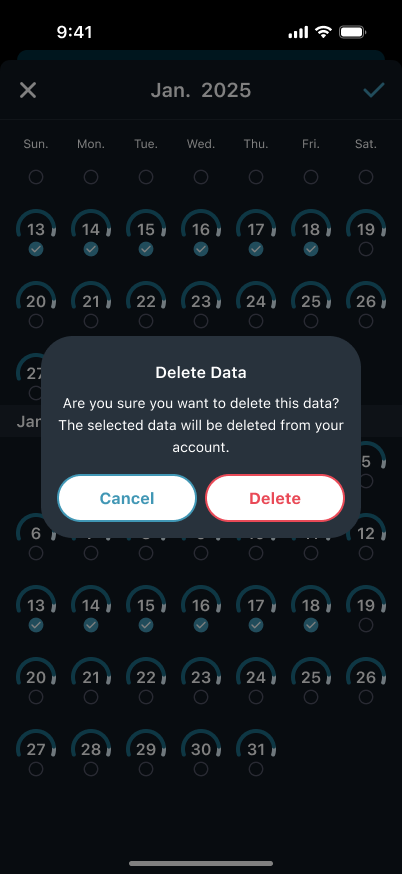
- After selecting, confirm in the pop-up.
7.3.4 Download Sleep Data
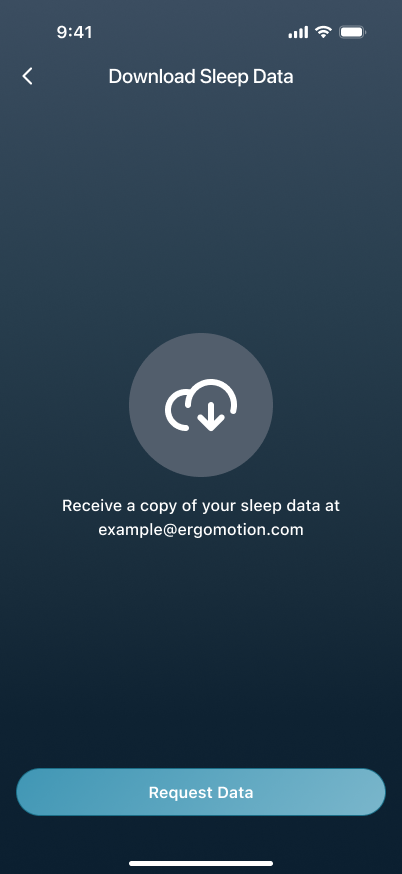
Want to keep your own copy of your sleep records? Here's how.
- Tap Data & Sharing Settings.
- Tap Download Sleep Data and follow the prompts.
7.3.5 View & Manage Sharing
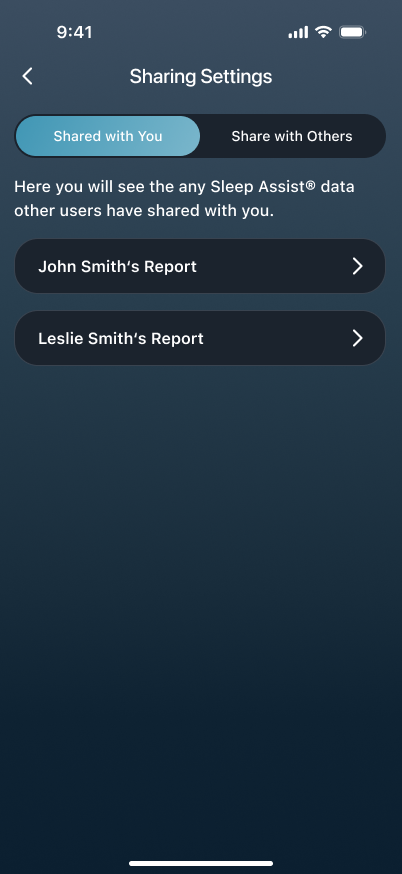
Want to see reports shared with you, or share your own? Here's where.
- Tap Data & Sharing Settings.
- Tap Sharing Settings.
You can view what's been shared with you and manage your own sharing.
7.3.6 Share Your Report
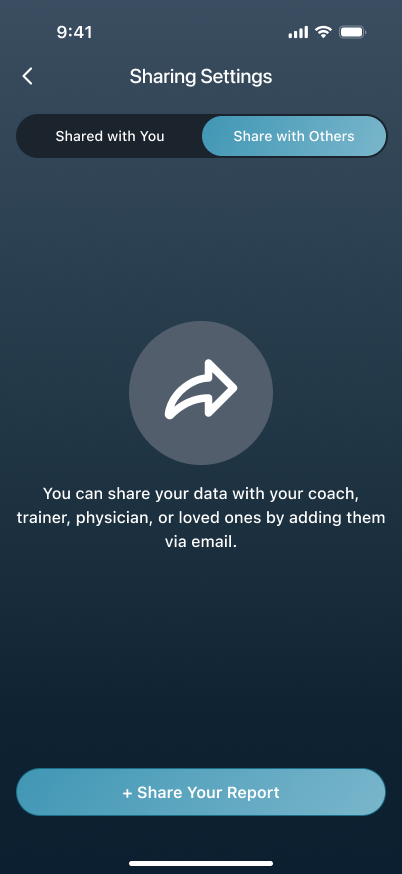
Want your coach, physician, or family to see your sleep data? Share it with them by email.
- In Sharing Settings, switch to Share with Others, then tap + Share Your Report.
- Enter the recipient's email address. They'll receive an email invitation to create a Sleep Assist® account, which then lets them view your data. To share with more people, tap + Add Another Contact.
- Tap Share Report.
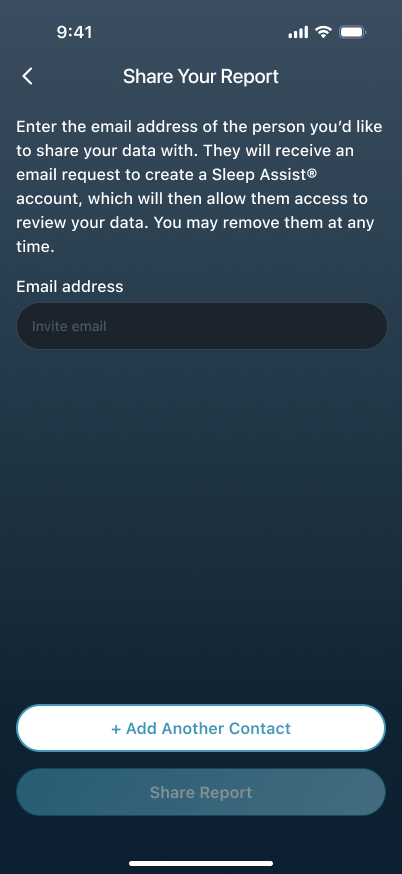
You can remove a recipient at any time in Sharing Settings.
7.4 Face ID Sign-In
If your device supports Face ID, you can turn on Sign In With Face ID in Account & Security. Once enabled, you'll need to pass Face ID verification each time you sign in.
7.4.1 Open Account & Security
- Go to Settings, then tap Account & Security.
7.4.2 Turn On Face ID Sign-In
- Find Sign In With Face ID.
- Turn it on.
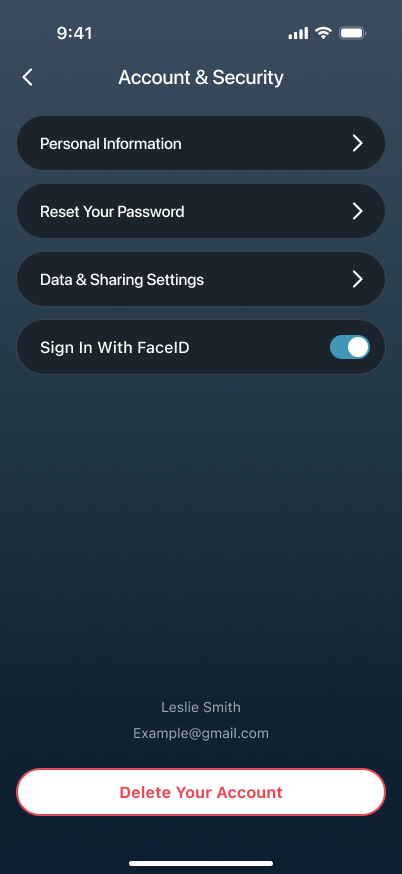
- If the system asks for Face ID permission, allow it — or go to system settings to authorize.
- Next time you sign in, Face ID verification comes first.
7.5 Change or Recover Your Password
Two scenarios here: if you remember your current password, change it in the app. If you forgot it, email recovery is faster.
7.5.1 Open Account & Security
- Go to Settings, then tap Account & Security.
7.5.2 You Remember Your Password
Change it directly in Account & Security.
- Tap Reset Your Password.
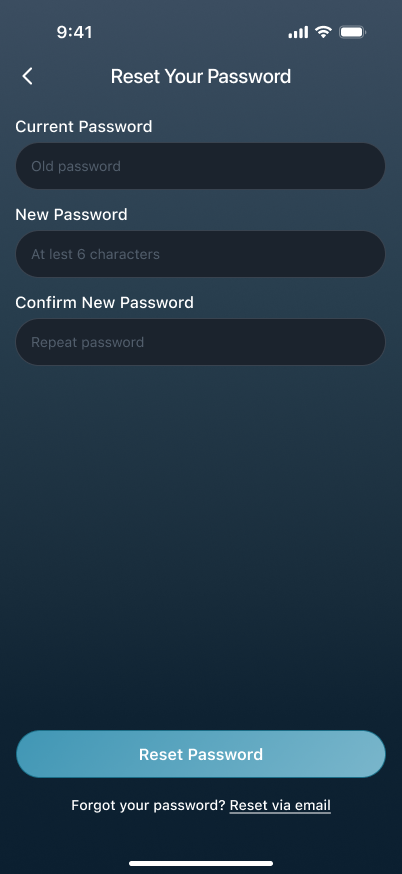
- Enter your current password in Current Password.
- Enter the new password in the New Password field.
- Enter it again in Confirm New Password.
- Tap Reset Password.
The new password must be at least 8 characters and include one special character (!@#$%). Use it next time you sign in.
7.5.3 You Forgot Your Password
Don't keep trying old passwords — email recovery is faster.
- Tap Reset via email at the bottom of the page.
- Enter the verification code from your email.
- Set a new password on the Create a new password page.
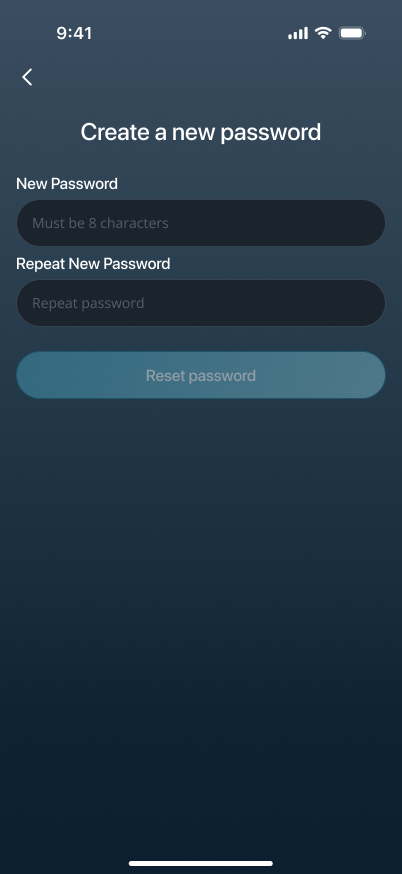
- Done — you'll be taken back to the Sign In page. Sign in with your new password.
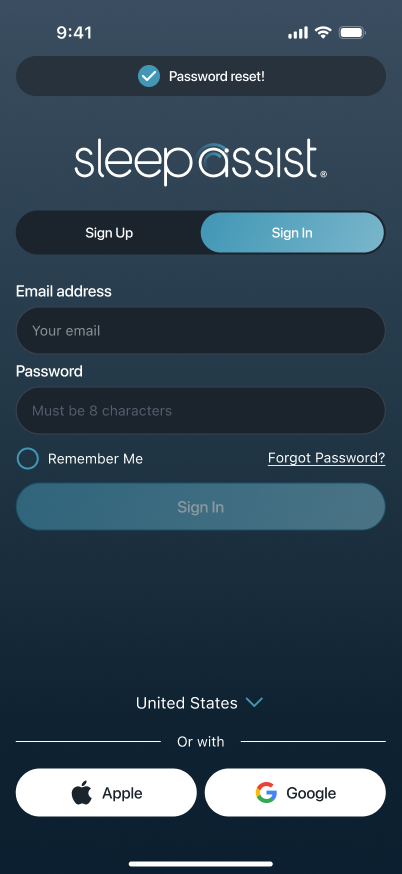
7.6 Before You Delete Your Account
Deleting your account removes all data and signs you out. This usually can't be undone — make sure you truly don't need this account anymore.
7.6.1 Open Account & Security
- Go to Settings, then tap Account & Security.
7.6.2 Check These First
Before confirming, consider:
- Want to keep your sleep data? Use Download Sleep Data first.
- Only want to delete some sleep data? Use Delete Sleep Data first.
- Just taking a break from the app? Signing out is usually better than deleting.
- Just need a new password or Face ID? Use Reset Your Password or Sign In With Face ID — no need to delete.
7.6.3 Ready to Delete
If you're sure, follow these steps:
- Find Delete Your Account near the bottom of the page.
- Read the on-screen message again to make sure it matches your expectations.
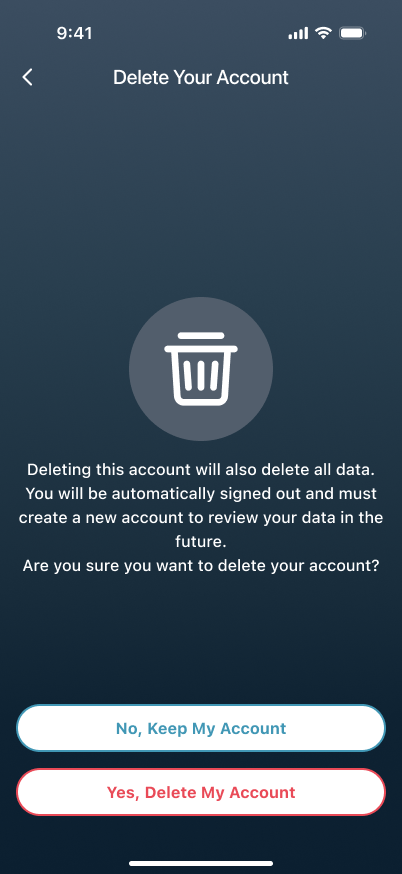
- All good? Follow the prompts to complete the deletion.
7.7 Sign Out
Need to switch accounts or stop being signed in? Sign out at the bottom of Settings.
- Open Settings.
- Scroll to the bottom.
- Tap Log Out.
- Follow the prompts to finish.
After signing out, you'll need to sign back in to use account features and smart bed data.
8. Help & Support
Need help? The most useful places are all in this chapter. Check bed status, read help content, or contact the support team — all accessible from the Support area in Settings.
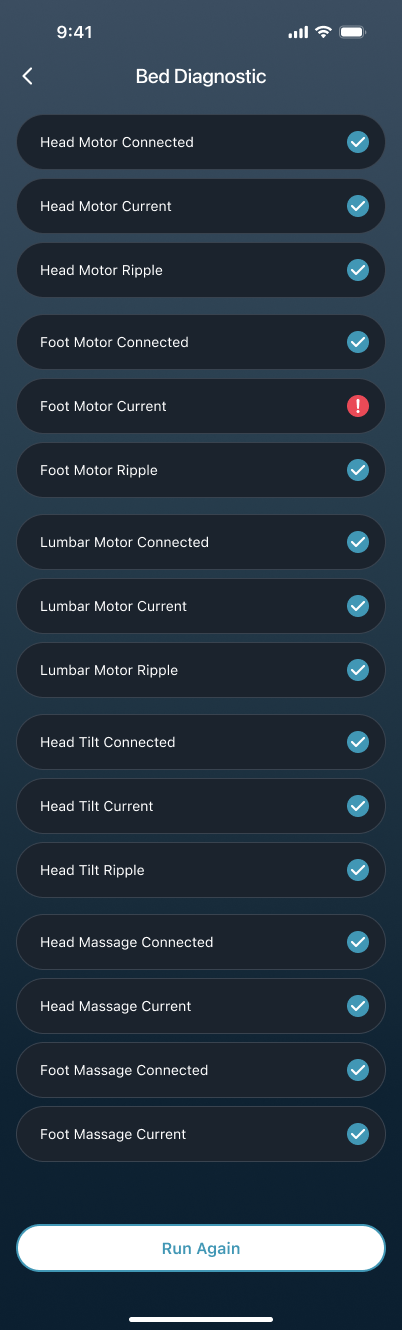
8.1 Run Bed Diagnostic
Think something's off with the bed? Run a Bed Diagnostic first.
- On the Settings page, tap Bed Diagnostic.
- Make sure the area around the bed is clear, then tap Run Bed Diagnostic Test.
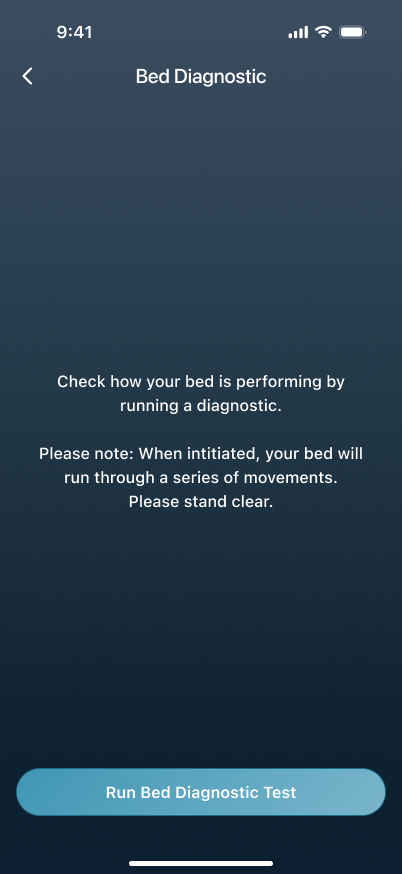
- Wait for it to finish, then check the results.
8.2 Open Help Center
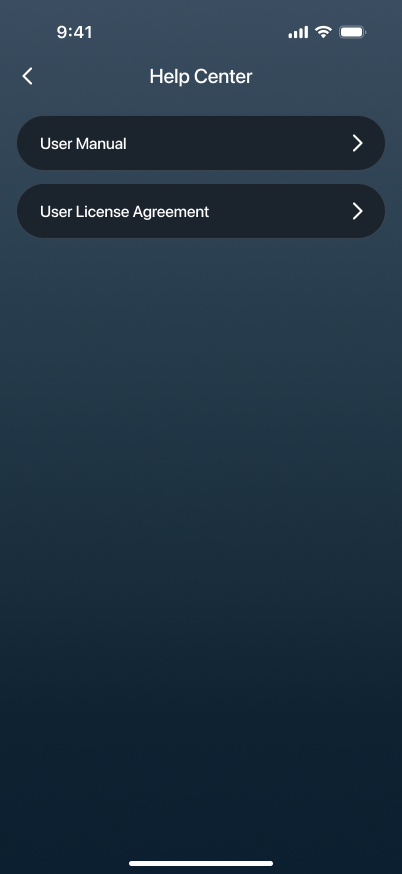
Want to browse help content? Open Help Center.
You'll find the User Manual, FAQs, and End User License Agreement — open whatever you need.
8.3 Contact the Support Team
Need to talk to a person? Open Contact Us.
- Describe your issue in the input box.
- Check the email-related options on the page if needed.
- Tap Send Message to submit.
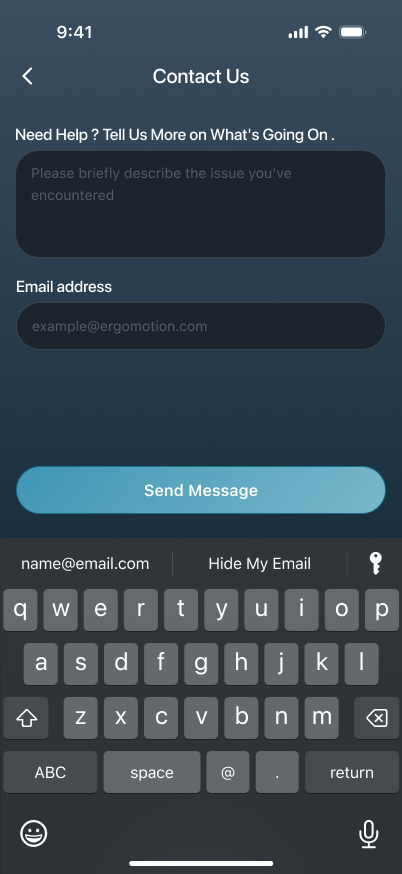
To help the support team respond faster, include what you saw, when it happened, and what you've already tried.
9. Troubleshooting
Running into issues with connecting, signing in, viewing reports, or using AI? Find the section that matches your situation — it's usually the fastest way to a fix.
9.1 Can't Find the Bed or Connection Fails
App can't find your bed, or the connection gets stuck? Check these in order:
9.1.1 Check the Basics First
- Make sure the bed is powered on and your phone is nearby.
- If connecting a Wi-Fi smart bed, confirm you're using a dedicated 2.4G or 5G band — not a combined multi-band network.
- Restart the bed search and try again.
9.1.2 Auto-Connection Failed
- Didn't auto-search find it? Try scanning the QR Code with the camera first.
- QR code didn't work? Switch to manual device ID entry.
- Bed found, but the type can't be confirmed? Select the correct type manually and continue.
Still can't connect? See .
9.2 Permissions Not Enabled
The first time you connect, the app may ask for Bluetooth, location, and camera permissions.
- Bluetooth affects device search and connection.
- Location affects nearby device scanning.
- Camera affects QR code scanning.
Without these, the app may not find the bed, can't scan QR codes, or can't continue connecting. Go to your phone's system settings, grant the missing permissions, then come back and try again.
9.3 Wi-Fi Smart Bed Connection Fails
Wi-Fi smart bed stuck on the Wi-Fi or server connection step? Work through these:
- Confirm the Wi-Fi network is correct and not a combined multi-band network.
- Double-check the Wi-Fi password.
- Keep your phone near the bed while the app completes Bluetooth, Wi-Fi, and server connections.
- If the page doesn't change for a while, go back, reselect the Wi-Fi, and try again.
- Still not working? Start the bed search and setup from scratch.
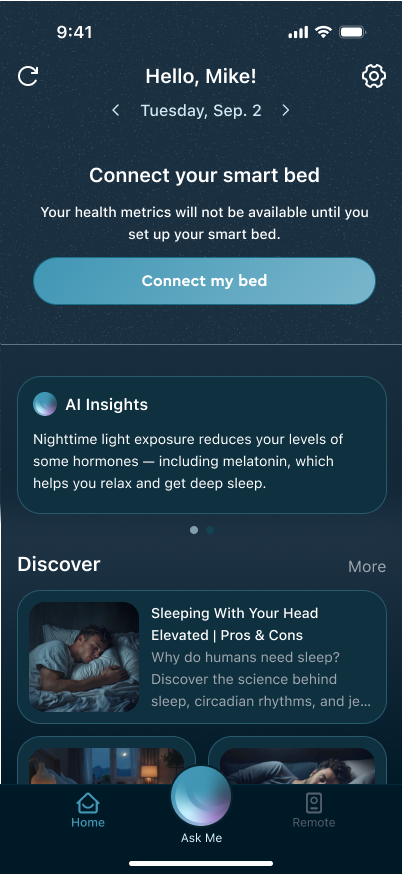
9.4 Home Screen Shows Disconnected
If the home screen shows disconnected, the app isn't currently connected to your bed.
- Look for the disconnected prompt and the Proceed to bed connection link.
- Tap Proceed to bed connection.
- Follow the prompts to reconnect.
- If search or identification issues come up again, check and .
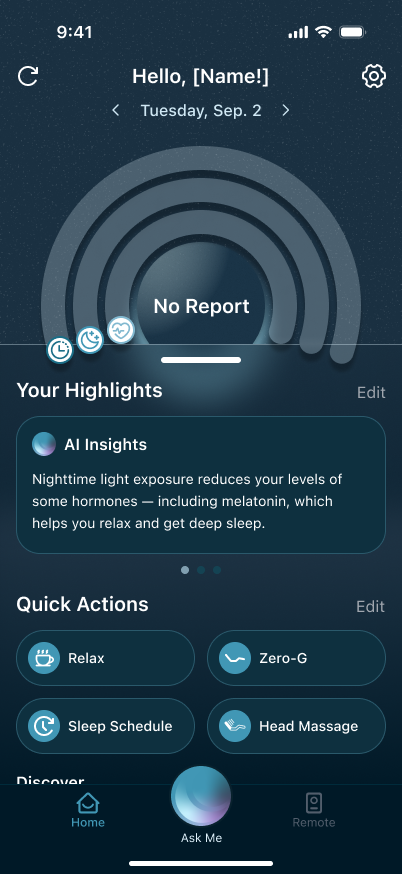
9.5 Home Screen Shows No Report
If the home screen shows No Report, there's no sleep report available for the selected date. This only appears for smart beds.
- Confirm the home screen is showing No Report.
- Tap the date to switch to another day and see if data is available.
- Make sure your account and bed are connected normally.
- If you just finished a sleep session today, wait for the data to generate, then check again.
Data still not showing? Check the bed connection status once more.
9.7 Verification Code Not Arriving or Can't Sign In
Stuck during sign-up, sign-in, or password reset? Check these:
- Is the email address correct?
- Give the system email a moment to send, then check your inbox.
- If signing in to an existing account, make sure you're using the right method (email, Apple, or Google).
- Still can't get in? Tap Forgot Password? on the Sign In page and follow the email to reset.
Already signed in and just want to change your password? Go to .
10. Experimental Features
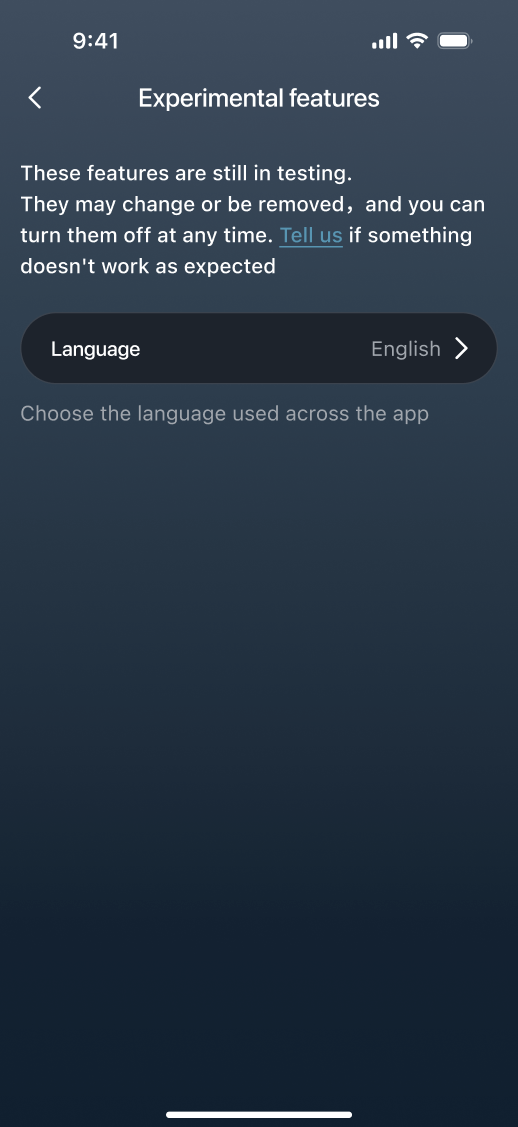
New features sometimes arrive here first, while they are still in testing. They may change or be removed, and you can turn them off at any time. Right now, this is where you switch the app language.
10.1 Change the App Language
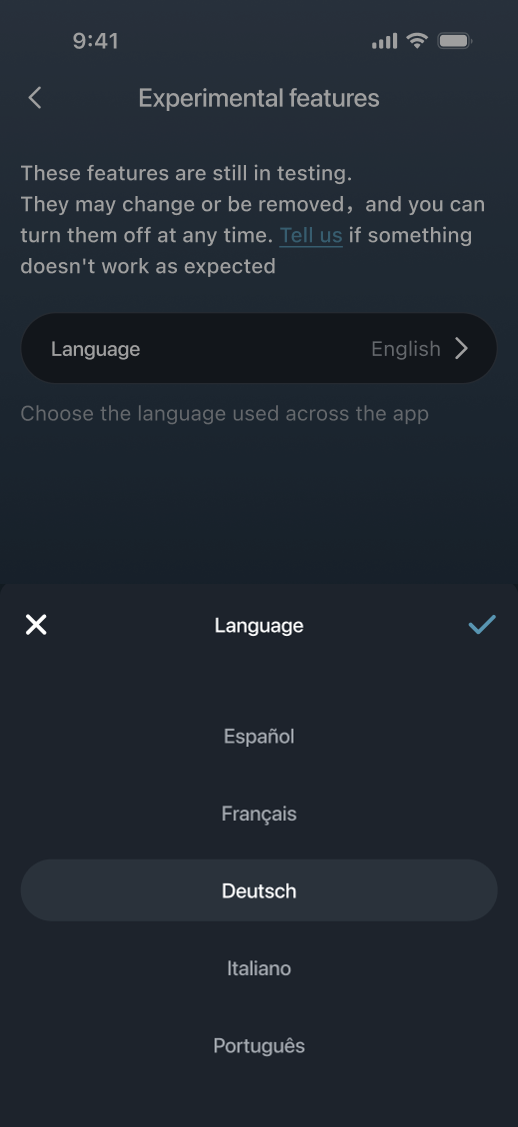
Want to use the app in your language? Besides English, the app is available in Spanish, French, German, Italian, Portuguese, Dutch, Icelandic, Lithuanian, Greek, Hebrew, and Arabic.
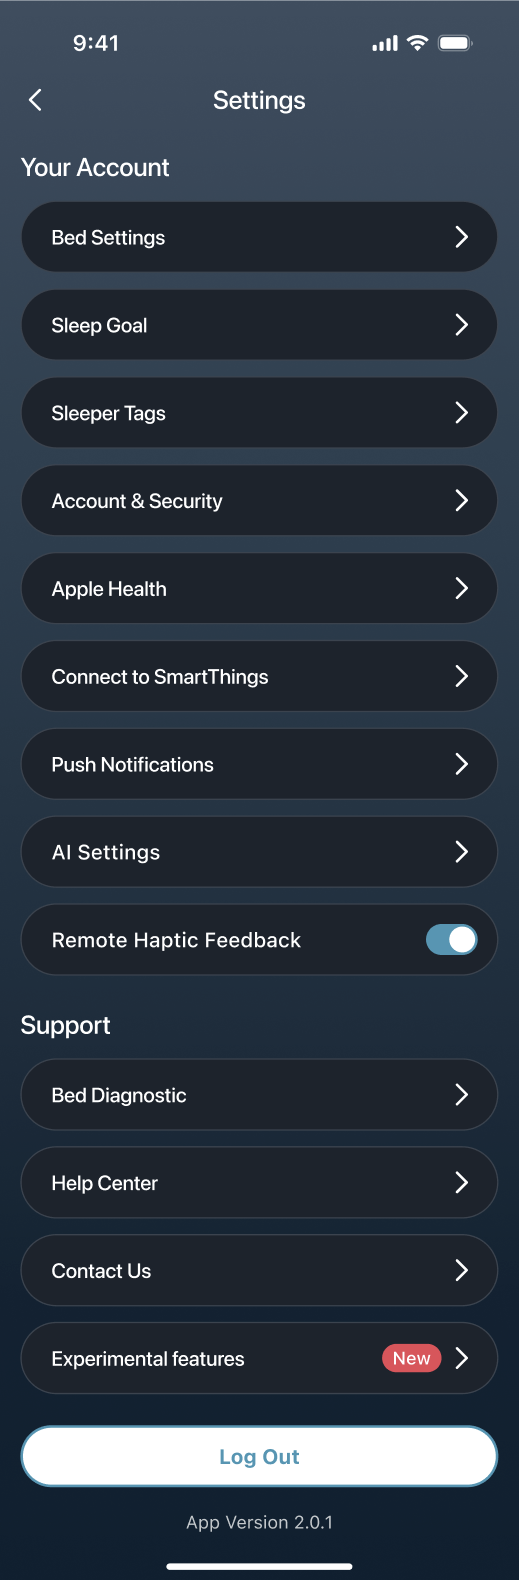
- On the Settings page, tap Experimental features. It sits at the bottom of the page, marked with a New badge.
- Tap Language.
- Select the language you want. The app switches right away, and you can return to English at any time.
Translations are still being refined, so some text may not be translated yet. If something doesn't work as expected, tap Tell us at the top of the Experimental features page to send feedback.